Pages

Tuesday, July 30, 2013

DIY DIsney Momma Planner | Back to School


I am an organizer. I love organization and I love to know what is coming and who is going; it would appear that I am currently the ONLY one in the cottage who's like that. There's still hope for the little two, but I'm not holding my breath!

But as we have expanded our family, I have found it more difficult to keep all the details straight, even with my smart phone. And since school is upon us here in the midwest - Doc starts back this week - it's time for this Disney momma to get organized!

I had never used a Mom Planner before. There are tons of them out there and amazing resources on Etsy if you just browse around. There are also all sorts of free printables out there. I started by searching Pinterest for Mom Planner and Blog Planner. You don't have to customize your pages like I did to get a personalized planner. But I am picky and I wanted mine to have everything I needed, and nothing I don't. I also wanted to include some blogging resources, as my inspiration seems to strike no matter where I am or what I am doing. 

So I started a list of what I needed in my planner, and printed out enough pages to last 6 months. Here's the final breakdown:

1. A monthly overview including those items that happen only once a month (and are really easy for me to overlook). I also wanted a place for special events that month and cards to send. I wound up designing my own pages for that:


2. A weekly to do list. I needed to be able to put my week on paper and see a reasonable list of things to do. I also wound up making my own of those pages, and printing them front to back so I didn't have even more bulk than necessary:


3. Meal Prep. We are members of a vegetable delivery service called Green Bean Delivery. I needed a way to be more conscious of using the vegetables we received. This downloadable meal planner was the perfect thing for me. Check out her shop; she has the cutest downloads!


 4. A place for all those recipes that sound amazing but I just can find when I want them. I converted a pretty file folder in to a folder for this planner and then printed out the recipes for the week (along with our invoice for our veggie box) so I can get to them when it's dinner time.


5. And finally, a place for my running ideas for the blog. I will admit that this is a bit of overkill, as I already have a binder for the blog; but this makes me feel like I won't miss an idea once I have it. I found this printable list at My May Sunshine.


6. The Cover. I had some old cardboard lying around from a photographer friend. I used that for the back and front of the notebook. I cut out my mushrooms and title using the Silhouette SD. I adhered them to the cover and then covered it with packing tape, as I knew the beating it was going to take! I used my Zutter machine and some 3/4" binding rings to put it all together. I am IN LOVE with the final result. I've been using it to about two months and feel like it really helps me to stay focused even on those wild days. I took a couple days to get it all together, but it was totally worth the effort!

Until next time, may all your days be filled with fairy dust!

Saturday, July 27, 2013

DIY Mary Blair Inspired It's A Small World Block, #3


If you missed the first post I did on these blocks, you can find out the story behind them by checking out this blog post. They are made of plastic canvas and acrylic yarn and are 3" square. They are kind of addicting! I would eventually like to have a full set that the kids can play with. Who knows? Maybe by the time Minnie is actually toddling about they will have a set.

This is block #3. I call it the Utopia Block because it's based on the final room in the It's A Small World attraction in Walt Disney World. If you've never been, it's a room full of dolls from all around the world dressed in these pastel colors enjoying life together at a carnival of sorts, in a world of harmony. Doc calls it the Utopia Room. I like that.


The sides here include a hot air balloon, a kite, a Ferris Wheel, a piñata, a carousel horse and a balloon man. All of which can be seen throughout the ride. This is the first block to have a pattern written up for it and you can find it on Etsy as a digital file! I'm very proud of how professional it looks, and my mastery of Adobe Illustrator to create it! If you are interested in it, you can find it in my Etsy shop, Merryweather's Cottage.

If you work one of these up, I'd love to see what you've done! Tag us on Instagram (@merryweatherscottage) or leave a message here telling us where we can see your work. We love to see what our followers have been up to. And until next time, may all your days be filled with fairy dust!

Thursday, July 25, 2013

DIY Savings Bank for Disney

Here in the cottage, we have always followed the same rule my parents set up for me regarding buying souvenirs in the parks. They gave us a set amount (and later we earned our own money). That was all we had to spend. If they purchased something for us it was their prerogative, but we knew even before asking that the answer was probably going to be no. (This didn't prevent my sister from asking - ever.)

For Doc, out of sight is out of mind; and before you know it we are leaving and he is complaining that he didn't know it was so close to Disney and why didn't we remind him? (Of course, we did; he just doesn't remember; ever.) When I saw this idea on Pinterest, I knew I would be using it for Doc. At least this way, there's a tangible reminder that Disney is coming!

I started with an 8"x8" shadow box, a dremel tool with a rotary cutting bit, and this gorgeous Disney subway art available for download from Eighteen25.

Cutting through the frame was weird. It wasn't wood, and it smelled like it was plastic; but given enough time I was able to get it cut. I had to cut an opening much larger than I expected in order to get the change to fall in easily, but once it was cut and sanded it was easy to get the money to drop right in. I used a dentist pick tool to help line up the cut lines and to scrape away some stubborn shaving bits.

I printed out the subway art and cut it to fit the 8x8 frame. I decided to cut off "Disneyland" since we would be going to Walt Disney World - and Doc is a stickler for details. As an added bonus, the more change we put in it, the sturdier the frame bank became. I assume there will be a tipping point for this. We may have to encourage paper money instead of coins!

All in all, the bank was a fairly easy project (once the littles were well away)! I highly recommend trying it. Imagine the possibilities! Until next time, may all your days be filled with fairy dust!

Tuesday, July 23, 2013

DIY Alice In Wonderland Disney Tea Cup

I found a wonderful glass mug at the Dollar Store recently, just big enough to do a glass etching on it. And it seemed to say Alice In Wonderland to me. And so this project was born! I used my Silhouette SD to create a stencil that says "Drink Me" using the font Started By A Mouse. It reminds me of Fantasyland - where you can find some fabulous spinning tea cups!

This mug was big enough that I didn't have to finagle the stencil too much around the curves. Once the stencil was on I applied the Armor Etch with a popsicle stick and 10 minutes later, the mug was done! I really love how quickly the etching cream works. This definitely qualifies as a nap-friendly project. And it's budget friendly too! The mug cost a dollar and I already had everything else I needed. You can't beat that!

As an added bonus, I thought I'd share my favorite sleepy time tea recipe, developed right here in the cottage!

Merryweather's Night Time Tea
makes one tea bag (two infusions)

2 lemon verbena leaves, crushed
1/2 tsp. lavender
1/2 tsp. lemon balm
1/2 tsp. peppermint
1/2 tsp. ceylon tea (optional)

Until next time, may all your days be filled with fairy dust!

Saturday, July 20, 2013

From Belle's Library | Kingdom Keepers Book I: Disney After Dark

This month's column, From Belle's Library, features a new(ish) Disney series for young readers: Kingdom Keepers. I feel like I am coming a bit late to the party on this one, after all, the series has been out since 2009. (That's what happens when you stop teaching middle school!) But the good news is that there are now 6 books out and a 7th available for pre-order. I like not having to wait for the next book to be released!

You should know, I am a large fan of young adult fiction aimed at boys. It can be a challenge getting some kids to read, and an adventure is always a good call for most boys. That being said, I would highly recommend these books to ANY reader (boy or girl) who has ever been to the Disney parks. They are a blast! And if you happen to have a reluctant reader at home, these books could be just the thing they need to get started. Best of all, it is a series, so if they do get hooked, there are seven books to read. I love when Doc gets going on a series. It makes it so easy to just hand him the next book and keep on going!

Disney After Dark is the first book in Ridley Pearson's series. I was sucked in from the first chapter. This is a high-tech, fantastical romp through the parks with questions to be answered right from the beginning. There is a group of 5 kids who have all been used to create holographic hosts for the Disney parks. They start having some strange experiences and you get the idea that there is a lot more going on here than just a new sort of "magical experience" in the Disney resort. I won't spoil it for you, but there is a lot of fun to be had with these kids - especially when they get to experience the Magic Kingdom after closing!

I highly recommend this first book (I have yet to read any of the others) for grown ups and kids alike. They have a fantasy quality about them (which is hot right now with many young audiences) and a Disney magic that really meshes well. If you give them a try we'd love to hear how you like them. Until next time, may all your days be filled with fairy dust!

Thursday, July 18, 2013

DIY Circle Scarf from Upcycled Disney T-shirts Tutorial

I have to admit right up front, I'm not much of a scarf wearer outside of winter. They just seem in the way to me. But a scarf from jersey? That I can get into. And one that has more than one way to wear it? Even better. And one that showcases my old Disney Ts? Now we're talking! I'm even playing around with the idea of wearing this to the parks in the evening in October. It could happen!

This project was conceived mainly because I wanted to see the logos of the shirts I was using. Most tutorials I came across online were made with the bottom half of the T-shirt. That wasn't going to work for me. So I whipped up a practice scarf using some shirts destined for the rag bag and found that my idea worked! Here's the tutorial on how to make a Disney T-shirt Circle Scarf:


You will need:
  • 3 adult sized T-shirts (this would work with any T size 5 and up; the smaller they are, the more you need)
  • Good pair of scissors
  • coordinating thread
  • pins

Begin by turning your T-shirts inside out and measuring a 12" swath down the middle. Be sure any logos or designs you want to keep are inside that 12" area.


I then marked with white pencil (or a fabric marker on the white shirt) a line all the way down both sides. This is my stitch line. Once you have all your shirts marked, take them to the sewing machine and stitch down each line creating a tube. You don't have to be too precise with this; remember it's going to drape so no one has to know that your side seams are a little wavy.

Once all your shirts have been sewn up the sides, cut off the excess fabric on the sides leaving a 1/4" to 1/2" seam allowance.

I then cut off the collar of T-shirt and the bottom hem so that I had a nice tube. **I also took the tag off the Pirates shirt so I could reuse it on the outside, a little bit later.**


Begin sewing you first two shirts together. Turn one tube right side out and keep the other one inside out. Sandwich them together, right sides together. This is a good time to check that your logos are lined up the way you want them to be.

Pin the side seams together and pin the middle of each side together. Sew this seam using a 1/2" or 5/8" seam allowance. If the two pieces of fabric don't line up perfectly, you can stretch the fabric as you sew it so it lines up a bit better.


If you wish to insert the tag from the T-shirt so it shows on the outside, sandwich it into one of these seams, aligning all the raw edges. When you turn it right side out it should look something like this:


Continue sewing this way until you have sewn the last piece on. You should have one giant tube. 
To connect it, turn the scarf in on itself so that you can line up the last pice with the first piece just as you did all the others: right sides together, aligning the raw edges, and pin. When you sew this up, remember to leave about at 3" gap so you can turn the scarf right side out.

Once you have turned your scarf right side out, you can either sew the gap closed by hand (which looks best) or use the machine. I chose to use the machine. I invoke my grandmother once again: if you can't see it from the back of a running horse, it'll be just fine.

And that's it! I'd say this took me about 3 hours from start to finish on this project. Not bad for a rainy afternoon. If you want some tips on how to wear your circle scarf, check out this wonderful graphic. While this one isn't the sort you can wear as a dress, you could certainly work it in many of the other ways.


Enjoy experimenting with your circle scarf! And until next time, may all your days be filled with fairy dust!

Tuesday, July 16, 2013

DIY Amagarumi Squirt from Finding Nemo

If you like amagarumi and you are not familiar with Roxycraft and Tammie O., let me introduce you. These patterns are very well written and easy to follow and she has quite a selection to choose from. I loved doing this Big Poke as a version of Squirt, from Finding Nemo.

I haven't really worked much with amagarumi. I've dabbled a little for my nieces and Doc, but nothing that I really had a vision for how it should turn out. This project was different. I really wanted it to look like Squirt when I was all done. I'm happy with the end result, but as with most first-time projects, I learned a lot about amagarumi along the way. Here are a few tips I wish I had known before I started:


  1. don't go up a hook size; next time if I don't have the hook I am looking for I will go down a size or buy the hook(s) I need. I don't love how open the stitching is.
  2. Safety Eyes and Suncatcher Eyes are totally the way to go! If you need some, look no further than The Tiny Garden on Etsy. Leslie had a great selection and wonderful customer service. Plus they were really easy to use.
  3. follow the directions; I over stuffed the head and little Squirt won't stand up without a little help - also, the up-a-hook-size thing may have made this more of a problem.
  4. cotton yarn is soft and lovely, but it doesn't fill in the way the acrylic blend does. (I would assume wool would fill in better too.) I'll try a different yarn the next time.
But having said all that, I like this little character. He definitely reminds me of Squirt! Here's what I did to alter the pattern:

I used 30mm Suncatcher Eyes instead of the 18mm recommended in the pattern. I used Scrapbook & Cards today's tutorial to create the crocheted flowers. And obviously I used a different color assortment for the yarn. 

I hope you'll take some time to check out Roxycraft for yourself. And if you make up one of her patterns, we'd love to see it! Tag us on Instagram (@merryweatherscottage) or post a picture here in the comments. Until next time, may all your days be filled with fairy dust!

Saturday, July 13, 2013

DIY Disney Beer Flight Set | The Snuggly Duckling - Tangled

I've been wanting to do some of these for a long time now. When I saw these beer flight sets in the Target dollar bins, I knew I had a project! I've mentioned before that it can be tough to find creative gifts for men. This is something many of the men in my life could use and I see several Disney variations coming. This one, however, is from the movie Tangled.

I am a big fan of Tangled. It appeals to me in so many ways: a creative princess who doesn't act like a princess (is in fact, rather clueless), a fabulous pub scene, a hero realizing he needs to be himself, a romp through the kingdom and a villain who gets what she deserves. What's not to love? And that pub scene - hilarious! I absolutely adore it. Haven't seen it? You must. Here it is:


Am I right? It's just so funny. And the perfect inspiration for these beer sampler glasses. While you don't see the pub sign in this clip, they are at The Snuggly Duckling. I decided to take that "logo" and make what would be a beer sampler from their pub. The actual glass etching was very quick. I'd never etched glass before, so if it seems intimidating to you, don't let it be! It was as easy as following the directions, and there are several YouTube videos out there if you need to see how it's done before you attempt it yourself. For this project, I used Armor Etching Cream.

I used my Silhouette machine to create the Snuggly Duckling logo. I used Echo Park Duck Icon (design #40686) and then created my own cattail. I used font LD Pirate from scrapNfonts.com. There are other free fonts out there, I just happened to have this one in my library. If you are interested in downloading my silhouette design, you can access it here. (It is a .studio file which is only compatible with the Silhouette machine.) Once I had the design, I simply cut it out and adhered it to the glass. You have to do a little massaging of the decal over the curvy glass, but it worked with a little patience. I only had one tiny mistake out of all four glasses.

Overall, I am very pleased with the design! The Silhouette did a great job of getting clean lines even with such a small and detailed stencil. Until next time, may all your days be filled with fairy dust!

Thursday, July 11, 2013

DIY Disney Storybook Road Trip Magnet Game

DIY Disney Magnets
If you have ever been on the road with kids for any length of time, then you know that a variety of activities can save your sanity. As I have already stated, we will be driving from the cottage to Walt Disney World this October. In preparation for our trip I have been scouting out activities on Pinterest that will keep our car entertained. When I ran across this one, I realized I already had all the supplies necessary to give it a try. I am so glad I did! If you ever played with colorforms as a child, this will feel familiar.

I found a couple of scribbled on, torn up Disney Readers in a garage sale this spring. I wasn't sure how I would use them, but I knew I could find a way. I took several of the salvageable pages and cut roughly around them. I then adhered them to some Adhes-a-mag I had hanging around the studio. You could certainly use any sticky-backed magnet sheets. I then went back around the illustrations with more precision to cut out the characters I was interested in.

It was a little bit time consuming, but I'm glad I did it. We'll take a small cookie sheet with us and use these to make up stories together on the way. There are a number of other magnet based games that can be played with a small cookie sheet in the car. I'll be investigating these as well and reporting back if there are any I plan on using this fall. If you've done something similar, I'd love to hear about it. We are always looking for fun car games to play!

Until next time, may all your days be filled with fairy dust!

Tuesday, July 9, 2013

Sitting with Grandmother Willow: Melissa & Meg


As part of our on-going series, Sitting with Grandmother Willow, I am happy to introduce Melissa and Meg, of MouseMaps, an Etsy shop. This series of blog posts highlights artists and bloggers of all stripes with one thing in common: a passion for Disney! I hope you will enjoy getting to know Melissa and Meg as much as I have.


Disney by the numbers (with apologies to Harpers):
# of trips you've made: I have made more than 25 (I have lost track), and Meg has been about 8 times.
Date of first trip: My first trip was at age 4 with my aunt, uncle and cousins, which I barely remember.  The first I remember was at age 12, and just about every year since then. We started Meg at age 2!
Date of next trip: August 2013
# of Resorts stayed in: 12
Usual # in your travel party: Usually, it’s just me and Meg.
Pairs of mouse ears in your cottage: Meg has 2 pairs.  Sadly, I have none!

WDW or Disneyland (or other)? WDW, although I would like to go back to Disneyland!
How do you usually travel to Disney? Mostly by plane, once by car from MA.
Do you have any tips for trips?  My best tip would be to plan ahead!  Make dining reservations, and don’t try to fit everything into one trip!
Do you have a favorite place to eat while in Disney? ‘Ohana, Be Our Guest, 50’s Prime Time Café
What is your absolute DON'T MISS attraction? We have to stick with the classics and say Haunted Mansion, and Carousel of Progress.
Stage shows, yes or no? Yes!
Parades, yes or no? Yes!!!
Best Fast Pass to get: Toy Story Midway Mania, and Soarin
Favorite park: Magic Kingdom
One piece of advice you'd give a novice about WDW/DL: Research beforehand, but while at the parks, “take time to stop and smell the roses”.
How do you create extra magic for your family? We have booked an Illuminations cruise, sat front row at the Hoop dee doo Revue, and on our next trip we’re going to try the Tomorrowland Terrace Dessert Party.  There is always something new to try.

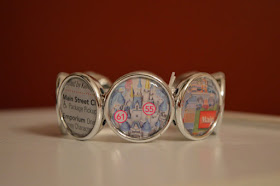
Tell us about your Etsy shop: I started out making one bracelet as a Christmas gift for Meg, then some for a Give Kids the World raffle at a Disunplugged event.  So many people liked them!  Finally, Meg talked me into opening an Etsy shop.  Now you can take part of your 2nd home with you everywhere!

How can we connect with you? We are on Etsy at etsy.com/shop/mousemaps and on Twitter at @MouseMaps

Saturday, July 6, 2013

DIY It's A Small World Blocks

As I was rummaging through some old craft supplies this spring, this idea popped into my head. And right away I knew I needed to try it. It goes without saying, I'm a fan of Mary Blair and It's A Small World. Let's be honest, "fan" might not be a strong enough word, obsessed might come a bit closer. And since the kids' room is already themed as such, these Small World blocks seemed like just the right thing for their toy box.

As I said, I was going through some old craft supplies. In fact, I hadn't worked with this plastic canvas since my grandmother and I made several tissue boxes in the 80s! It was so great to remember that time with her. I definitely inherited her need to craft! I think she'd be just as proud of these blocks as she was with our tissue boxes.

I started with the cover art from the original It's A Small World Disneyland record. I printed the artwork at 150% and then drew a 1 cm x 1 cm graph over those adorable little boys. Viola! My block design was born! I used my colored pencils to transfer the design to paper and make sure that the blocky versions still looked like the little dolls I intended them to represent. I then cut from one sheet of plastic canvas: 6, 23x23 squares and 6, 15x15 squares. (Each block requires 6 sides.) I was able to get one large block and another smaller block from one sheet of plastic canvas. This turns out to be a fairly inexpensive project if you have a significant stash of yarn. Um, that would definitely be me!

Once I had my canvas cut and rough edges trimmed, I was able to copy my design from graphs to the canvas. I was surprised at how little yarn it actually took to create these little people. All you need to complete this project is yarn, a yarn needle, and a pair of scissors. I sewed my designs to each block side. Once I was satisfied with how each side looked, I began whip-stitching the sides together. I thought the last sides would be difficult, but because the canvas is fairly stiff, it wasn't hard at all. When I was done, I pulled the end of the yarn through about 5 stitches on the side and snipped it off. I then remembered why my grandmother and I had made so many tissue boxes; it's so satisfying to see them all complete! I like the sides accentuated with a contrasting color. I will certainly do this for the rest of them. I have a few more in the works!

My little doll people wouldn't fit on the smaller blocks, so I created a few iconic images that I think represent the design of the Small World attraction. I'm going to be selling some block kits in my Etsy store, so swing by and check them out! They would be a perfect project to do on the way to Disney! And a fun toy for the ride home. Until next time, may all your days be filled with fairy dust!


Tuesday, July 2, 2013

Taking Cloth (Hybrid) Diapers to Walt Disney World

We have been using hybrid diapers since Happy came along. I was seriously disturbed by all the waste the disposable diapers were creating but I needed something easy. And as it turned out, Happy needed something for some incredibly sensitive skin - even the sensitive disposables were too much for him. So we turned to gDiapers.

You may be wondering what a hybrid diaper is. Well for gDiapers, it's a cloth pant, a water resistant liner and a cloth or disposable insert. gDiapers offer a fully biodegradable disposable that can also be composted (wet ones only) or flushed. I love how Earth friendly they are, and I also love how gentle they are on Happy's skin. Diaper rash just isn't much of an issue for him anymore. That is worth his weight in gold!

But I will admit, traveling with this system seemed daunting at first. But once we were comfortable with the system it was no harder than traveling with disposable diapers. I LOVE that the gDiaper inserts can be flushed down the toilets. No stinky garbage hanging out in the room and no runs to the trash cans. Simple and easy. And both the pant and the snap-in liners can be washed out in the hotel room sink. We stayed in the Contemporary tower the first time we used these and found it to be no problem whatsoever. The second time we stayed at Disney's Bay Lake Towers and having the washing machine in the room was worth the cost of the villa. And having the kitchen was awesome for our toddler as well.

In fact, the two tips I would give for making life easier traveling with Gs are these: 1.) If there is any way to have access to a washer, do it. It makes everything that much more convenient. And that's what vacations are about for me. 2.) Get yourself one of these inexpensive suction cup drying racks and pop it in your shower (or on the shower door). Not only is it great for drying a few diapers at a time, it can also accommodate a wet swimsuit or two!

Until next time, may all your days be filled with fairy dust!