Showing posts with label scrapbooking. Show all posts

Tuesday, July 5, 2016

DIY Disney Travel Game

When I saw this idea on Pinterest, I knew I wanted to recreate it using the Disney ephemera I had collected over the years. I tend to be a pack rat - every now and again, this winds up being a good thing. It's nice when that happens! If you are a pack rat too, then this project is free to create. I know I love a budget friendly DIY.
I had an old sturdy tube from some Silhouette stencil vinyl that was just right for this project, perfect for outlining the shapes of some old Disney stickers I had lying around. (I believe these are from the 90s - when I was still paper scrapbooking. Disney had a terrific scrapbooking store back then; I'm not sure if it's still around today.) If you don't have any stickers, they are very easily obtained from the Dollar Store, or a craft store. And they are usually fairly inexpensive, especially if you have a coupon.

The idea here is simple. I removed the outer edge of the sticker paper, leaving the actual stickers on the page. Then I used the "blanks" as a stencil to trace the shapes of the stickers onto the paper tube. I used a fat Sharpie to trace them and then a fine point Sharpie to label the shapes. (I have a bit of a pen addiction as well. I love my Sharpies!) Happy isn't quite able to read yet, and I wanted Poppins or Doc to be able to help him if I wasn't available.  So now there are several Disney shapes and characters to match to the shapes on the tube. I figure this could last him a good 20 minutes if he takes to it! Stickers are generally a favorite for him. For our family, the trick is finding new and different things to keep the little ones occupied on our drive. It's a LONG way to Orlando from our cottage in the midwest! I'll let you know if this works for us. And if you try it, let us know how it worked for you!

Until next time, may all your days be filled with fairy dust!

Tuesday, May 31, 2016

DIY Disney Camera Buddy

DIY Winnie The Pooh Camera Buddy
I've been wanting to give this idea a try for a while now, but didn't want to screw up a $20 souvenir! So when I recently stumbled upon Tuesday Morning's clearance sale, I knew it was time to give this a try. Have you ever tried getting a little one to look at your camera? It can be pretty tricky. This camera buddy will turn your clunky black box into a soft fluffy Pooh Bear. A much nicer and interesting object to look at, don't you think?

I found this Winnie The Pooh plush for only $4; a steal if you ask me! And I used this very easy to follow tutorial on  making lens creatures. Seriously, it only took me an hour. And the tutorial only calls for scissors, pins, needle & thread, and enough elastic to wrap around your lens twice. THAT'S IT.

My seams were not so lovely, but since they are facing the lens, it doesn't really matter. I will say, I was surprised at how hesitant I was to cut into Pooh. I suppose Doc McStuffins has it's affect on a Mama.

Overall, I couldn't be happier with how this Camera Buddy turned out. I had no idea it would come together so quickly! I think this would be a fantastic gift for a new mom, a scrapbooker, or a Tinkerbell Treasure for your resident Disney photographer. It would also be a great way to upcylce those Disney souvenirs that get neglected. If you have a passing thought that this would be of interest to a fellow Disney mama, you absolutely should give it a try. Until next time, may all your days be filled with fairy dust!

Thursday, May 26, 2016

DIY Disney Road Trip Travel Clips

Happy Memorial Day Weekend Musketeers! In honor of the long road trip we have ahead of us, I'm running this great road trip idea! I hope you enjoy it and have a beautiful holiday weekend wherever you are.


Say Hello To Good Behavior!
We have traveled to Walt Disney World in just about every way possible, although I'm still holding out for the auto train. When I was younger, we rode down in our MT Motorhome. In my opinion, there is no better way to go! Of course, I wasn't driving, so that may have something to do with that. We've gone by airplane, driven through the night, even taken a conversion van and tents. Our next trip will be in our new minivan. I'm not exactly dreading the trip; in fact, there are several things I am looking forward to about it (not the least of which is that our own Mary Poppins will be able to come with us!) But we all know that a long road trip can wear on the best of us, so I've taken some precautionary measures. When your traveling from a cottage in the Midwest to Florida, it pays to have every advantage you can get!

This was an inspired idea from Julie at Less Than Perfect Life of Bliss. I took it and Disney-fied it. I used our blog names and created a tag for each of us -- yes, even the adults. The idea here is that everyone starts with his or her clip on the visor. Good behavior = clip stays up. Bad behavior = clip comes down. (Your elementary teacher probably had a similar system.) It's up to you how you enforce this, but we give the opportunity to earn your clip going back on the visor, by being helpful, polite, etc. Just make sure everyone is clear on the rules at the start. At the next stop (gas, rest area, restaurant) whoever has a clip still on the visor gets a goodie. (This is where that Tinkerbell Treasure hunting can come in handy!) I'm all for bribery - especially in the case when 6 people are trapped in a van for 18 hours, two of whom are strapped into carseats.

One caveat, our visor was too thick for the clothespins to clip onto it. I took some elastic and made a band that fit over the visor. We clipped the clothespins to that. If you need to do the same, make sure you subtract a couple inches from the band measurement; you want it to be nice and tight against the visor. Those clips can get heavy!

I love this idea. Simple and cute! Until next time, may all your days be filled with fairy dust!

Tuesday, May 10, 2016

DIY Disney Scrapbook Layout | Anatomy of a Disney Enthusiast

Rerunning one of my favorite scrapbook layouts with updated links for the brushes! Enjoy.


You all know I am a Disney scrapbooker, and I am absolutely in love with this Disney Enthusiast layout! Partially because I designed the entire thing; partially because Doc has never been scrapped so perfectly! My inspiration for this layout came from a very clever resume I saw via Pinterest. I knew that I wanted to do this for Doc at the very least, I am still hoping to get it done for all of us Disney fanatics in the cottage! Maybe I'll select one of us each trip for this treatment. It wasn't too hard to do and it's a fun surprise in the midst of my project life layouts.

Here's how I did it. I work in Photoshop CS5 (If you know a student who can purchase this for you, you can same a bundle!). I took a photo of Doc that showed his entire body and converted it to black and white. I then used the marquee tool to create the white boxes. Once I had them in place I used my custom shape tool and my brushed to create the smaller icons. You can find my Disney Mountain Range Digital Brushes here, free for personal use. You can find my Disney Snacks Digital Brushes here, also free for personal use. If you can't find the custom shape you are looking for, simply google "free custom shapes photoshop" and a whole host of options should come up.

If you decide to do this too, I'd love to see what you come up with. Send me and link, tag me on Instagram, or leave me a comment here. Until next time, may all your days be filled with fairy dust!

Tuesday, April 5, 2016

Easy Upcycled DIY Disney Travel Game

When I saw this idea on Pinterest, I knew I wanted to recreate it using the Disney ephemera I had collected over the years. I tend to be a pack rat - every now and again, this winds up being a good thing. It's nice when that happens! If you are a pack rat too, then this project is free to create. I know I love a budget friendly DIY.
I had an old sturdy tube from some Silhouette stencil vinyl that was just right for this project, perfect for outlining the shapes of some old Disney stickers I had lying around. (I believe these are from the 90s - when I was still paper scrapbooking. Disney had a terrific scrapbooking store back then; I'm not sure if it's still around today.) If you don't have any stickers, they are very easily obtained from the Dollar Store, or a craft store. And they are usually fairly inexpensive, especially if you have a coupon.

The idea here is simple. I removed the outer edge of the sticker paper, leaving the actual stickers on the page. Then I used the "blanks" as a stencil to trace the shapes of the stickers onto the paper tube. I used a fat Sharpie to trace them and then a fine point Sharpie to label the shapes. (I have a bit of a pen addiction as well. I love my Sharpies!) Happy isn't quite able to read yet, and I wanted Poppins or Doc to be able to help him if I wasn't available.  So now there are several Disney shapes and characters to match to the shapes on the tube. I figure this could last him a good 20 minutes if he takes to it! Stickers are generally a favorite for him. For our family, the trick is finding new and different things to keep the little ones occupied on our drive. It's a LONG way to Orlando from our cottage in the midwest! I'll let you know if this works for us. And if you try it, let us know how it worked for you!

Until next time, may all your days be filled with fairy dust!

Tuesday, March 1, 2016

Scrapping WDW | My Favorite Apps for iPhone Photos

Six years ago I would never have believed you if you told me I wouldn't be carrying my DSLR to Walt Disney World anymore. I mean, I am the queen of snapping vacation photos! I love to catch every moment - many times! And I actually scrapbook. Photos are a major part of my vacation experience anywhere I go.

But I have, in fact, been photographing my family exclusively with my iPhone for last several years. It may be because I now have two toddlers who keep me on my toes! Or it may just be the fact that I feel like my entire life is on my iPhone. Whatever caused the switch, I am quite happy with it. Let's face it; the iPhone is smaller, easier to pop out to catch that photo with, and always with me!

I'm guessing I'm not the only one who is experiencing this change in photography habits. So here are some of my favorite apps. They both help me post great pictures on the fly (to Instagram and Photos) and get them ready for the scrapbook! In full disclosure I use an iPhone 6 and have only tried these with the iPhone.

1. Snapseed - This is my go to app for any of the photo editing basics like brightness, contrast, and tone; it also has the ability to add some fancier features for filters, grain, etc. This app is free.
Edited completely in Snapseed

2. PicFrame - easy to use collage app that allows you to change the shape of just one photo. App price is $0.99
PicFrame was used to create this collage

3. Big Lens - my newest favorite! With this app you can create the effect of changing your aperture on a DSLR. Essentially you can get your subject to stay in focus and blur the background after you've taken the photo. App price is $0.99
Edited in Big Lens and Instagram

4. Squaready - can edit any photo to fit a square frame. Very easy to use and uploads directly to IG if you wish. It has several other functions, but I don't use them. This app is free.

5. Over - gives you the ability to put text and or art work on your photos. It's interface is super easy and allows for the basics. App price is $0.99
Over was used to caption this photo Doors Of Dublin

6. Rhonna Designs - this is for lots of artwork options and text. I use it sparingly, but it has lots of options for design. And there are tons of preloaded phrases and goodies so you don't have to come up with them yourself, all for an additional cost. App price is $1.99

7. RealBokeh - allows you to add bokeh to your photos after you've taken them. You can choose where to put it and what shape you want. There is also a Mickey mouse shape perfect for your Disney photos! App price is $1.99


And there you have it! The apps I use to edit my iPhone photos. Once you have the hang of it, it's easy to do while waiting in line or for your ADR! Until next time, may all your days be filled with fairy dust!

Saturday, September 19, 2015

Scrapbooking Disney's Hilton Head Island Resort

My regular readers will know that my family LOVES Disney's Hilton Head Island Resort. It is one of the properties where DVC members can use their points, but you DON'T have to be a DVC member to stay there! We had one of our most enjoyable family vacations there for Spring Break 2014. . . . and I finally got around to scrapbooking it! I wanted to share these pages with you as inspiration for your own scrapbooking or as inspiration to go there! If you want to book a trip through me, your independent earmarked Disney Travel agent, feel free to contact me at amy@wishdrawals.com

Until next time, may all your days be filled with fairy dust!


Tuesday, July 7, 2015

Scrapping Disney | Ratatouille Birthday Party

Sometimes there is the perfect scrapbooking kit for you pages, and sometimes what you want is so obscure you just have to figure it out for yourself! This was one such moment when I found myself in need of some Ratatouille themed Project Life cards. Well. Good luck! I knew it was going to be a hard sell. So instead, I purchased some PNG files from Pinky Katie over on Etsy and made my own! You can click on each layout to enlarge it for further detail.

The key to creating you own filler cards, is to stick with a color palette and not over embellish. These rules, simple as they are, can be tricky for me! I did my best. I played around a lot with my styles and patterns and I really love the way it looks! And I'm not so big on journaling right now. I'm just too tired by the time I get around to actually scrapping the photos. The pictures tell most of the story. However, if you want to read all about it, you can check out this blog post to get all the details on the "how to."

I mentioned it before, but if you have never made your own marshmallows, it is SO worth it. They are entirely different than what you will get in the store!

It was so much fun to relive this party through scrapping it. I think that's part of the reason we scrapbookers do it, to be reminded of all the good stuff. Until next time, may all your days be filled with fairy dust!

Saturday, May 30, 2015

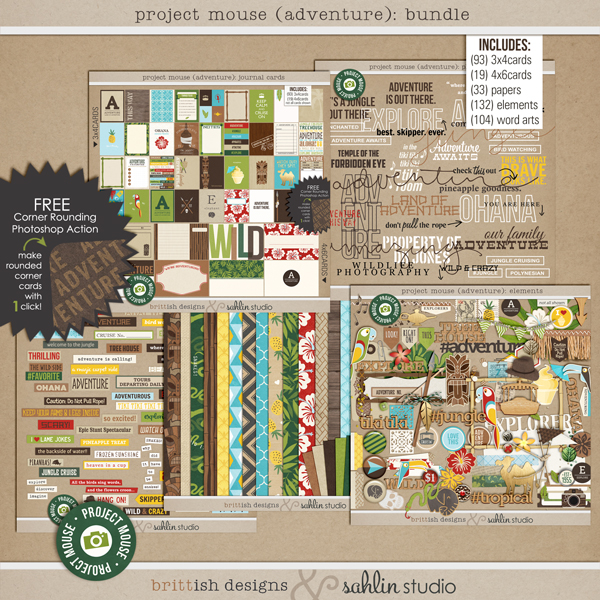
Scrapbooking WDW | NEW Project Mouse Adventure Bundle Released!

Just yesterday my favorite scrapbook designers brittish designs and  sahlin studio released a new Project Mouse kit themed to Adventureland in Disney's Magic Kingdom! My regular readers will know how very excited I am to snap it up and add it to my ever growing collection of digital scrapbook supplies!

I think Disney scrappers will also be able to use parts of this kit for those Animal Kingdom layouts as well as some Animal Kingdom Lodge pictures! This one is definitely a keeper! And you don't have to be a digital scrapper to use the kit. It comes with print files if you want to print them and use them for your Project Life albums as well.

Be sure to stop by the sahlin studio blog and the brittish designs blog for inspiration and to grab the freebie that goes along with this kit! (There is a lot of scrolling through the post, but it's worth it!) And right now the whole kit and caboodle is on sale at The Lilypad! Up to 30% off!

I have no affiliation with Project Mouse, I just love this digital scrapbooking product and want to share all the Disney goodness with my readers. Until next time, may all your days be filled with fairy dust!

Thursday, April 16, 2015

Scrapping WDW | My Favorite Apps for iPhone Photos

Five years ago I would never have believed you if you told me I wouldn't be carrying my DSLR to Walt Disney World anymore. I mean, I am the queen of snapping vacation photos! I love to catch every moment - many times! And I actually scrapbook. Photos are a major part of my vacation experience anywhere I go.

But I have, in fact, been photographing my family exclusively with my iPhone for last several years. It may be because I now have two toddlers who keep me on my toes! Or it may just be the fact that I feel like my entire life is on my iPhone. Whatever caused the switch, I am quite happy with it. Let's face it; the iPhone is smaller, easier to pop out to catch that photo with, and always with me!

I'm guessing I'm not the only one who is experiencing this change in photography habits. So here are some of my favorite apps. They both help me post great pictures on the fly (to Instagram and Photos) and get them ready for the scrapbook! In full disclosure I use an iPhone 6 and have only tried these with the iPhone.

1. Snapseed - This is my go to app for any of the photo editing basics like brightness, contrast, and tone; it also has the ability to add some fancier features for filters, grain, etc. This app is free.
Edited completely in Snapseed

2. PicFrame - easy to use collage app that allows you to change the shape of just one photo. App price is $0.99
PicFrame was used to create this collage

3. Big Lens - my newest favorite! With this app you can create the effect of changing your aperture on a DSLR. Essentially you can get your subject to stay in focus and blur the background after you've taken the photo. App price is $0.99
Edited in Big Lens and Instagram

4. Squaready - can edit any photo to fit a square frame. Very easy to use and uploads directly to IG if you wish. It has several other functions, but I don't use them. This app is free.

5. Over - gives you the ability to put text and or art work on your photos. It's interface is super easy and allows for the basics. App price is $0.99
Over was used to caption this photo Doors Of Dublin

6. Rhonna Designs - this is for lots of artwork options and text. I use it sparingly, but it has lots of options for design. And there are tons of preloaded phrases and goodies so you don't have to come up with them yourself, all for an additional cost. App price is $1.99

7. RealBokeh - allows you to add bokeh to your photos after you've taken them. You can choose where to put it and what shape you want. There is also a Mickey mouse shape perfect for your Disney photos! App price is $1.99


And there you have it! The apps I use to edit my iPhone photos. Once you have the hang of it, it's easy to do while waiting in line or for your ADR! Until next time, may all your days be filled with fairy dust!

Tuesday, March 17, 2015

King Brian of the Little People St. Patrick's Day Photo Bomb


Happy St. Patrick's Day readers! I've mentioned before that we love celebrating this Irish-American holiday here in the cottage. Several birthdays surround the holiday for our family and we are already in a very celebratory mood! Whats a little more Guinness? And as an added bonus, I will be traveling to Ireland with my niece at the end of the month!! I am so excited.

And as is our tradition here in the cottage, we will be watching Darby O'Gill and the Little People. The movie was made in the live-action heyday of Disney studios and is a quirky little gem. If you're REALLY a Disney geek, or grew up renting these tapes from the video store, then you know exactly what I mean, and you've probably watched this one yourself a couple of times. This movie is not your standard Disney fare of today. But the bonus material on the DVD almost makes watching it worth it - even if you do groan all the way through the movie.

One of the central characters of Darby O'Gill and the Little People is King Brian, King of the Leprechauns - although that term is a bit pejorative for the Little People. He's a wee devil and only shows himself to Darby. I thought it would be fun to make him into a little png file and have him photo bomb our family for St. Patrick's Day! I had way too much fun doing this! He should also come in handy for some of those Ireland pictures that are to come!

If you are interested in this King Brian png file too, help yourself. It's for personal use ONLY as I created it from copyrighted materials. Enjoy using it today to photobomb you favorite people. And if you do, use #KingBrian on Instagram so I can enjoy it with you! Until next time, may all your days be filled with fairy dust!

Thursday, February 12, 2015

DIY Disney Pixar's Toy Story Birthday Party | Creating A Digital Invitation

There are a lot of invitations available on Etsy if you are not so inclined as to create your own. But I love creating this sort of thing, AND I wanted something that could be used in a text message. I don't know about you, but texting is a huge part of my life and seems easier for moms in my circle to use than anything else. I also seem to get an RSVP from most everyone. And since we all send a very informal "save the date" message via text anyway, it seemed logical to just have the invite be a text and let that be that!

If you are inclined to want to do this, here is how I created this invitation.

Start with a 4" x 5" canvas in photoshop.

I used a selection of scrapbooking supplies from two sources: Papelland's Toy Story Collection and Frontier from Project Mouse. Select the plaid paper and size it to your background. Remember it's going to be on a digital screen, so don't make it so small the checkers go all funny on your eyes.

Select a custom shape; I chose this 8-pointed star frame. In a new layer, create the frame in any color. Move the cow print paper onto the shape and reduce the size the same way you did for the background. Then group the paper to the shape (paper layer on top of the shape layer). Your shape should now be filled with this cow print. To outline it, use the stroke function.

To create the inner star, I selected the same custom shape, but the solid version, and made it in white. Then I layered on the cloud paper and changed the opacity to about 30%.

Making the script was fairly simple. I already had the Gill Sans font. Bump it up to Extra Bold and use the stroke function to create the blue border. Then use the emboss function to make it stand out. I then drew a red rectangle behind the word "turns" and used the skew function in the transform menu to shape it like the Toy Story logo.

And that pretty well sums it up! I love having something so easy and it will transition to the scrapbook with no trouble at all! Until next time, may all your days be filled with fairy dust!


Saturday, November 15, 2014

Scrapping On The Fly in Walt Disney World


I have made no secret of my love for Project Mouse. I have used it to scrapbook our family's last several Disney trips, as well as a few other layouts, and it's sure to be used to scrap the next several trips as well. But recently, I have also found the Project Life app. I love the flexibility it offers, how easily I can create layouts and record memories. 

I really wanted to be able to incorporate using the Project Life app into my scrapbooking as well. The Project Mouse kits are not offered as part of the Project Life app and I was lamenting this to my friend, Flora, on our recent trip to Disney. She suggested I save the cards from Project Mouse as pictures and then import them into the app when I want them. And you know what? It works! This is revolutionary for my scrapping habits, y'all! I could actually be current in my scrapbooking within the next year. That has never happened to me before! I welcome the possibility.

I am a devoted Mac user, so all my equipment is from Apple. If you are an android user, perhaps this could work for you as well, I have no experience with that. All I know for sure is that doing it this way, with iPhoto, the use of iCloud, and my iPhone, this process worked for me! 

Here's exactly how I made it happen:


  1. I selected all the cards I thought I might want while on our last Disney trip and imported them into iPhoto.
  2. I moved all those cards into an iCloud album called Disney Cards.
  3. When I was ready to journal on one of them, I opened it up in Rhonna Designs (I used this app because I love the fonts available, but any app that allows you to add text to photos would do the trick.)
  4. I added the text I wanted to the photo and saved it to my camera roll (or photos).
  5. I opened up the Project Life app.
  6. I added the card I just edited as a photo in the layout. Voila! The layout is done and my favorite Project Mouse cards were used!
All these cards were scrapped in the moment (or shortly there after) in Walt Disney World or on the road home. I cannot tell you how much I love being able to capture my thoughts about our trip, and any of the little details, before they are gone. 

I don't like scrapping out of order, so I am usually having to remember long after the fact what we were doing and who was happy (or not) about it. But by creating these cards the day the moment happens I can get those thoughts down before they are gone. And when I save the image, it's in order in my photo stream so I will see it when I go to scrap the layout! No more forgetting the little things! I could not be happier! Scrapbooking just got a whole lot easier.

Until next time, may all your days be filled with fairy dust!


Thursday, November 6, 2014

DIY Stitched Disney Park Map

Here's a fun way to add a little dimension to your scrapbooking, or create a unique keepsake from a special day at the Disney Parks: stitch a map with your route that day. It's simple and easy.

One thing I love about Disney are the maps. They are such an excellent tool, as well as being a great souvenir of the day! I am always trying to find new ways to use them, and new ways to enhance my scrapbook pages. This one turned out even better than I imagined!

I simply took a contrasting embroidery floss color and used a running stitch to chart our course from October 22, 2014. I stitched through the numbers on the map of the places we went. I plan on incorporating it into a scrapbook page with pictures of the day. I think this could easily be adapted for any of the Disney parks, and would be especially fun in Epcot's World Showcase where you could document kids at the Kidcot stops, completing Agent P's missions, or the adults frequenting the Food and Wine Festival booths! The possibilities are endless!

This would also look great framed, commemorating a special day in the parks. You could use a shadow box to put other ephemera around it, or just pop it in an 8x10 frame (this would cut off the legend though).

Let your imagination run with this idea! And if you do, I'd love to see how you use it! Until next time, may all your days be filled with fairy dust.

Thursday, October 30, 2014

DIY Disney Scrapbook Inspiration | Project Mouse and WDW

Today I give you some more scrapbook pages from our 2013 trip. I have to admit, I love scrapping Disney! And as usual, I have made liberal use of my favorite Disney scrapbook kits: Project Mouse. What can I say? They speak to me. And I have also discovered Mousescrappers.com. What a great way to find Disney inspiration and scrapbooking kits! If you haven't checked them out, it's worth a stop.

I hope these pages will inspire your layouts. If they do, I'd love to see them! Leave me a comment or tag me on Instagram. Until next time, may all your days be filled with fairy dust!


Thursday, October 2, 2014

DIY Disney Scrapbook Inspiration | Project Mouse and WDW

I find myself almost perpetually 18 months back in my scrapbooking. This in not really something that concerns me, but more like a matter of fact. It's fine. But when I looked at the calendar recently and realized that I had TWO(!) trips to Walt Disney World scheduled this fall, I realized I needed to get 2013 in the books! There's nothing worse than trying to sort our multiple trip memories and anecdotes for this tired mama! So today I give you some scrapbook pages from our 2013 trip. I have to admit, I love the title page! And as usual, I have made liberal use of my favorite Disney scrapbook kits: Project Mouse. What can I say? They speak to me.

I hope these pages will inspire your layouts. If they do, I'd love to see them! Leave me a comment or tag me on Instagram. Until next time, may all your days be filled with fairy dust!


Tuesday, September 16, 2014

Scrapbooking Disney | Project Mouse Frontier Bundle


So these layouts are NOT of Walt Disney World, I realize, but I did use an amazing new kit from Project Mouse and I wanted to share with you all how versatile it is!

We live in the Indianapolis area, and one of our favorite local treasure is the Eiteljorg Museum. If you ever have the opportunity to visit, I highly recommend it. They are very family friendly, as you can see, but they also have amazing displays of all things Native American and specifically items and artwork from the Southwest. We are lucky to have such a unique place in the midwest!

That said, it was hard for me to find scrapbooking elements that were not cartoony for the scrapbook. I was so excited when Britt-ish Designs and Sahlin Studios released this kit! I knew we would use it for our Walt Disney World pages - Doc is quite the sharpshooter at the Shootin' Arcade! But I also knew it would be well used for our Eiteljorg layouts as well.

You can get all the information on the new Project Mouse Frontier Bundle here. As my regular readers will know, I am a huge fan of Project Mouse!

Until next time, may all your days be filled with fairy dust!

Tuesday, August 12, 2014

DIY Disney Scrapbook Inspiration | Project Mouse & Walt Disney World, Installment 3

Some of my favorite memories have been made in Walt Disney World. This vacation was no exception. And so while everyone is busy with summer plans, vacations, and school starting up (gulp!), I thought this would be a great time to showcase a few more Project Life style pages that I completed from our 2012 trip. I keep saying how much I love using the Project Mouse kits by Sahlin Studios and Britt-ish Designs, but it's the best product out there for my money. 

For these pages I used Project Mouse Bundles 1, 2, & 4, plus the Days & Washi Tape Bundle, the Halloween Bundle, and the Fantasy Bundle. I also used the Stuffed with Fluff kit from Britt-ish Designs, and the Now Showing Mini Kit from Tickled Pink Studios. Until next time, may all your days be filled with fairy dust!


Thursday, July 10, 2014

DIY Disney Scrapbook Inspiration | Project Mouse & Walt Disney World, Installment 2

Some of my favorite memories have been made in Walt Disney World. This vacation was no exception. And so while everyone is busy with summer plans and vacations I thought this would be a great time to showcase a few more Project Life style pages that I completed from our 2012 trip.

During this particular trip we had the pleasure of dining with an Imagineer! If you've never done this and you are a Disney Geek, I HIGHLY recommend it! We loved the experience! And there was a lot of swag that came with that experience. I scanned as much of it as possible for my pages. You can see a bit of that here.

 Kit information and links are at the bottom of this post. Enjoy!


I keep saying how much I love using the Project Mouse kits by Sahlin Studios and Britt-ish Designs, but it's the best product out there for my money. For these pages I used Project Mouse Bundles 1, 2, & 4, plus the Days & Washi Tape Bundle, the Halloween Bundle, and the Fantasy Bundle. I also used the Stuffed with Fluff kit from Britt-ish Designs, and the Now Showing Mini Kit from Tickled Pink Studios. Until next time, may all your days be filled with fairy dust!