Wednesday, September 23, 2015

Disney's Hilton Head Island Resort Trip Report

Since we are gearing up for another fabulous vacation at Disney's Hilton Head Island Resort, I thought I would rerun this trip report post from last year's amazing trip. Disney does vacations right! If you want more information on this resort, or would like to book a trip, contact me at amy@wishdrawals.com and let me set it up for you at no additional cost! Until next time, may all your days be filled with fairy dust!


Let me start by saying this was quite possibly the best Disney vacation Mr. Photos From The Parks and I have had since the kids have arrived in our lives. I actually felt like I had a vacation. It's been a couple years since I could say that! Why was it so great? I think there were several things that made us wish we had bought into this resort at the beginning.

From our very arrival, we loved the atmosphere of this resort. Mr. Photos grew up vacationing on the Eastern Shore of Maryland and it immediately felt very much like home. As many of you know, I grew up vacationing in Fort Wilderness, before there was anything more than the Magic Kingdom & River Country (and eventually Epcot). This resort took me back to how it used to feel spending our days as a family at Fort Wilderness. There was lots of down time and plenty to do if you weren't in the parks. We did most of it then and loved it. Hilton Head brought all of that back for me.

The pace of this resort also made our stay wonderful. We are used to our Disney vacations being of the fast-paced, non-stop, I'll-sleep-when-I-get-home variety. It's just not possible to do that here. The pace on the island was easy. If we slept in, no matter. If we missed the storyteller, he'd be back in an hour. If we wanted to eat later, no ADRs to worry about. The kids did as they wished and no one bothered to worry about it. It was such a delight!

Additionally, this resort is small, roughly 15 acres. To give you are reference point, Disney's Boardwalk Inn Resort encompasses 45 acres. The entirety of the Hilton Head Island Resort has roughly the same footprint as both areas of Fantasyland in the Magic Kingdom at Walt Disney World. That's it. There are only 31 cottages here (with extremely spacious units), one pool and central activities area, as well as a few things to do at the check-in area. It's incredibly walkable with plenty to do without ever leaving the resort. But it's also easy to walk all around the Shelter Cove area, visiting several shops and restaurants.


The units were undergoing a major rehab while we were there. The color schemes were all updated to much more soothing blue/taupe/white theme. We had all new appliances as well as a full-size washer and dryer. This is the view of our main living area in the 2-bedroom villa. We had plenty of room to spread out even with all our baby/kid paraphernalia! There were several full sized closets as well as a mudroom for all our jackets, shoes, hats and stroller! That alone was a selling point for me! And although we didn't need it, both of these sofas fold out into beds. We could have easily slept 4 more people in our villa. It was more than enough room for us.

Disney also has a beach house and private beach area that is quite easy to get to. We drove, but Disney offers transportation, and there is also a very nice bike path for access. We had cool weather while we were there, but it didn't keep us from enjoying the beach and the amenities at the beach house. With the arcade and the beach, we were happy to spend the afternoon playing.

So, should you stay at Disney's Hilton Head Island Resort? I say absolutely! If you are looking for a relaxing place to get away from it all, this is just the place you are looking for. Less hustle and bustle but still all the comforts of Disney you've come to love and expect. And for those of you who like seeing it all in one place, I've created a PDF fact sheet for the resort. Enjoy!


Saturday, September 19, 2015

Scrapbooking Disney's Hilton Head Island Resort

My regular readers will know that my family LOVES Disney's Hilton Head Island Resort. It is one of the properties where DVC members can use their points, but you DON'T have to be a DVC member to stay there! We had one of our most enjoyable family vacations there for Spring Break 2014. . . . and I finally got around to scrapbooking it! I wanted to share these pages with you as inspiration for your own scrapbooking or as inspiration to go there! If you want to book a trip through me, your independent earmarked Disney Travel agent, feel free to contact me at amy@wishdrawals.com

Until next time, may all your days be filled with fairy dust!


Wednesday, September 16, 2015

Bringing Honor To Us All Mulan Inspired Design on RedBubble

I have a soft spot in my heart for the story of Mulan. She is not one of the well-loved Disney Princesses but her story is every bit as brave as Merida's and spunky as Rapunzel's. She was just a bit ahead of her time.

This new design, now available on RedBubble, was inspired by Mulan. I think it's fun and functional and looks great on so many of the great products at RedBubble. And now they are featuring laptop sleeves as well as all the other great stuff they carry! Head on over for a quick look.

Until next time, may all your days be filled with fairy dust!

Saturday, September 12, 2015

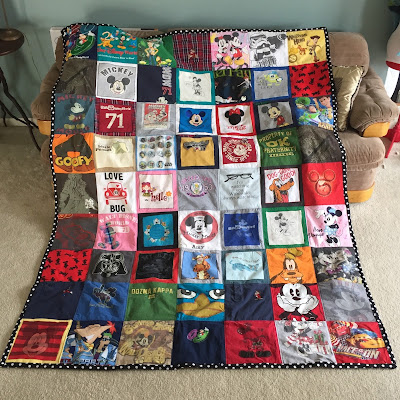
DIY Disney T-shirt Quilt | Phase 5: Finishing

I am so excited to present my completed Disney T-Shirt Quilt! It was a long time in the making and a very big undertaking, but alas, I have persisted and completed this project!

I backed this with an old twin size duvet cover that the teenage had decided was too complicated to use. I also found this fun black and white polka dot fabric in my stash that was given to me a while back. I used it to make my own bias tape for binding.

So by the end of this project, the only cost that went into it was the bolt of iron-on Pelon I used to back the t-shirts. I'd say that's a bargain! Not only did it give new life to t-shirts we had outgrown, but also now is the coveted blanket for movie night!

I could not be happier with this quilt. It embodies all the qualities of love for a great DIY: reused items made into something useful and lovely. It is not going to win any awards for the construction, but it is definitely a family treasure, and that is better than any perfectly constructed quilt I could buy.

Until next time, may all your days be filled with fairy dust!

Wednesday, September 9, 2015

Disney DIY Envelopes from Calendar Pages

Like many Disney fans, I have Disney calendars in the cottage. I love watching the months change throughout the year. And then, just like that, the new year is upon us and I have an old calendar with pictures I love but have no idea what to do with.

It occurred to me recently that these calendar pages would make great envelopes! They are fun, brightly colored and easy to make. All you need is a little glue or tape for the back flaps and you are all set! And being such an good environmentalist will certainly earn you your Environmentaility Badge from Jiminy Cricket!

These are easy to make, just follow these simple instructions for folding an envelope:


And you are all set! You can actually post these, or use them for teacher notes, hand delivered sentiments, enclosed in a gift, or for gift cards or certificates! They are a handy little way to put just a bit more Disney magic into the world.

Until next time, may all your days be filled with fairy dust!

Saturday, September 5, 2015

Disney themed DIY Double-Sided Headbands

I've been trying to adopt some healthy habits now that the kids are back in the swing of school. And as a part of that, I've been working out a little bit more! But as such, I discovered that I needed more of these headbands for my workouts. I made one of these many moons ago, so I knew it wouldn't be tough. Now I just needed it to be Disney!

I also knew that I would need to make a minor adjustment with the elastic length. I have a big head (ahem). So the 5" elastic in the back was way too short for me. I increased it to 7" and lengthened the cover pieces an extra inch too. This worked perfectly. And now I have an ample supply to headbands for my workouts that are Disney themed! Disney makes everything better, right?

If you want to try your hand at this easy sewing project, you can find the pattern at Happy Together. The directions are very simple to follow and there is only straight stitching! Even a beginner could have success with this pattern. If you are wondering where I got such adorable fabric, I hunt for my Disney fabrics on Etsy. I got these fabrics over 2 years ago and have been hoarding them for the perfect projects ever since! I decided this was just right for me. And the projects were small enough that I still have a little bit left for something in the future! When I figure that out, you'll be the first to know! Until next time, may all your days be filled with fairy dust!

Wednesday, September 2, 2015

DIY Disney T-shirt Quilt | Phase 4: Putting It All Together


So it feels like I started this project 100 years ago, collecting old t-shirts, ironing on stabilizer, cutting out squares of fabric.  It was taking so long I had resigned myself to never really having a quilt. And then, all of a sudden, I had all the squares I needed! Just like that. And in the course of one day (a very long, dedicated day) I had not only completed the top the quilt, but also completed the "sandwich" (the top, the batting and the backing,) and the quilting on top of it. It was an amazing day.

Quilting is a lot like painting a room. So much time is spent prepping the space that when the paint finally goes on the walls it feels incredibly satisfying. Same with sandwich day. It all starts coming together and you can see the real progress you've been making all along. Granted, painting a room usually only takes a day or two (not a year and a half!), but the principle's the same.

I began the assembly part of the quilt project by laying out all the squares on the floor to get an idea of the layout I preferred. I started with the squares I liked the most in the center of the quilt and went around them until I was finished, trying not to put two of the same color shirts right next to one another. I tried not to worry too much if three Mickey's were next to one another. That nonsense can drive me crazy! I made sure to take a photo incase my kids decided to mess with it. Of course they did! I was glad I had that photo!

After I was happy with the layout, I sewed the squares together in horizontal strips, noting each row as I went. This made sewing them all together easy. Once I had each horizontal row, I sewed them all together in order to create the completed top.

And here is just a sneak peek of the top before it was sandwiched and quilted together! Once I have the binding made and attached I will reveal the finished product. But this was a very productive and satisfying step toward a new family quilt!

Until next time, may all your days be filled with fairy dust!