Saturday, May 31, 2014

DIY Disney T-shirt Quilt | Phase 3: Using Smaller T-shirts

As I mentioned in my first post about this t-shirt quilt, I have t-shirts of varying sizes. Some are as small as 6 months onesies, others are 3T. I have some sentimental attachment to many of these and I wanted to include them in the quilt - a way of keeping them and making them useful again. But I was clearly not going to get an 11"x11" square out of them. So I decided to appliqué them onto larger squares.

This is the process I used:

As I was cutting the adult sized t-shirts, I laid them flat and cut through both the fronts and the backs of the shirts. This way, I had the printed square from the front, and a blank square from the back.

I then took the blank square, ironed on the fusible interfacing (Pellon) to stabilize it. (I did not use the Pellon on the smaller square as it felt it wasn't necessary.)

Then, I cut out the printed design from the child sized t-shirt using an 8"x8" square. Again, I made a pattern from scrapbooking paper to make it easy to cut.

Once the smaller square was cut, I centered it on the larger square and used Stitchery Witchery to bond the smaller one to the larger one. If you've never used Stitchery Witchery, it's very simple. It will bond two fabrics together by just ironing it on, the perfect thing to hold the small square on the larger one in order to appliqué it.

After the smaller square was securely adhered to the larger one, I simply used the zigzag stitch on my machine, and stitched around all four sides of the small square. And since I had plenty of scrap material from the left-over t-shirt parts, I was able to test the zigzag settings to get them just the way I wanted them prior to sewing on the first square.

I almost have all my squares completed! The next installment should be the sewing of the quilt top! Until next time, may all your days be filled with fairy dust!

Thursday, May 29, 2014

DIY Disney T-shirt Quilt | Phase 2: Preparing the Shirt Squares

As my regular readers will know, I am currently working on a t-shirt quilt. This is my first attempt and I thought what better way to share it than while it's in progress?! Last time, we discussed the measurements and gathering up of t-shirts. This time, I wanted to show you how I prepared the t-shirts for the quilt.

If you've ever worked with jersey, you know it can be a little finicky in the machine. You can approach this in a couple of ways. For smaller projects, such as these adorable boxers from upcycled t-shirts, you can starch the heck out of the jersey and it sews up just fine. But for these larger squares of jersey, I wanted something more stable, especially since I want the measurements to stay fairly accurate. I happened to have some pellon fusible interfacing on hand, and used it (and another bolt I purchased from Amazon) to stabilize the t-shirt squares. If you've never used it, it's extremely easy.

To begin, I made a pattern from scrapbook paper of an 11" x 11" square. I placed it on top of the shirts (no pinning) and cut around it with my scissors. I cut out the back and the front at once so I would have the back squares for the smaller shirts, as I mentioned in my Phase 1 post. If you are a quilter and have a rotary cutter, this would be even faster. I don't have a mat for cutting on at the moment, so I just went old school with the scissors.

I also used that same pattern to cut out the interfacing. Once I had all my squares and all my interfacing cut out, I then ironed the interfacing to the t-shirt squares using the interactions included with the interfacing. I like to start in the middle and work out so there's less chance of puckering, stretching, or wrinkling. Jersey has a tendency to want to stretch as you iron it.

Once I have all 54 squares done it will be time to start sewing them together. Next time I'll walk you through using smaller t-shirts and how I made them fit the larger quilt blocks. Until next time, may all your days be filled with fairy dust!

Tuesday, May 27, 2014

DIY Disney T-shirt Quilt | Phase 1: Gathering Materials

It's official. I have begun work on my very first t-shirt quilt! This is something I have been wanting to do for a very long time. And what better way for us to do it than with our Disney shirts that we've been saving? In fact, I was amazed by how many shirts this quilt was going to need! I used several resources on-line to get started on this project, but finally settled on Totally Stitchin's tutorial. At least this gave me a good place to start with measurements.

I decided to make a twin size quilt. We generally use our quilts more as a throw while we are on the sofa watching movies, and less as a bed cover. To that end, I wanted this quilt to be easily accessible and not too big. I also realized that my t-shirts would not go nearly as far as I thought they would! Another good reason to stick with a twin-sized quilt. According to my measurements, I was going to need a LOT of shirts!

Since math is in no way my strong suit, I wanted my measurements to be even, meaning no half shirt squares to deal with for the quilt. For my twin, I decided to use 11" x 11" squares that would sew up to 10" x 10" squares. A twin quilt is 60" x 90". This way it was easy to see I would need 6 squares across and 9 down, for a whopping total of 54 shirts! This is actually more that I had on hand - shocking, by the way. So I gathered up the family and went to Goodwill. Did you know that the first Saturday of every month they have a 50% off the entire store sale? Neither did I, until we stumbled upon it. Great for the pocket book, not so great for the kiddos waiting for Mama to sort through all the shirts and then wait in line. Next time I will leave the kids with Mr. Photos From The Parks!

And to make things just a little more complicated, I realized that all my shirts were different sizes! So I needed to find a way to make them all work together in a way that would be pleasing to me. I didn't want to put something together only to think every time I got it out, "that looks so odd." Been there, done that! To address this problem I settled on appliqué. The baby and toddler sized shirts would need to be appliquéd to larger squares that fit the pattern.

The solution was easy, since most of my adult-sized T-shirts didn't have printing on the backs. I would use the backs of those T-shirst for the 11"x11" base square, and appliqué onto them the baby size shirts. In theory, it totally works! I'll keep you posted on how well it goes in real time!

Now that I have all of my shirts gathered, my next step is to get them all cut and prepped! I'll keep you posted on this project - I'm super excited to get it done! Until next time, may all your days be filled with fairy dust!

Saturday, May 24, 2014

From Belle's Library | Mortal Friends by Jane Stanton Hitchcock

This book, Mortal Friends, is decidedly NOT related to Disney in any way, but it IS a great vacation read. First of all, I am a sucker for a good murder mystery. It doesn't even have to be that good. It just needs to be campy enough to feel like an episode of Castle and I'm in. I especially like it if I don't have to pay extra close attention while I'm enjoying myself on the beach, or knitting on the plane, or driving in heavy traffic.

This is just such a book. I knew this was a good bet as I had previously read her novel, Social Crimes, on vacation. Ms Hitchcock has a way of drawing her readers into the upper crust, the social climbing ladies and their small circles of power. Mortal Friends takes place in Washington, D.C. and for me, that's an added bonus. Having lived and worked in the Baltimore area for several years I had a very good idea of who her characters were, and where the story was unfolding. I always enjoy a familiar setting.

I will say I thought I knew who the killer was 5 minutes into the book, and I was mostly right. But the twists and turns of this novel definitely kept it worth reading! Over all I would recommend this book and Social Crimes to anyone who likes a good mystery, enjoys reading about society and needs a good beach read (for me that means light and sugary). Until next time, may all your days be filled with fairy dust!

Thursday, May 22, 2014

DIY Disney Onesie to T-shirt Conversion

I don't know about you, but for a while, onesies are the greatest invention ever. And then one day you turn around and are cursing them up and down while that squirmy baby is trying to do anything but have it's diaper changed. (We never curse the baby, of course! Ahem.) We hit that mark a while ago around here and I decided that something had to be done. Especially considering we had some Disney onesies that I wanted Minnie to wear, just not as onesies!

So off to the internet I went, scouring for a way to easily hem what seemed to be 25 shirts. And because we have a girl, I found exactly what I needed! This lettuce edge tutorial by Betz White saved my day! In fact, it really helped some of the boyish onesies look more like they were intended for a girl. Happy accidents! This is one of those moments where I slapped my head and thought, now why didn't I think of that! It's easy, painless, and you probably have the supplies you need right at your sewing table.

The first thing I did was cut off the onesie as low as possible. I wanted to give myself some room to mess up (and Minnie seems to have either a long torso or a big belly, depending on the day!). I then read through the tutorial and followed it step by step. I felt fairly certain as I was sewing that it wasn't going to be as cute as the ones in the pictures, but when it was all done an I held it up, I was amazed at how good it looked! Now I wouldn't say it looked professional, but for a baby who's going to trash it before breakfast? Perfect!

Until next time, may all your days be filled with fairy dust!

Tuesday, May 20, 2014

From Mrs. Pott's Cupboard | Snow White's Iced Apple Tea

As it's finally warming up into summer I thought it would be the perfect time to introduce the next Princess Tea! Of course Snow White's tea would need apples, but when I brewed it, I could never find just the right combination for the perfect pot. I like to reuse my tea (you can usually get two-three pots from one of my recipes. But either the second pot was too strong and apply, or the first pot was too weak. If you are a fan of very fruity teas, this second pot is almost cider-like, so it could just be "your cup of tea!" But I am not a fan of super fruity teas in general. So I came to the compromise of using this as a one pot tea, hence the Iced Tea recipe. If you have an iced tea maker like the one here, you can simply use a coffee filter, put all of these in the basket, and brew as usual. If not, then brew a strong pot of this tea as you usually would and pour it into a pitcher full of ice. Remember that the ice will dilute the tea as it melts, so a strong brew is recommended.


When I think of brewing this tea my mind immediately goes to the Evil Queen brewing her transforming potion, to make her into an old hag. So to that end....

Begin with a black tea, as black as snow white's hair,
a teaspoon of skullcap & some peppercorns from the evil queen's lair,
add in some rose rosehips, 
as rosy as Snow White's lips,
a dash of spice & a bit of mint for the dwarves good fortunes,
and some apple slices, but be mindful of their origins.

Well, it's a good effort anyway! Until next time, may all your days be filled with fairy dust!


Thursday, May 15, 2014

Here We Go!


Mr. Photos from the Parks and I are taking a well deserved vacation without the littles! We'll be gone for just a little while and in an attempt to honor that time of rest and restoration, I am taking just a couple days away from the blog too. Hello vacation!

Don't worry though, we'll be back to posting fun ideas next week with new posts and the start of a really big project I've been wanting to do for a long time now! I'll catch you then. And if you want to see what we're doing you can hop on over to the Instagram feed for some beachy eye-candy. (of the beaches, no me!) Until next time, may all your days be filled with fairy dust!

Tuesday, May 13, 2014

DIY Small Zippered Mickey Mouse Pouch

As you know, I'm a fan of little bags and pouches for travel. I saw this little beauty and thought it could be Disney-fied with a little alteration. And while I would work a bit on the shapes of the ears, this came together very easily and I would certainly do it again!

I found the original pattern from Dog Under My Desk on Pinterest. I had all the necessary supplies already in my stash, so this project was definitely budget friendly! If you don't already have what you need, I would say this can easily come in under $5.00 a pouch. Still well within my Tinkerbell Treasure limit. And wouldn't it be so cute for all your pressed pennies? Of course the author of the pattern, Erin, suggests using it as a housing for your earbuds. I also love this idea. Keeping those things from tangling with everything else in my bag is forever my mission! And a great solution for the kids! Especially since this isn't too girly - Doc would even use it.

I tried using different circle shapes for the ears, and in the end, went with this: 


As I mentioned before, I would probably choose to go with bigger circles next time. It's always a bit tricky sewing around circles, but over all, I was still pleased with the way this pouch turned out. It will definitely get used! And I can imagine an endless stream of variations for the fabrics and for making it fit different Disney characters.

Until next time, may all your days be filled with fairy dust!

Saturday, May 10, 2014

Sitting With Grandmother Willow | Dodie of Designs by Dodie

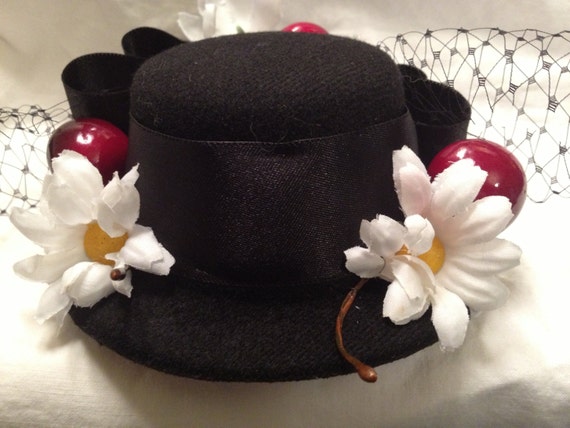
As part of our on-going series, Sitting with Grandmother Willow, I am happy to introduce Dodie of Designs by Dodie, an Etsy shop. My favorite item in her shop may be this fabulous Mary Poppins inspired fascinator! But there is so much more to see, including zipper pulls, wine charms and even those Disney park map coasters!

This series of blog posts highlights artists and bloggers of all stripes with one thing in common: a passion for Disney! I hope you will enjoy getting to know Dodie as much as I have. A big thanks to her for taking the time to interview with us! And be sure to visit her blog and her Etsy shop for a wonderful selection of Disney themed goodies!

Disney by the numbers (with apologies to Harpers):


# of trips you have made: approximately 30
Date of first trip: 1974 – with my parents when I was 13 – when it was just the Magic Kingdom. I remember seeing a band play near Tomorrowland. They were dressed in sparkly white jumpsuits and played “dance music.” I loved them, so I remembered their name later when they actually became a hit – KC and the Sunshine Band. I also remember my dad rationing out those E-Tickets.
Date of next trip: A girls weekend March 6th!
# of Resorts stayed in: I actually just figured this out recently! I’ve stayed in 14 of the resorts!
Usual # in your travel party: My husband (Phillip) and I! He’d never been when we stayed in what was then Dixie Landings on our honeymoon. We bought Disney Vacation Club and haven’t looked back – making far over 20 trips in the past 20 years. That said, we have a group of great friends from all over the country who are Disney fans as well (met online several years ago). We often travel with them or schedule our trips for the same time so we’re there together. I sometimes take girls’ trips down with a group of the gals from that group also! (I have more vacation time than my husband does and I have an Annual Pass!)
Pairs of mouse ears in your cottage: Tons! Maybe 10 pair? I have some Minnie Mouse ears on a headband that I wear typically. A friend in our group makes special themed bows for them, so we can be unique while we’re at the parks!

WDW or Disneyland (or other)? Both, but mostly Walt Disney World. We’ve been to Disneyland twice and plan to go back in December of this year.

How do you usually travel to Disney? We fly from Indy to Orlando.

Do you have any tips for trips? Take your time. Enjoy being in the "magic bubble" away from the real world. Don't overschedule yourself.

Do you have a favorite place to eat while in Disney? My favorite restaurant is Narcoosee's. Yum!

What is your absolute DON'T MISS attraction? Phillip and I are HUGE Haunted Mansion fans!
Stage shows, yes or no? Hardly ever.
Parades, yes or no? Usually not – we take advantage of that time to grab attractions with shorter wait times
Best Fast Pass to get: Soarin’
Favorite park: Phillip’s is the Magic Kingdom, but mine is EPCOT

One piece of advice you'd give a novice about WDW/DL: You absolutely cannot see or do it all on your first trip, no matter how long you stay. Do your homework and cover your top priorities. Once you go, you’ll go back again anyway. Trust me.

How do you create extra magic for your family: I still look at park hours beforehand and make some sort of schedule, even if it’s just which park(s) we’ll visit on which days. That allows for extra magic because there isn’t a lot of “what do you want to do today?” “where are we going this morning?” discussion. We make magic as soon as we arrive!

How did you come to this time and place on Etsy?
I was a passenger in an automobile accident last May. A girlfriend and I were actually on our way to the airport for a girls' trip (where we were meeting 14 other gals and staying in one of the Treehouses and at Saratoga Springs in some studios) when a box truck ran a red light and totalled her car, injuring both of us enough to earn us a trip to the ER instead of a trip to the airport.

We easily could have both been killed. The wreck was that bad. It was quite an awakening for me. I had an epiphany. I wasn't balancing my work life with the artistic and crafty yearnings I have always had. I needed to do something that made me happy. What was I waiting for?

I opened my Etsy shop in June of last year and haven't looked back. Because one's art reflects themself, Disney-inspired items gradually became a primary theme for my store - so much so that I devoted a whole section to those items.

How can we connect with you?
www.Etsy.com/shop/DesignsbyDodie (Check out the Disney-Inspired section!)
www.pinterest.com/dodie_sheffield/designs-by-dodie-on-etsycom/
www.Facebook.com/DesignsbyDodie