If you've been following this blog then you know I do a lot of sock knitting. A lot. This means that I have a lot of leftover sock yarn. It's not enough that I could make another pair of socks, but it's enough that I feel bad trowing it out.
When I ran across this pattern for a sock yarn scrap scarf, I knew I was going to knit it. And I was inspired by Sally, from The Nightmare Before Christmas to just go ahead and mash up those patterns. I decided not to care if it was coordinated. I just knit until in needed to switch out colors.
I love it when a plan like that comes together! It was simple, mindless knitting that took no time at all to whip up. And it's so warm! I love it. And if last winter is an sort of predictor, I'll have lots of chances to wear it!
As usual, all the details for the scarf, including the pattern are on my Ravelry page. Feel free to browse around. And until next time, may all your days be filled with fairy dust!
Tuesday, September 30, 2014
Saturday, September 27, 2014
DIY Hair Rescue Spray for Disney's Small World Dolls
Let me start by saying, If you are a collector of these It's A Small World Dolls, I am sorry. You should look away now. We intended for our doll to be played with and that most certainly happens on a regular basis. Meena is one of our favorite toys (even if she doesn't know when to stop singing).
Having said that, you should also know that I am new at this whole mothering a daughter thing. I have lots of practice raising boys; I'm used to the odd lego mishap or the small cars in strange places routine. But I had no idea this doll ordeal could include this sort of bird's nest hair! I mean really, what causes that?? I don't actually want to know. It's just simply terrifying.
This little DIY may be old hat to those of you who've been dealing with "girl stuff" for a while now. I, however, thought this was the most brilliant save for a matted mess of Disney Doll hair! Pinterest to the rescue again!
This was easy. Combine 2 -3 Tbsp. of fabric softener to a small spray bottle of water. Swish to combine and apply liberally to the hair of your doll. After that it's divide and conquer. Take a comb and gently work the solution through the doll hair. It worked like a dream. I'm glad to know this now. I can only imagine the number of Disney dolls we are going to have around here! Until next time, may all your days be filled with fairy dust!
Having said that, you should also know that I am new at this whole mothering a daughter thing. I have lots of practice raising boys; I'm used to the odd lego mishap or the small cars in strange places routine. But I had no idea this doll ordeal could include this sort of bird's nest hair! I mean really, what causes that?? I don't actually want to know. It's just simply terrifying.
This little DIY may be old hat to those of you who've been dealing with "girl stuff" for a while now. I, however, thought this was the most brilliant save for a matted mess of Disney Doll hair! Pinterest to the rescue again!
This was easy. Combine 2 -3 Tbsp. of fabric softener to a small spray bottle of water. Swish to combine and apply liberally to the hair of your doll. After that it's divide and conquer. Take a comb and gently work the solution through the doll hair. It worked like a dream. I'm glad to know this now. I can only imagine the number of Disney dolls we are going to have around here! Until next time, may all your days be filled with fairy dust!
Thursday, September 25, 2014
Disney's Frozen DIY Sundress
This Olaf-themed Pinwheel Sundress is just the thing our Minnie needs for our fall trip to Walt Disney World!Honestly, there are just so many things about this sundress that make me happy!
First, the fabric is so much fun. It's all Olaf and summer postcards and bringing back summer! It is currently being sold at JoAnn's, both in the store and online (at least at the time of this writing). It's a cotton poly blend, but it works because it's so kitschy! It was a bit slippery to sew, but using some spray starch to keep the folds in place made a huge difference!
If you missed the post of Little Chef's Hawaiian shirt made from the same fabric, be sure to catch it. The style of this dress is the perfect thing for a hot Disney theme park day. And it will definitely be worn (along with Little Chef's shirt) the day we meet Anna and Elsa! I can't wait!
The second thing about this dress that makes me happy, is that it's an Oliver + S pattern and I have been dying to try one for the longest time! I think they are so adorable, classic yet modern, but they seem really intimidating. I think that's because they are so classic (which usually means tailoring). But let me assure you this Pinwheel Dress was NOT HARD to make. The pattern only called for one technique I had never tried and the entire thing was explained step by step in the directions. It was super easy to follow and so fun to make!
Lastly, I love the fact that Minnie can be rough and tumble in this dress. It doesn't hinder her play at all but still looks adorable. It can play with Pooh and still be royal enough to meet a queen. It's perfect. I'd love to know what toddler patterns you are sewing right now.
Until next time, may all your days be filled with fairy dust!
First, the fabric is so much fun. It's all Olaf and summer postcards and bringing back summer! It is currently being sold at JoAnn's, both in the store and online (at least at the time of this writing). It's a cotton poly blend, but it works because it's so kitschy! It was a bit slippery to sew, but using some spray starch to keep the folds in place made a huge difference!
If you missed the post of Little Chef's Hawaiian shirt made from the same fabric, be sure to catch it. The style of this dress is the perfect thing for a hot Disney theme park day. And it will definitely be worn (along with Little Chef's shirt) the day we meet Anna and Elsa! I can't wait!
The second thing about this dress that makes me happy, is that it's an Oliver + S pattern and I have been dying to try one for the longest time! I think they are so adorable, classic yet modern, but they seem really intimidating. I think that's because they are so classic (which usually means tailoring). But let me assure you this Pinwheel Dress was NOT HARD to make. The pattern only called for one technique I had never tried and the entire thing was explained step by step in the directions. It was super easy to follow and so fun to make!Lastly, I love the fact that Minnie can be rough and tumble in this dress. It doesn't hinder her play at all but still looks adorable. It can play with Pooh and still be royal enough to meet a queen. It's perfect. I'd love to know what toddler patterns you are sewing right now.
Until next time, may all your days be filled with fairy dust!
Tuesday, September 23, 2014
From Belle's Library | The Pixar Touch
Growing up Disney has had it's advantages for sure. I had the opportunity to watch the Disney company (& family of companies) grow. To that end however, it feels like I have an idea of how things went down, but no real information. For instance, I remember the coup that put Micheal Eisner on the board at Disney and then the campaign to remove him, but the details are fuzzy at best.
If you have any interest in the story of Pixar, how it cam to be, how Steve Jobs came to own it, and how it eventually came to a happy partnership with Disney, I would highly recommend reading The Pixar Touch, by David A. Price. It's a thorough history of the startup from the very beginnings in a garage through the production and release of Ratatouille.
It was a great way to learn about John Lassiter and his rocky start with Disney, his passion for story telling and his commitment to the best of what computer animation had to offer. It was also interesting to read the perspective on Steve Jobs and how his investment in the company was the only thing that got them through some very lean years. And of course I loved hearing about the creative process that brought about Toy Story, Bugs Life, Toy Story 2, Monsters Inc., Finding Nemo, The Incredibles, Cars and Ratatouille. Lastly, I really loved reading about the political intrigue with Michael Eisner (for whom I still have a bad taste in my mouth), Roy Disney and the board of the Disney company.
This is definitely a book for the Disney-phile. I enjoyed reading about this wing of Disney history. Until next time, may all your days be filled with fairy dust!
If you have any interest in the story of Pixar, how it cam to be, how Steve Jobs came to own it, and how it eventually came to a happy partnership with Disney, I would highly recommend reading The Pixar Touch, by David A. Price. It's a thorough history of the startup from the very beginnings in a garage through the production and release of Ratatouille.
It was a great way to learn about John Lassiter and his rocky start with Disney, his passion for story telling and his commitment to the best of what computer animation had to offer. It was also interesting to read the perspective on Steve Jobs and how his investment in the company was the only thing that got them through some very lean years. And of course I loved hearing about the creative process that brought about Toy Story, Bugs Life, Toy Story 2, Monsters Inc., Finding Nemo, The Incredibles, Cars and Ratatouille. Lastly, I really loved reading about the political intrigue with Michael Eisner (for whom I still have a bad taste in my mouth), Roy Disney and the board of the Disney company.
This is definitely a book for the Disney-phile. I enjoyed reading about this wing of Disney history. Until next time, may all your days be filled with fairy dust!
Saturday, September 20, 2014
I'm Gone To Disney!
I'm touring the World and gathering ideas for my next blog post! Enjoy the weekend. I'll be back on Tuesday with another Disney book review for you! Until next time, may all your days be filled with fairy dust!
Thursday, September 18, 2014
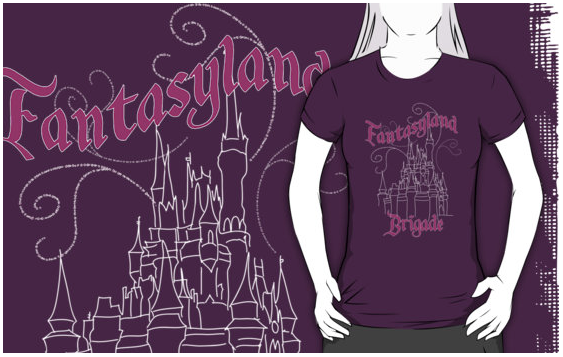
New Fantasyland Brigade Products now Available on Redbubble
I am so excited to announce the release of this new Fantasyland Brigade RedBubble design! This design comes in adult and kid size t-shirts as well as throw pillows, tote bags, iPod & iPad cases and phone cases!! The tote bag would be perfect for all the necessary "ish" I wind up carrying to the parks.
Not only do I absolutely adore the design of this shirt, but it's a Tinkerbell Treasure for a surprise girls trip that is happening TODAY! Flora and I are taking some of our favorite girls to Walt Disney World this weekend to celebrate our birthdays! So if you happen to see us in these amazing t-shirts, make sure you stop us and say hello! We will be tearing it up in Fantasyland, among other things! Oh, and you can stalk my IG feed to live vicariously through us if you can't get away just now. And be sure you hop on over to RedBubble and check out all my other Disney related designs.
Until next time, may all your days be filled with fairy dust!
Not only do I absolutely adore the design of this shirt, but it's a Tinkerbell Treasure for a surprise girls trip that is happening TODAY! Flora and I are taking some of our favorite girls to Walt Disney World this weekend to celebrate our birthdays! So if you happen to see us in these amazing t-shirts, make sure you stop us and say hello! We will be tearing it up in Fantasyland, among other things! Oh, and you can stalk my IG feed to live vicariously through us if you can't get away just now. And be sure you hop on over to RedBubble and check out all my other Disney related designs.
Until next time, may all your days be filled with fairy dust!
Tuesday, September 16, 2014
Scrapbooking Disney | Project Mouse Frontier Bundle
So these layouts are NOT of Walt Disney World, I realize, but I did use an amazing new kit from Project Mouse and I wanted to share with you all how versatile it is!
We live in the Indianapolis area, and one of our favorite local treasure is the Eiteljorg Museum. If you ever have the opportunity to visit, I highly recommend it. They are very family friendly, as you can see, but they also have amazing displays of all things Native American and specifically items and artwork from the Southwest. We are lucky to have such a unique place in the midwest!
That said, it was hard for me to find scrapbooking elements that were not cartoony for the scrapbook. I was so excited when Britt-ish Designs and Sahlin Studios released this kit! I knew we would use it for our Walt Disney World pages - Doc is quite the sharpshooter at the Shootin' Arcade! But I also knew it would be well used for our Eiteljorg layouts as well.You can get all the information on the new Project Mouse Frontier Bundle here. As my regular readers will know, I am a huge fan of Project Mouse!
Until next time, may all your days be filled with fairy dust!
Saturday, September 13, 2014
Kungaloosh! DIY Vintage Disney Cocktail Recipe
I remember when Pleasure Island and Downtown Disney opened in the late 80s. I was so excited to finally be old enough to drink and experience this other side of Disney.
For the most part, being the introverted and shy person I am, I was disappointed. It just was never going to be my scene. Except for one place: The Adventurer's Club. That, my friends, was Disney for adults. A bar with a crazy fun theme, awesome walk-around actors, and a drinking song!
Here's a bit from Wikipedia for those of you who never had the opportunity to be there:
It was styled after a private club for world travelers and explorers and was set in 1937. The walls of the club were covered with artifacts and photographs from various explorations. The Adventurers Club featured animatronics, puppets, and a cast of adventurers who performed in shows and improvisational comedy while mingling with the club's patrons. Shows and conversation were often laced with innuendo, and the patrons might have been welcomed as guests, given fictitious names and "recognized" as fellow adventurers, or simply referred to as "drunks".
There was also a house drink, the Kungaloosh, that was all part of membership ceremony schtick. Every night, new members were inducted into the Adventurers Club by way of singing the song, saying the pledge and toasting with this drink shouting, "Kungaloosh!" If you ask for it today at Walt Disney World, you will get a completely different drink. But thanks to Deb at AllEars.net, I have the vintage recipe here for you!
Old Kungaloosh Recipe -- Circa 1997
1 1/4 ounce vodka
1 1/4 ounce Malibu Rum
3/4 ounce Midori (melon liqueur)
2 tablespoons pineapple juice
1 splash cranberry juice
Mix well.
For the most part, being the introverted and shy person I am, I was disappointed. It just was never going to be my scene. Except for one place: The Adventurer's Club. That, my friends, was Disney for adults. A bar with a crazy fun theme, awesome walk-around actors, and a drinking song!
Here's a bit from Wikipedia for those of you who never had the opportunity to be there:
It was styled after a private club for world travelers and explorers and was set in 1937. The walls of the club were covered with artifacts and photographs from various explorations. The Adventurers Club featured animatronics, puppets, and a cast of adventurers who performed in shows and improvisational comedy while mingling with the club's patrons. Shows and conversation were often laced with innuendo, and the patrons might have been welcomed as guests, given fictitious names and "recognized" as fellow adventurers, or simply referred to as "drunks".
There was also a house drink, the Kungaloosh, that was all part of membership ceremony schtick. Every night, new members were inducted into the Adventurers Club by way of singing the song, saying the pledge and toasting with this drink shouting, "Kungaloosh!" If you ask for it today at Walt Disney World, you will get a completely different drink. But thanks to Deb at AllEars.net, I have the vintage recipe here for you!
Old Kungaloosh Recipe -- Circa 1997
1 1/4 ounce vodka
1 1/4 ounce Malibu Rum
3/4 ounce Midori (melon liqueur)
2 tablespoons pineapple juice
1 splash cranberry juice
Mix well.
Enjoy this one and remember to toast with "kungaloosh!" Until next time, may all your days be filled with fairy dust.
Thursday, September 11, 2014
It's A Small World Kid's Room | Easy DIY Throw Pillow
Our Small World Room is absolutely one of my favorite places in the cottage. I fully intend to make it mine one day! But for now, it belongs to the littlest people in the cottage and they love playing in there too. But apparently the chair needed a pillow, because the littles kept bringing throw pillows from all over the house and putting them in their chair! Seemed to me like the perfect time for a little It's A Small World project!
This throw pillow project was very simple and easy. I know I say that a lot, but it went together exactly as I had imagined it would. That's perfect! Those of you in the straight line sewing club could easily accomplish this during nap time! We had a very beat-up old throw pillow in need of repurposing, so I took the old cover off and threw it away. I washed the insert to start fresh and then measured it to get the correct dimensions for the front of the pillow cover. I added 1/2" to all sides for seam allowances.
Note: If you want a tighter fitting cover, don't add length for seam allowances. My cover is much looser than I expected it to be, but the pillow insert comes out easily, and for me, that was a must.For the back of the pillow cover I wanted two overlapping flaps, so I could get the cover off to wash it as necessary. We do DAILY loads of laundry here in the cottage! So I cut two pieces for the back of the pillow making sure they overlapped at least 3 inches, including seam allowances.
I finished the edges of the overlapping sides by folding the edge over 1/4", pressing it, folding over another 1/4", pressing again, and sewing the edge down with a straight stitch. After the overlapping edges were finished, I pinned all three pieces together, right sides facing and sewed them all around the outsides. I trimmed the corners, turned the cover right side out and put in the insert! It was really that simple.
If you are curious about the fabric, I found it through Etsy. It's called Smiles Of The World by Alexander Henry (2006). I'm fairly certain it's out of print, but you could still find it through Etsy as of the writing of this post. It is a perfect fit for our It's A Small World decor even though it's not officially Disney fabric! I used approximately 1/2 a yard for this project.Until next time, may all your days be filled with fairy dust!
Subscribe to:
Posts (Atom)