Showing posts with label Disney Parks. Show all posts

Friday, February 24, 2017

Celebrate Flag Day with Margaritas!

Hello readers! Did you know it's flag day in Mexico today? I think a little margarita celebration is in order, don't you? Let's take a look back at one of my favorite Cinco de Mayo posts ever!


In honor of Cinco de Mayo, we decided to do our own Disney Margarita Tour. If you are a margarita fan, you will no doubt know that La Cava del Tequila is THE place to go for some of the best and most inventive margaritas on property. But it's not the ONLY place. We chose to recreate some new and some vintage recipes to celebrate Cinco de Mayo with some of the the old crew. What a blast!

And special thanks to the hubs for the incredible food!

Here are the recipes we tried. We salted all of our glasses with pink Himalayan salt. Enjoy them! And until next time, may all your days be filled with fairy dust!

Sun-Kissed Margarita
From Mickey's Gourmet Cookbook
(Outer Rim, Contemporary - which is no longer there)

Lemon Rind
Kosher salt
1.5 oz 80 percent oak-aged tequila
3/4 oz brandy-based orange liqueur
3/4 orange liqueur
4 oz sour mix
crushed ice
lime wheel
1 oz orange juice

Rub the rim of the cocktail glass with lemon rind & dip into kosher salt. Combine tequila, liqueurs & sour mix in a shaker filled with ice. Shake well and strain into salt-rimmed cocktail glass. Top with orange juice. Garnish with lime wheel.

Seven Seas Sunset -- same as above, but substitute cranberry juice for the orange juice.


Avocado Margarita 

La cava del Tequila - Epcot's Mexico Pavillion
(recipe from Disney Food Blog)

1/2 ripe Haas avocado
2 oz white 100% agave Tequila
1 oz Midori melon liquor
juice of one lime
1 oz. Agave syrup
Ice

Blend all ingredients in a blender until very smooth and creamy. Serve in salt rimmed glass. (use Hibiscus salt if you can. Look for it at the market next time you're in the Mexico pavilion in Epcot!)

Habanero Lime Margarita
available at any resort lounge
(Recipe from Party Through The Parks)

1 part Patron Silver tequila
3 parts Mr. & Mrs. T's sweet & sour
pour ingrédients over ice and add a good drizzle of Monin habanero lime syrup and the juice from half a lime


Agave Nectar Margarita
available at any resort lounge
(from Party Through The Parks)

1 part Tierras Organic Blanco tequila
3 parts simple syrup made with agave nectar (50% agave/50% water)
Pour ingrédients over ice and add the juice from 1/2 a lime


Jalapeño Margarita Recipe
(Cava del Tequila - Mexico pavilion, Epcot)

1/4 fresh cucumber (peeled and seeded and then cut into 1.5" pieces)
2" piece green bell pepper (seeded)
1/2 of 1 small jalapeño (seeded and cut into 1.5" pieces)
1 shot Silver tequila
Fresh lime juice
Triple Sec - orange flavor
Simple Syrup / agave nectar

Method: place fruit in the bottom of your glass and muddle to release some of the juices. Don't go crazy here, muddling shouldn't create a mush of fruit, just sufficiently bruise them. Top off the glass with ice and add 2 parts tequila, 1 part triple sec, 2 parts lime juice, 1 part simple syrup made with agave nectar. Shake and serve in a Himalayan salt rimmed glass.


Thursday, September 15, 2016

The Chapeau | DIY Sleeping Beauty's Fairy Merryweather's Hat

In honor of Felt Hat Day (which is today for those of you unawares), I am rerunning this post about making my favorite fairy's fascinator! I hope you enjoy it!

I am in love with the hat shop on Main Street USA: The Chapeau. It's the place to find any hat your heart desires; as long as Disney makes it! I realize there are those who would never be caught dead in a Disney hat, and those of us who think they are AWESOME. If you fit into that latter category, then this post is for you!

I have an affinity with Merryweather, naturally, but she's not the easiest character to find in the parks. And neither is a Merryweather themed hat. So I put my DIY skills to use and created my very own Merryweather fascinator. This is my very first foray into the world of millinery, so I did a little research on hat making via YouTube. Just search for "how to make a fascinator" and you'll get plenty of videos to choose from! If you too are new to the hat making world, you'll want to become familiar with a product called sinamay. It's what the structure of the hat is made from. It helps it hold it's shape and gives it the body you need for it to stand up on it's own. The link will take you to several resources for purchasing sinamay.

I first created a pattern using scrapbooking paper (as it was large enough to experiment with, and I have TONS of it), a compass, and scotch tape. Once I had my basic shape together (which took several tries), I took it all apart and cut the pieces from the sinamay. I used a double layer of sinamay because I wasn't sure a single layer would hold the shape as well as I wanted it to. After all, that hat had to make it all the way to Florida without getting crushed!

After I had the sinamay cut out, I cut out felt about a 1/4" larger than the sinamay and machine stitched it to the sinamay. I then shaped the hat into it's 3-dimentional form and pinned it together. I hand sewed the hat together trying to hide my stitches where I could. Once it was together I realized it needed the organza on it to really make it work. What a difference that made! It went from ok, to cool. The devil is always in the details!

My hair is quite fine, so a comb was not going to work for me to wear this all day in the park. I decided to attach it to a thin, ribbon-covered headband I found at JoAnn's. It worked like a dream! The headband is small enough that it doesn't fight with my glasses for room behind my ears, is fairly well hidden in my hair, and comfortable enough to wear all day. For a first project, I couldn't be happier! I'd love to see any hats you may have altered or made for your trips to the Happiest Place On Earth.

Until next time, may all your days be filled with fairy dust!


Saturday, September 10, 2016

Another Great DIY Disney Luggage Tag!

Thursday's post has inspired me to create another cute DIY felt luggage tag for our family's upcoming Fall Break Trip!

I give you Donald Duck. I was a little worried about sewing around a shape with a lot more definition than the simple three circles of the Mickey head in the last post. But it was not as difficult as I first thought. As long as I went slow it was fine! Here's the trick, I like to make the stitches in the zig-zag closer together. So if your machine can shorten the distance between stitches, I would recommend it. It looks a bit more uniform in the end. I also love how the yellow felt pops on the blue background. You will DEFINITELY be able to spot your luggage on that carousel!

If you want the full description on the how-to, check out my original post DIY Disney Felt Luggage Tags. Until next time, may all your days be filled with fairy dust!

Thursday, September 8, 2016

DIY Disney Felt Luggage Tags

Are you headed to a Disney Destination for Fall Break this year? If so, this is the perfect little project to get you in the Disney spirit!

You know how excited you are to get to Disney, and then you get to the airport and everyone's bag looks pretty much the same? Even with those snazzy Disney luggage tags they send you, your bag still looks like everyone else's, because they got the same tags you did!

September is National Sewing Month and as such, I thought it would be fun to share this easy Disney luggage tag. You can make it in any color your choose, but it will make your bag stand out as your own. That's a particularly good thing when you have antsy, anxious children pulling your pant leg, ready to get to Disney!

You could hand stitch this project or machine stitch it. I chose to use the machine simply for the sake of time. I was able to whip this up in half an hour. That's well within our nap-time window here at the cottage!

I first did a Google search for a Mickey Mouse silhouette, printed it, and used it as a template for this tag. I then cut out my Mickey from black felt, used it to determine the size for the background and cut out two rectangles of felt. (I chose yellow for the other side of this tag because that's what I had, but get creative and let your tag be entirely yours.)

I then took the red felt, pinned the Mickey silhouette to that and used a zigzag stitch to appliqué it to the background. I then pinned the yellow felt to the back of the red felt and used the overlock stitch to sew them together. You could also play around with the decorative stitches on your machine for sewing the two rectangles together. I love using felt for this project, because even if you use a strait stitch to finish this project, your edges will look good.

I'd love to get several of these together for our next trip, each one themed to our favorite characters. Until next time, may all your days be filled with fairy dust!

Tuesday, July 19, 2016

DIY Disney Dinner | Catfish and Grits from the Coral Reef

I think one of the best kept secrets for Disney Dining is the Coral Reef at Epcot's Living Seas. If you have never taken the opportunity to dine there and you even remotely like seafood, you are missing out! Book an ADR for your next trip. You'll be glad you did. Not only is the menu outstanding, the atmosphere is complete unique from any other restaurant on property. Where else can you dine inside a living coral reef? And they even give you souvenir guides so you know what fishes you are looking at. (Don't forget to spot that hidden Mickey on the ocean floor!)

This recipe is from Magical Recipes, a truly great resource for Disney recipes from around the "World." If you are looking for something specific, I would search there first. Although I'd stay away from the Crystal Palace Lemon Bars. Just saying.

Mr. Photos from the Parks is an amazing chef and his spin on this recipe was simply delicious. Although I'm not sure I would recommend this wine for this meal, as we both felt it was more like a Pinot Grigio than a Chardonnay; we would go with Francis Coppola's Diamond Collection Chardonnay instead. It's one of my standbys. (And if you even get the chance to visit that winery I HIGHLY recommend it!)

Until next time, may all your days be filled with fairy dust!

Tuesday, July 5, 2016

DIY Disney Travel Game

When I saw this idea on Pinterest, I knew I wanted to recreate it using the Disney ephemera I had collected over the years. I tend to be a pack rat - every now and again, this winds up being a good thing. It's nice when that happens! If you are a pack rat too, then this project is free to create. I know I love a budget friendly DIY.
I had an old sturdy tube from some Silhouette stencil vinyl that was just right for this project, perfect for outlining the shapes of some old Disney stickers I had lying around. (I believe these are from the 90s - when I was still paper scrapbooking. Disney had a terrific scrapbooking store back then; I'm not sure if it's still around today.) If you don't have any stickers, they are very easily obtained from the Dollar Store, or a craft store. And they are usually fairly inexpensive, especially if you have a coupon.

The idea here is simple. I removed the outer edge of the sticker paper, leaving the actual stickers on the page. Then I used the "blanks" as a stencil to trace the shapes of the stickers onto the paper tube. I used a fat Sharpie to trace them and then a fine point Sharpie to label the shapes. (I have a bit of a pen addiction as well. I love my Sharpies!) Happy isn't quite able to read yet, and I wanted Poppins or Doc to be able to help him if I wasn't available.  So now there are several Disney shapes and characters to match to the shapes on the tube. I figure this could last him a good 20 minutes if he takes to it! Stickers are generally a favorite for him. For our family, the trick is finding new and different things to keep the little ones occupied on our drive. It's a LONG way to Orlando from our cottage in the midwest! I'll let you know if this works for us. And if you try it, let us know how it worked for you!

Until next time, may all your days be filled with fairy dust!

Thursday, June 23, 2016

DIY Disney Mickey Mouse Sippy Cup Leash

Mickey Mouse Sippy Cup Leash
This is one of those things that makes a huge difference with little effort. The last time we were in Walt Disney World, our 2-year-old loved throwing his sippy cup down when he was done with it. Chasing those rolling cups in the parks was not fun, and not a thought I relished doing again. But never fear, Make It & Love It has a tutorial that will save the day! I love that this little sippy cup leash is extremely lightweight and won't take up any extra room in the storage compartment when you are done with it. So, so smart.

This tutorial is so easy that I was able to bang it out in less than 20 minutes. THAT'S a project I can love! I scored this ribbon at Walmart, prepackaged in 3 yard increments. Unfortunately, I don't remember the cost, but I'd be surprised if it was more than $5.00. I've since seen it at JoAnn's too. I've also had luck with Etsy and Ebay for deals on Disney ribbon, some really rare, some not so much. Shop around; I assure you, you'll find more than you bargained for!

I already had my elastic on hand, so this project was well under $5.00. I consider that a great deal! You could use this in the car on a road trip as well as on the stroller or backpack in the parks. We've tried it on a number of different sippy cups, and all of them seem to work well. These Nuby ones are Happy's favorites, so I made sure it would hold these easily. We'll be taking several with us again this October! If you see our decked out stroller, stop and say hi! We love to hear from our readers.

Until next time, may all your days be filled with fairy dust!

Tuesday, June 21, 2016

DIY Disney Stroller Cup Holder

Who doesn't need another water bottle holder at Disney? I know we never seem to have enough places to store everything when we are in the parks, and I love the idea of having the stroller do most of the work for us. This is one solution I just had to try.

I used this tutorial from Sew Can Do to create my cup holder. I love that it's large enough to hold my aluminum water bottle and this combo snack/sipper cup I found through Zulily!

I did tweak this pattern a bit. Instead of using oil cloth, I used quilting cotton. To give it a little more heft, I inserted a piece of scrap canvas (you could use a bit of denim from an old pair of jeans as well) between the two sides, and one in the bottom; and I used pellon interfacing on all the cotton pieces. Pellon is an iron-on interfacing and I use it for a LOT of sewing projects. If you can't find it in your local fabric shop, ask at the cutting desk. They will know exactly what you are looking for. I loved the stiffness and absorbency of the fabric when it was all done. I hate sweaty drinking glasses and bottles.

I also made an extension piece for our stroller handlebar. I thought about making the entire piece bigger, but I like the idea of having the size option. The only caveat to that is with the extension, the holder swung around a bit, and Mr. Photos From The Parks says it hits him in the navel whenever he uses the stroller. I'm a bit shorter and it doesn't seem to do that for me. You may want to make some adjustments according to your own stature.

A note about water in Disney:
I think the water in Disney (well, in Orlando) is a bit skunky. I am usually a fan of filling my own water bottle at the drinking fountain wherever we are - or at least out of the tap. But in Disney, that just won't cut it for me. I need the filtered water to get the odd smell out. If you are opposed to paying "Disney prices" for water, there is another solution. Almost every Disney Resort room has a mini fridge. Stop and get a case of water before you arrive on property. This is obviously easy if you drive, but even if you fly (as we often do), it's not as complicated as it might seem. Tiffany Towncar - a company we HIGHLY recommend - will make a 30 min. grocery stop as part of their ground transportation service. If you would rather take the Magical Express, you can always have Garden Grocer deliver groceries right to your room. In either case, you have water at your disposal and much cheaper than if you would buy it in the parks.

Tuesday, June 14, 2016

Flag Day DIY inspired by Disney's Animal Kingdom


DIY Tibetan Prayer Flags Inspired by Disney's Animal Kingdom
Flag Day is intended as a celebration of the adoption of the American Flag - it is always celebrated on June 14th. As it happens, the US Army's "birthday" is also on this day. If you are interested in more history on Flag Day, you can check out this Wikipedia article. But for Flag Day this year, I decided to take a more non-traditional track.

I have always loved the themeing in the Animal Kingdom of Walt Disney World. Even as a new park (when it was not very fun for our family - and SUPER hot) the themed areas seemed superior to much of the rest of the Disney Resort. I have especially become a fan of the Tibetan prayer flags near Expedition Everest. I've always been a spiritual person, and drawn to these flags and their purpose wherever I see them. They are meant to be torn and impermanent items. If you want a little more information about them, you should check out The Peace Flag Project. I think they are just beautiful. So when I found this tutorial for making miniature prayer flags from Small World Land, I knew I had found a project for me.

For this project, I used the printable document supplied in the tutorial. I sized it to 150% and printed it directly only my fabric. If you've never printed on fabric, it's a very simple process. I used these instructions from Instructables. I didn't have any freezer paper, so I used Silhouette's Sewable Heat Transfer Fabric Interfacing. I'm glad I did. I was able to print on it with no problems. I was even able to iron two small strips of flags together to make them double sided. I then just cut them apart and strung them on button-hole thread. (It's thicker thread than what you usually sew with.) And I love the result! I have my own little string of prayers hanging in my studio. They are a lovely reminder of the prayers I wish to offer up to the universe.

Until next time, may all your days be filled with fairy dust!

Tuesday, June 7, 2016

DIY Disney Map Coasters

 Perhaps you've seen this lovely tutorial on Pinterest. I've been eyeing it for a while and finally tackled it. I love the way these coasters turned out and the best part is they cost under $1.00 each to make! These would be a great gift to make for your fellow Disney geeks.

Of course, Jimminy Cricket would also be pleased that we are upcycling more of those park maps we all bring home as souvenirs.

I followed this tutorial with a few minor adjustments. I like to use Golden's Gel Medium instead of Mod Podge. It's more expensive, but I like the way it dries better. And I've been using it for years, so my comfort level is there. This also meant I had it on hand and didn't have the mod podge. One additional benefit to using the Gel Medium, it can handle hot liquids within a couple of days. No need to wait a month!

I applied one coat of Gel Medium to the top of the naked tile and adhered the cut out map piece to it. Try to smooth it out really well. The slick nature of the map makes it want to bubble up. You could use a credit card or bone folder - gently! - to get all the bubbles out. I let that dry. Then I came back and applied two more thin coats of Gel Medium, letting each tile dry thoroughly between coats. I made sure to brush the Gel all around the edges of the paper, making sure it was not going to peel up.

And instead of using rubber cement for adhering the felt, I used a spray adhesive. (If you are ever in doubt as to which glue to use, This To That is a fantastic resource!) I used an old box as my "spray zone" so as not to make my whole work space tacky. And that's it! My total cost for this project was $3.00 for the tile. Now THAT'S a bargain! If you try this project be sure to send us a photo; until next time, may all your days be filled with fairy dust!

Tuesday, May 24, 2016

DIY Disney Pressed Penny Push Pins


I am a self-professed pressed penny enthusiast. I always head to Disney armed with rolls of quarters and pennies. It's a great way to keep the littles busy while we wait for the thrill-seekers to to finish their attractions. I especially love to hit the penny machines in the shops on Sunset Boulevard in Disney's Hollywood Studios. The wait for The Rockin' Roller Coaster and Hollywood Tower of Terror can be LONG. If we didn't get fast passes and we've already finished the Disney Jr. show, this is where I go to keep the kiddos busy. Of course, there are penny machines throughout the entire Disney Resort. Some of the best pressed pennies can be had at some of the less-visited places. A pressed penny hunt can be a great activity for a non-park day.

And what's better than a 51 cent souvenir? This also means, however, that I have quite a collection of pressed pennies. And that I am always looking for something to do with them. It occurred to me that I could glue them to some flat head push pins to create a unique (and useful) souvenir. I LOVE a useful souvenir. I feel better about it taking up space in my house. So these fantastic little beauties were born! I used Gorilla Glue, but I think an epoxy or even Super Glue would do the trick.

So simple and so fun. I think they'd be the perfect stocking stuffer, don't you? Or perhaps a graduation gift? After all, the traditional graduation gift is money, right? Wrap these up in a sweet little box and include a couple of bills in there too. Voila! Thoughtful and easy - my kind of gift! And these certainly fall into the nap time friendly and budget friendly category as well. I just love these little gems. I see many sets in our future!

I hope you have fun making these, and until next time, may all your days be filled with fairy dust!

Thursday, May 19, 2016

Tinkerbell Treasures: Coin Rolls

I saw this idea on pinterest, via Martha Stewart, as a stocking stuffer and thought it would be great for a Tinkerbell Treasure! I love the pressed penny machines in Disney. I think they are a great way to spend your waiting time -- waiting for a dinner reservation, waiting for the taller kiddos to finish their thrill rides, waiting for mom to check out at the shops. I'll buy that kind of patience for 50¢ any day of the week! Plus, there are all sorts of games you can play with the pressed pennies once you've collected a few (more on that in a later post).


For these coin rolls I decided to just wrap them in scrapbook paper scraps, but you could certainly decide to use a solid paper and ribbons that match your child's favorite Disney character, or specifically Disney paper. And I was tempted to skip the cellophane, but it really makes a big difference in keeping the ends of the rolls together and adding a sweet touch. A roll of quarters ($10) and a roll of pennies (50¢) should keep two kids busy for at least a couple of days (that's 10 pressed pennies each), that is, if they don't develop an obsession for collecting pressed pennies!

If you want to make these for the pressed penny lover in your life, I have a downloadable page of tags for you to use. Just click here, or click on the thumbnail below to download. Until next time, may all your days be filled with fairy dust!

Thursday, May 5, 2016

DIY Disney Margarita Tour for Cinco de Mayo!

In honor of Cinco de Mayo, we decided to do our own Disney Margarita Tour. If you are a margarita fan, you will no doubt know that La Cava del Tequila is THE place to go for some of the best and most inventive margaritas on property. But it's not the ONLY place. We chose to recreate some new and some vintage recipes to celebrate Cinco de Mayo with some of the the old crew. What a blast!

And special thanks to Mr. Photos From The Parks for the incredible food!

Here are the recipes we tried. We salted all of our glasses with pink Himalayan salt. Enjoy them! And until next time, may all your days be filled with fairy dust!

Sun-Kissed Margarita
From Mickey's Gourmet Cookbook
(Outer Rim, Contemporary - which is no longer there)

Lemon Rind
Kosher salt
1.5 oz 80 percent oak-aged tequila
3/4 oz brandy-based orange liqueur
3/4 orange liqueur
4 oz sour mix
crushed ice
lime wheel
1 oz orange juice

Rub the rim of the cocktail glass with lemon rind & dip into kosher salt. Combine tequila, liqueurs & sour mix in a shaker filled with ice. Shake well and strain into salt-rimmed cocktail glass. Top with orange juice. Garnish with lime wheel.

Seven Seas Sunset -- same as above, but substitute cranberry juice for the orange juice.


Avocado Margarita 

La cava del Tequila - Epcot's Mexico Pavillion
(recipe from Disney Food Blog)

1/2 ripe Haas avocado
2 oz white 100% agave Tequila
1 oz Midori melon liquor
juice of one lime
1 oz. Agave syrup
Ice

Blend all ingredients in a blender until very smooth and creamy. Serve in salt rimmed glass. (use Hibiscus salt if you can. Look for it at the market next time you're in the Mexico pavilion in Epcot!)

Habanero Lime Margarita
available at any resort lounge
(Recipe from Party Through The Parks)

1 part Patron Silver tequila
3 parts Mr. & Mrs. T's sweet & sour
pour ingrédients over ice and add a good drizzle of Monin habanero lime syrup and the juice from half a lime


Agave Nectar Margarita
available at any resort lounge
(from Party Through The Parks)

1 part Tierras Organic Blanco tequila
3 parts simple syrup made with agave nectar (50% agave/50% water)
Pour ingrédients over ice and add the juice from 1/2 a lime


Jalapeño Margarita Recipe
(Cava del Tequila - Mexico pavilion, Epcot)

1/4 fresh cucumber (peeled and seeded and then cut into 1.5" pieces)
2" piece green bell pepper (seeded)
1/2 of 1 small jalapeño (seeded and cut into 1.5" pieces)
1 shot Silver tequila
Fresh lime juice
Triple Sec - orange flavor
Simple Syrup / agave nectar

Method: place fruit in the bottom of your glass and muddle to release some of the juices. Don't go crazy here, muddling shouldn't create a mush of fruit, just sufficiently bruise them. Top off the glass with ice and add 2 parts tequila, 1 part triple sec, 2 parts lime juice, 1 part simple syrup made with agave nectar. Shake and serve in a Himalayan salt rimmed glass.

Tuesday, April 26, 2016

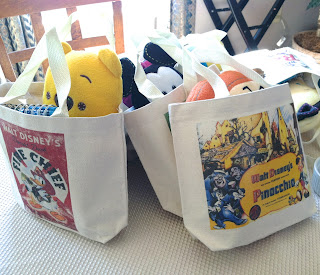
DIY Disney Tote Bags

The links for the posters in this post are no longer available. But you can find some great Disney poster art on the Disney Movie Rewards website under digital rewards. They seem to rotate in and out with some regularity, but if you keep a look out, you can find some very fun and unique stuff in there! And of course you can run an Etsy search to see what else might be out there. Enjoy this rerun of one of my favorite Disney gift ideas!

___________________________________________


Breaking up is hard to do, and it's always hardest when we have to say goodbye to Walt Disney World. We all tend to be tired and cranky, and we usually like to maximize our time there, so we are leaving on the last plane home - our friends like to call it the Disney Express. It's a plane filled with other tired, cranky, bloody stumps of people. I think it's incredibly important to have a little something special for the ride home.


I decided to make these cute little tote bags for each kid for "leaving day." I filled them with homemade Rice Krispie treats, a game to pass the time, and a few other little treats I found along the way. If you have a dining plan with snacks left on it, this is a great way to use them up. Stop by any gift shop and pick up bags of pretzels or other packaged goodies that fit within the plan.

For the tote bags I used Transfer MAGIC's Inkjet Transfer Paper for Light Colored, Light Weight Fabrics. I still got a plasticy finish to the transfer, but on the canvas bags, it was fine. The images are from the same series of vintage Disney poster images through Nukes at Etsy. These are top quality and big, so at a dollar an image, you can't go wrong. I used Photoshop to size and reverse the image for transfer. If you have text on your image, DON'T FORGET TO REVERSE your design before you print!

I found these tote bags fairly inexpensively at Hobby Lobby. I found a 4 pack for $8.00. (If you use your 40% off coupon, they are really a steal!) They are 100% cotton canvas, and the iron-on paper worked beautifully on them. Since I already had the transfer paper they were only $3.00 a bag. That's a price I can live with!

Leaving The Mouse is never easy, but a little goodie bag can help ease the transition home. Until next time, may all your days be filled with fairy dust!


Saturday, April 23, 2016

Disneyland Snickerdoodle Knockoff Recipe

Sometimes it seems like a really long time between visits; that's when a little kitchen magic can really come in handy. I found this Disneyland Main Street Bakery Snickerdoodle knock-off recipe on Pinterest and decided a rainy afternoon was the perfect time for a little Disney pick-me-up. The family was happy to oblige!

It was simple to make them into Mickey heads. Instead of rolling only one ball, I rolled one larger and two smaller balls and laid them out on the cookie sheet as such. I tried not to smash the ears on too much, as they do spread in the oven.

They took a little longer to assemble than regular snickerdoodles would, so I was able to assemble one pan while the other was baking. It was just about the perfect amount of time. Be sure to let the cookies cool just a bit on the pan before moving them to the cooling racks - we lost a couple ears by being impatient! (Although, it was a good excuse for an early taste!) My apprentice chef became quite good at rolling and pressing out the Mickeys.
One small deviation from the recipe - I like a lot of cinnamon sugar on my snickerdoodles, so we employed the Joy of Cooking technique of rolling each ball of cookie dough in a bowl of cinnamon sugar, instead of sprinkling the tops as the original recipe suggests. A personal preference, but worth it, in my humble opinion.

And because someone will ask, the WDW serving tray was one of my parents' first souvenirs. It lived in our motor home until it died and now it comes out whenever we need a little shot of Disney magic! Until next time, may all your days be filled with fairy dust!

Thursday, April 21, 2016

DIY Disney Gift Bag from Upcycled Park Map

Every now and then you need emergency gift wrapping while in Disney: someone in the party reveals it's their birthday, you find the perfect just-because gift, or you remembered the gift and the occasion, but forgot to pack wrapping paper. Whatever the situation, I know I've had need before. Well, here is your solution.

Every park, every resort and many other places around Walt Disney World have free maps available. I always grab two or three when we enter a park because I know my family, and they have a tough time keeping track of theirs. This means I usually come back to the hotel with extras. Even if you don't, just stop by the check-in desk. They always have them. This map is your new gift bag - it just needs to be folded. You may need to stop at guest services and ask if they have a glue stick (or tape) and a ruler you can borrow - or scope out the gift shop. It's Disney. Someone is bound to help a guest in need.

I'll save you the double post and simply direct you over to How About Orange's awesome tutorial on how to make a gift bag from a newspaper. The steps are easy to follow. The only change you will want to make is in the folding dimensions. The Disney maps are a bit bigger than the rectangle she uses. Instead of the sides of the bag measuring 4 1/2", you will want to make them 6 5/8". Everything else is the same.

Viola! You have the perfect wrapping for the perfect Disney gift, and it was upcycled to boot. Wouldn't Jiminy Cricket be proud? Until next time, may all your days be filled with fairy dust.

Thursday, April 14, 2016

DIY Disney Monorail Scavenger Hunt Cards

I've always had a love-affair with the monorail system in Walt Disney World. It's magical in it's own right, and such a cool way to travel! As a kid I longed to stay in the Contemporary Resort so we could see the monorail swishing through the concourse on a regular basis.

And as a kid, we always played a monorail version of the license plate game, keeping track of the different colors we'd seen. Today there are twelve monorails operating in WDW. Rarely are they all on-line at once. But if you are lucky, you could see most of the following: Red, Orange, Yellow, Gold, Peach, Coral, Green, Lime, Blue, Teal, Silver and Black.

In the spirit of making the most of our wait time (there can be A LOT of wait time in Disney, depending on your travel dates), I created these scratch-off cards for the kids in our party. I used a heavy card stock to print these, and I would recommend making several extras as you may need them for those adults kids who tend to lose theirs in the parks, or for a learning curve with the scratch-off paint.

Then, I used this tutorial from Artmind to make scratch-off paint. A couple of tips regarding the scratch-off paint: 1.) It bubbled up when I applied it, but most of the bubbles went away as it dried. The more you agitate the paint, the more bubbles you will get. 2.) A lighter color of paint is recommended. I used copper and it didn't scratch off cleanly - as you can see in the photo below. The gold was much better.

To create the actual card, I used a scanned image of the monorail from a promotional Disney flyer. You may want to clean up the edges of the image in Photoshop. To create the different colored monorails, I selected the color stripe so it could be changed to the different colors I needed. Due to copyright laws, I can do this for my own personal use, but not, I am sorry to say, to distribute it to others. Therefore, I cannot offer you a PDF as I would like to. I can, however, refer you to my March 5th post about how to select an image and create a PNG from your own photo, and this tutorial on how to select an area of a scanned image in Photoshop and change its color. It was much easier than it sounds. Give it a try. And remember that if you are scaling down your image significantly, you will not have to be so worried about little detail areas that don't look right on a larger scale. Some of them just disappear. Don't stress yourself out about the little things.

Of course, it was only logical that each kid got a pressed penny to use as a scratch-off tool! The edge was perfect for removing the paint. I hope you give this scavenger hunt a try. We had a blast using them. Until next time, may all your days be filled with fairy dust.

Tuesday, April 5, 2016

Easy Upcycled DIY Disney Travel Game

When I saw this idea on Pinterest, I knew I wanted to recreate it using the Disney ephemera I had collected over the years. I tend to be a pack rat - every now and again, this winds up being a good thing. It's nice when that happens! If you are a pack rat too, then this project is free to create. I know I love a budget friendly DIY.
I had an old sturdy tube from some Silhouette stencil vinyl that was just right for this project, perfect for outlining the shapes of some old Disney stickers I had lying around. (I believe these are from the 90s - when I was still paper scrapbooking. Disney had a terrific scrapbooking store back then; I'm not sure if it's still around today.) If you don't have any stickers, they are very easily obtained from the Dollar Store, or a craft store. And they are usually fairly inexpensive, especially if you have a coupon.

The idea here is simple. I removed the outer edge of the sticker paper, leaving the actual stickers on the page. Then I used the "blanks" as a stencil to trace the shapes of the stickers onto the paper tube. I used a fat Sharpie to trace them and then a fine point Sharpie to label the shapes. (I have a bit of a pen addiction as well. I love my Sharpies!) Happy isn't quite able to read yet, and I wanted Poppins or Doc to be able to help him if I wasn't available.  So now there are several Disney shapes and characters to match to the shapes on the tube. I figure this could last him a good 20 minutes if he takes to it! Stickers are generally a favorite for him. For our family, the trick is finding new and different things to keep the little ones occupied on our drive. It's a LONG way to Orlando from our cottage in the midwest! I'll let you know if this works for us. And if you try it, let us know how it worked for you!

Until next time, may all your days be filled with fairy dust!

Tuesday, March 8, 2016

DIY Disney Pirate Onesie T-shirt

I've mentioned before that we love having plenty of T-shirts while at Disney; this is especially true for our toddler set. And I especially love coordinating the onesies with the Quick Change Trousers I've made for them.

I have been able to find packages of plain onesies at Dollar General very reasonably priced. I would look around at your favorite discount shops for the best deal. This is great budget-friendly project. And it's another quick project (for those of you who have to find your creativity during nap time). I found this Yo Ho image all ready to go in the Silhouette shop. For those interested parties, it's pirate swords, image id 9329. From there it was as easy as downloading, printing on heat transfer paper, sending it through the Silhouette, and ironing it onto a plain onesie. 

Not only was this a great outfit for our little one in the Magic Kingdom at Mickey's Not So Scary Halloween Party (a seriously easy "costume" to pack), it would be perfect for Disney's Pirate Adventure. Don't forget about these children's activities hosted throughout the resorts. They are the perfect thing for a non-park day. Your little one can experience a bit of themed magic and you can take an hour or so for yourself. Now that's what I call a win-win! To hear what other veteran Disney Mom's think of these children's activities, take a listen to this PassPorter podcast about child care in Walt Disney World. There are some great bits of advice in there.

Until next time, may all your days be filled with fairy dust.

Saturday, October 10, 2015

Gone To Disney!


Our family is off on another Disney adventure! We will be in Walt Disney World this weekend - stop and say hello if you see us! Then we are off for the idyllic Disney's Hilton Head Island Resort! It's one of our favorite places.

I'll be back to the blog in a couple of weeks; until then, may all your days be filled with fairy dust!