Showing posts with label gifts. Show all posts

Thursday, September 1, 2016

DIY Small Zippered Mickey Mouse Pouch

As you know, I'm a fan of little bags and pouches for travel. I saw this little beauty and thought it could be Disney-fied with a little alteration. And while I would work a bit on the shapes of the ears, this came together very easily and I would certainly do it again!

I found the original pattern from Dog Under My Desk on Pinterest. I had all the necessary supplies already in my stash, so this project was definitely budget friendly! If you don't already have what you need, I would say this can easily come in under $5.00 a pouch. Still well within my Tinkerbell Treasure limit. And wouldn't it be so cute for all your pressed pennies? Of course the author of the pattern, Erin, suggests using it as a housing for your earbuds. I also love this idea. Keeping those things from tangling with everything else in my bag is forever my mission! And a great solution for the kids! Especially since this isn't too girly - Doc would even use it.

I tried using different circle shapes for the ears, and in the end, went with this: 


As I mentioned before, I would probably choose to go with bigger circles next time. It's always a bit tricky sewing around circles, but over all, I was still pleased with the way this pouch turned out. It will definitely get used! And I can imagine an endless stream of variations for the fabrics and for making it fit different Disney characters.

Until next time, may all your days be filled with fairy dust!

Tuesday, July 26, 2016

DIY Cowl Knitting Chart Inspired by Oaken in Disney's Frozen

Since I have been busy knitting up a new Frozen Fever inspired set (Poncho, Fingerless Mitts, & Hat), I thought it would be fun to rerun my other Frozen inspired knitting this week. After all, it's time to start thinking about all those Christmas gifts you have to knit! Enjoy this post from two summers ago!

Those of you who follow me regularly know that I love to knit up Disney patterns. And when I saw Frozen for the first time I just kept thinking about all the knitting that was possible from the patterns in the movie! Nordic design lends itself to that sort of knitting, but there are just SO MANY PATTERNS in the movie! I'll be busy for months.

The first project I've created is this wonderfully warm cowl inspired by Oaken. You remember him, right? Big summer blow-out! I loved his sweater from the start - it is a fabulous sort of ugly sweater that was just begging to be knit. I first designed the pattern using my trusty colored pencils and graph paper. And once I had the chart all drawn up, I realized that this pattern, having been originally though up and drawn by graphic designers, and not knitters, did not have the correct stitch count to be easily converted to an actual sweater. So I decided to go with something that wouldn't need any shaping or decreases/increases. A cowl was perfect. It can be knit in the round and then sewn together at the ends so no one has to see the backside of the fair isle! Perfect.

Except that the larger pattern with the two-color diamonds (circles) should really be knit intarsia. Well, I decided to go for it anyway. And while the intarsia was working I was getting frustrated with all the strands of yarn. I decided to knit it as I would fair isle, sort of making it up as I went along, holding three colors instead of two. As long as I remembered to wrap the floats it was just fine. And far less tangled! I didn't mind the extra thickness in back, as it's supposed to be keeping me warm and will be all bunched up around my neck anyway.

I really love the way this cowl turned out. Please forgive me for not having blocked it before taking the photo; but these carrots were destined for dinner and I really wanted to use them in the photo! If you are interested in my charts, you can find them at Tricksy Knitter in the shared charts section. I've also included them here for your personal use. If you knit anything with them I'd love to see it! Please be sure to tag me on Ravelry (@HarrisonAmy) or IG (@merryweatherscottage)!

Until next time, may all your days be filled with fairy dust!


Tuesday, July 12, 2016

DIY Alice In Wonderland Disney Tea Cup

I found a wonderful glass mug at the Dollar Store recently, just big enough to do a glass etching on it. And it seemed to say Alice In Wonderland to me. And so this project was born! I used my Silhouette SD to create a stencil that says "Drink Me" using the font Started By A Mouse. It reminds me of Fantasyland - where you can find some fabulous spinning tea cups!

This mug was big enough that I didn't have to finagle the stencil too much around the curves. Once the stencil was on I applied the Armor Etch with a popsicle stick and 10 minutes later, the mug was done! I really love how quickly the etching cream works. This definitely qualifies as a nap-friendly project. And it's budget friendly too! The mug cost a dollar and I already had everything else I needed. You can't beat that!

As an added bonus, I thought I'd share my favorite sleepy time tea recipe, developed right here in the cottage!

Merryweather's Night Time Tea
makes one tea bag (two infusions)

2 lemon verbena leaves, crushed
1/2 tsp. lavender
1/2 tsp. lemon balm
1/2 tsp. peppermint
1/2 tsp. ceylon tea (optional)

Until next time, may all your days be filled with fairy dust!

Saturday, July 9, 2016

DIY Infinity Scarf from Upcycled Disney T-shirts Tutorial

I have to admit right up front, I'm not much of a scarf wearer outside of winter. They just seem in the way to me. But a scarf from jersey? That I can get into. And one that has more than one way to wear it? Even better. And one that showcases my old Disney Ts? Now we're talking! I'm even playing around with the idea of wearing this to the parks in the evening in October. It could happen!

This project was conceived mainly because I wanted to see the logos of the shirts I was using. Most tutorials I came across online were made with the bottom half of the T-shirt. That wasn't going to work for me. So I whipped up a practice scarf using some shirts destined for the rag bag and found that my idea worked! Here's the tutorial on how to make a Disney T-shirt Circle Scarf:


You will need:
  • 3 adult sized T-shirts (this would work with any T size 5 and up; the smaller they are, the more you need)
  • Good pair of scissors
  • coordinating thread
  • pins

Begin by turning your T-shirts inside out and measuring a 12" swath down the middle. Be sure any logos or designs you want to keep are inside that 12" area.


I then marked with white pencil (or a fabric marker on the white shirt) a line all the way down both sides. This is my stitch line. Once you have all your shirts marked, take them to the sewing machine and stitch down each line creating a tube. You don't have to be too precise with this; remember it's going to drape so no one has to know that your side seams are a little wavy.

Once all your shirts have been sewn up the sides, cut off the excess fabric on the sides leaving a 1/4" to 1/2" seam allowance.

I then cut off the collar of T-shirt and the bottom hem so that I had a nice tube. **I also took the tag off the Pirates shirt so I could reuse it on the outside, a little bit later.**


Begin sewing you first two shirts together. Turn one tube right side out and keep the other one inside out. Sandwich them together, right sides together. This is a good time to check that your logos are lined up the way you want them to be.

Pin the side seams together and pin the middle of each side together. Sew this seam using a 1/2" or 5/8" seam allowance. If the two pieces of fabric don't line up perfectly, you can stretch the fabric as you sew it so it lines up a bit better.


If you wish to insert the tag from the T-shirt so it shows on the outside, sandwich it into one of these seams, aligning all the raw edges. When you turn it right side out it should look something like this:


Continue sewing this way until you have sewn the last piece on. You should have one giant tube. 
To connect it, turn the scarf in on itself so that you can line up the last pice with the first piece just as you did all the others: right sides together, aligning the raw edges, and pin. When you sew this up, remember to leave about at 3" gap so you can turn the scarf right side out.

Once you have turned your scarf right side out, you can either sew the gap closed by hand (which looks best) or use the machine. I chose to use the machine. I invoke my grandmother once again: if you can't see it from the back of a running horse, it'll be just fine.

And that's it! I'd say this took me about 3 hours from start to finish on this project. Not bad for a rainy afternoon. If you want some tips on how to wear your circle scarf, check out this wonderful graphic. While this one isn't the sort you can wear as a dress, you could certainly work it in many of the other ways.


Enjoy experimenting with your circle scarf! And until next time, may all your days be filled with fairy dust!

Thursday, June 23, 2016

DIY Disney Mickey Mouse Sippy Cup Leash

Mickey Mouse Sippy Cup Leash
This is one of those things that makes a huge difference with little effort. The last time we were in Walt Disney World, our 2-year-old loved throwing his sippy cup down when he was done with it. Chasing those rolling cups in the parks was not fun, and not a thought I relished doing again. But never fear, Make It & Love It has a tutorial that will save the day! I love that this little sippy cup leash is extremely lightweight and won't take up any extra room in the storage compartment when you are done with it. So, so smart.

This tutorial is so easy that I was able to bang it out in less than 20 minutes. THAT'S a project I can love! I scored this ribbon at Walmart, prepackaged in 3 yard increments. Unfortunately, I don't remember the cost, but I'd be surprised if it was more than $5.00. I've since seen it at JoAnn's too. I've also had luck with Etsy and Ebay for deals on Disney ribbon, some really rare, some not so much. Shop around; I assure you, you'll find more than you bargained for!

I already had my elastic on hand, so this project was well under $5.00. I consider that a great deal! You could use this in the car on a road trip as well as on the stroller or backpack in the parks. We've tried it on a number of different sippy cups, and all of them seem to work well. These Nuby ones are Happy's favorites, so I made sure it would hold these easily. We'll be taking several with us again this October! If you see our decked out stroller, stop and say hi! We love to hear from our readers.

Until next time, may all your days be filled with fairy dust!

Saturday, June 18, 2016

DIY Disney Beer Flight Set | The Snuggly Duckling - Tangled

This is one of my favorite Father's Day ideas from 2013. I hope you enjoy it!

I've been wanting to do some of these for a long time now. When I saw these beer flight sets in the Target dollar bins, I knew I had a project! I've mentioned before that it can be tough to find creative gifts for men. This is something many of the men in my life could use and I see several Disney variations coming. We are very into our beer in these parts! This one, however, is from the movie Tangled.

I am a big fan of Tangled. It appeals to me in so many ways: a creative princess who doesn't act like a princess (is in fact, rather clueless), a fabulous pub scene, a hero realizing he needs to be himself, a romp through the kingdom and a villain who gets what she deserves. What's not to love? And that pub scene - hilarious! I absolutely adore it. Haven't seen it? You must. Here it is:


Am I right? It's just so funny. And the perfect inspiration for these beer sampler glasses. While you don't see the pub sign in this clip, they are at The Snuggly Duckling. I decided to take that "logo" and make what would be a beer sampler from their pub. The actual glass etching was very quick. I'd never etched glass before, so if it seems intimidating to you, don't let it be! It was as easy as following the directions, and there are several YouTube videos out there if you need to see how it's done before you attempt it yourself. For this project, I used Armor Etching Cream.

I used my Silhouette machine to create the Snuggly Duckling logo. I used Echo Park Duck Icon (design #40686) and then created my own cattail. I used font LD Pirate from scrapNfonts.com. There are other free fonts out there, I just happened to have this one in my library. If you are interested in downloading my silhouette design, you can access it here. (It is a .studio file which is only compatible with the Silhouette machine.) Once I had the design, I simply cut it out and adhered it to the glass. You have to do a little massaging of the decal over the curvy glass, but it worked with a little patience. I only had one tiny mistake out of all four glasses.

Overall, I am very pleased with the design! The Silhouette did a great job of getting clean lines even with such a small and detailed stencil. Until next time, may all your days be filled with fairy dust!

Tuesday, June 14, 2016

Flag Day DIY inspired by Disney's Animal Kingdom


DIY Tibetan Prayer Flags Inspired by Disney's Animal Kingdom
Flag Day is intended as a celebration of the adoption of the American Flag - it is always celebrated on June 14th. As it happens, the US Army's "birthday" is also on this day. If you are interested in more history on Flag Day, you can check out this Wikipedia article. But for Flag Day this year, I decided to take a more non-traditional track.

I have always loved the themeing in the Animal Kingdom of Walt Disney World. Even as a new park (when it was not very fun for our family - and SUPER hot) the themed areas seemed superior to much of the rest of the Disney Resort. I have especially become a fan of the Tibetan prayer flags near Expedition Everest. I've always been a spiritual person, and drawn to these flags and their purpose wherever I see them. They are meant to be torn and impermanent items. If you want a little more information about them, you should check out The Peace Flag Project. I think they are just beautiful. So when I found this tutorial for making miniature prayer flags from Small World Land, I knew I had found a project for me.

For this project, I used the printable document supplied in the tutorial. I sized it to 150% and printed it directly only my fabric. If you've never printed on fabric, it's a very simple process. I used these instructions from Instructables. I didn't have any freezer paper, so I used Silhouette's Sewable Heat Transfer Fabric Interfacing. I'm glad I did. I was able to print on it with no problems. I was even able to iron two small strips of flags together to make them double sided. I then just cut them apart and strung them on button-hole thread. (It's thicker thread than what you usually sew with.) And I love the result! I have my own little string of prayers hanging in my studio. They are a lovely reminder of the prayers I wish to offer up to the universe.

Until next time, may all your days be filled with fairy dust!

Saturday, June 11, 2016

DIY Amagarumi Squirt from Finding Nemo

With the release of Finding Dory on the horizon, I thought it would be fun to revisit this post. Enjoy!

If you like amagarumi and you are not familiar with Roxycraft and Tammie O., let me introduce you. These patterns are very well written and easy to follow and she has quite a selection to choose from. I loved doing this Big Poke as a version of Squirt, from Finding Nemo.

I haven't really worked much with amagarumi. I've dabbled a little for my nieces and Doc, but nothing that I really had a vision for how it should turn out. This project was different. I really wanted it to look like Squirt when I was all done. I'm happy with the end result, but as with most first-time projects, I learned a lot about amagarumi along the way. Here are a few tips I wish I had known before I started:
  1. don't go up a hook size; next time if I don't have the hook I am looking for I will go down a size or buy the hook(s) I need. I don't love how open the stitching is.
  2. Safety Eyes and Suncatcher Eyes are totally the way to go! If you need some, look no further than The Tiny Garden on Etsy. Leslie had a great selection and wonderful customer service. Plus they were really easy to use.
  3. follow the directions; I over stuffed the head and little Squirt won't stand up without a little help - also, the up-a-hook-size thing may have made this more of a problem.
  4. cotton yarn is soft and lovely, but it doesn't fill in the way the acrylic blend does. (I would assume wool would fill in better too.) I'll try a different yarn the next time.
But having said all that, I like this little character. He definitely reminds me of Squirt! Here's what I did to alter the pattern:

I used 30mm Suncatcher Eyes instead of the 18mm recommended in the pattern. I used Scrapbook & Cards today's tutorial to create the crocheted flowers. And obviously I used a different color assortment for the yarn. 

I hope you'll take some time to check out Roxycraft for yourself. And if you make up one of her patterns, we'd love to see it! Tag us on Instagram (@merryweatherscottage) or post a picture here in the comments. Until next time, may all your days be filled with fairy dust!

Thursday, June 9, 2016

DIY Mickey's Kitchen Pot Holders

Some of us are a little more "out" with our Disney obsession than others. We have great friends with a Mickey themed kitchen. There are all sorts of gadgets and cookware that can give your kitchen a Disney feel. In fact, Disney has an entire store in Downtown Disney devoted to such things. And for those of us who can't get to said brick and mortar store, Disney has conveniently provided a virtual store for our every shopping need. Check it out here.

Today we feature a project that would be perfect for the Mickey's Kitchen devotees: pot holders. I love the size of these. They are perfect for holding a hot mug of soup or a bowl that's been zapped in the microwave. It's also the ideally sized for the tea kettle handle. And it's easy enough that older kids can help with this project.

You could customize this project for any Disney character's color scheme (red, white, blue & yellow for Donald; green, blue, orange & black for Goofy; etc.) - but since most of the Disney kitchen accessories are in a Mickey color scheme, we chose to stick with red, black, yellow & white.

If you don't already have a potholder loom, they are fairly inexpensive and easy to come by. I found mine at the local JoAnn's, but they are available online as well. Check out Amazon for a wide selection, or just google potholder loom & use the shopping link. I have had good luck finding the loops in the kid's crafting area of any major craft or education store. But if you are finding it difficult to locate some (or get out of the house!), you can purchase them here.

Experiment with color and pattern. Doc helped me weave these two patterns and we loved the way they turned out. After completing these two, we had a few helpful hints to pass along:

1. The last couple rows of weaving are tricky, as the loops will want to pop off the loom. Go slowly.
2. To finish edges we used an H crochet hook started in the top right hand corner. Pull first loop off and leave on your hook; pull the second loop off and single crochet. Continue around the entire loom, pulling the last loop all the way through so it sticks out.
3. The last edge of the potholder wanted to pull off the loom; try to prevent that by using your left hand to hold it down while you finish the edge (assuming you are right handed).

And that's it! We were able to make 2 of these in an hour. If it's your first attempt at using the loom, give yourself a bit more time. And most importantly have fun! Until next time, may all your days be filled with fairy dust!

Tuesday, June 7, 2016

DIY Disney Map Coasters

 Perhaps you've seen this lovely tutorial on Pinterest. I've been eyeing it for a while and finally tackled it. I love the way these coasters turned out and the best part is they cost under $1.00 each to make! These would be a great gift to make for your fellow Disney geeks.

Of course, Jimminy Cricket would also be pleased that we are upcycling more of those park maps we all bring home as souvenirs.

I followed this tutorial with a few minor adjustments. I like to use Golden's Gel Medium instead of Mod Podge. It's more expensive, but I like the way it dries better. And I've been using it for years, so my comfort level is there. This also meant I had it on hand and didn't have the mod podge. One additional benefit to using the Gel Medium, it can handle hot liquids within a couple of days. No need to wait a month!

I applied one coat of Gel Medium to the top of the naked tile and adhered the cut out map piece to it. Try to smooth it out really well. The slick nature of the map makes it want to bubble up. You could use a credit card or bone folder - gently! - to get all the bubbles out. I let that dry. Then I came back and applied two more thin coats of Gel Medium, letting each tile dry thoroughly between coats. I made sure to brush the Gel all around the edges of the paper, making sure it was not going to peel up.

And instead of using rubber cement for adhering the felt, I used a spray adhesive. (If you are ever in doubt as to which glue to use, This To That is a fantastic resource!) I used an old box as my "spray zone" so as not to make my whole work space tacky. And that's it! My total cost for this project was $3.00 for the tile. Now THAT'S a bargain! If you try this project be sure to send us a photo; until next time, may all your days be filled with fairy dust!

Thursday, June 2, 2016

DIY Disney Tshirt Upcycled Bib

When you travel to Walt Disney World as much as we do, you can wind up with a lot of old Tshirts that are stained, too small, or simply "not your thing" (as Doc likes to say.) You certainly could donate them to a good cause, or you could choose to upcycle them. Being drawn to the crafty side of life, I like to upcycle.

The cottage is full of baby and toddler paraphernalia at the moment, and bibs are always in high demand. I especially appreciate the absorbent ones, as Happy seems to have been teething for a year solid and the drool has become an issue. Making bibs from too small Ts is a great way to get a little more life out of them. I know I find it sad when the last kid has outgrown that cute shirt we purchased in the parks several years ago. I also think these would be an awesome shower gift for the Disney enthusiast in your life. You know who they are; and trust me, these would be greatly appreciated.

I used this great tutorial from A Little Tipsy. It's very straightforward and even the novice seamstress could make a few of these at minimal cost. Instead of backing mine with Minky, I chose to use old towels that had made their way to the scrap bin. They are are nice solution to all the drool. I also found it difficult to cut around the existing neck of the T shirt. I actually cut out the Cars bib by placing the pattern on the tshirt so I could cut out the design, but then cut out the straps of the bib from a separate area of the tshirt. It meant sewing a few extra seams, but it was less frustrating for me that way. Michelle addresses this in the tutorial. I also found it easier to trace the pattern onto the shirt and then cut it out, instead of the traditional way of laying the paper patten on the fabric and cutting around it.

This little Tinkerbell shirt had a cute ruffle around the neck that I wanted to preserve. My pattern got a little funky, but I was able to save it. At first it really wanted to turn up at the neck, but after I topstitched all the way around the bib, the ruffle stayed in place.

If you decide to try this, drop us a picture in the comments, or link to our instagram feed so we can see what you're up to. Until next time, may all your days be filled with fairy dust!

Tuesday, May 31, 2016

DIY Disney Camera Buddy

DIY Winnie The Pooh Camera Buddy
I've been wanting to give this idea a try for a while now, but didn't want to screw up a $20 souvenir! So when I recently stumbled upon Tuesday Morning's clearance sale, I knew it was time to give this a try. Have you ever tried getting a little one to look at your camera? It can be pretty tricky. This camera buddy will turn your clunky black box into a soft fluffy Pooh Bear. A much nicer and interesting object to look at, don't you think?

I found this Winnie The Pooh plush for only $4; a steal if you ask me! And I used this very easy to follow tutorial on  making lens creatures. Seriously, it only took me an hour. And the tutorial only calls for scissors, pins, needle & thread, and enough elastic to wrap around your lens twice. THAT'S IT.

My seams were not so lovely, but since they are facing the lens, it doesn't really matter. I will say, I was surprised at how hesitant I was to cut into Pooh. I suppose Doc McStuffins has it's affect on a Mama.

Overall, I couldn't be happier with how this Camera Buddy turned out. I had no idea it would come together so quickly! I think this would be a fantastic gift for a new mom, a scrapbooker, or a Tinkerbell Treasure for your resident Disney photographer. It would also be a great way to upcylce those Disney souvenirs that get neglected. If you have a passing thought that this would be of interest to a fellow Disney mama, you absolutely should give it a try. Until next time, may all your days be filled with fairy dust!

Saturday, May 21, 2016

DIY Disney's It's A Small World T-shirt

This was a terrific little project for our Small World fans. And a nice easy project to round out our Small World marathon of posts. I promise, this is the last one for a while. Since Minnie is rapidly outgrowing all her 0-3 month clothes, I thought another shirt would suit her well. And she needs a cute little shirt to wear while she plays in that fantastic new room of mine hers. In truth, this would be a great unisex project for a new baby.

For this T-shirt, I used the Silhouette machine and the Travel Landmark shape (Design ID #27470). I made sure to size it according the the shirt I wanted it on - for the 6 month shirt shown here, I made sure the design measured 6.25" across. I then used the text tool and the Bimini font to write the slogan. I simply cut it from the vinyl, transferred it to the shirt and painted away. Don't forget to heat set it with the iron. I have to say, I love the Silhouette brand fabric ink. It REALLY holds up well in the wash. And when it comes to baby clothes, around here they go through the washer A LOT. The inks are well worth the money.

I mixed these colors from the ones I had on hand - red, yellow, green, white & brown. I'm very pleased with the way they came out. And in true Mary Blair form, I have a little blip of paint on the windmill where the stencil lifted up. (Mary Blair believed every work of art needed an imperfection. You can check out her five-legged goat for more information on this.) It's not terribly noticeable, and as my grandmother used to say, you couldn't see it from the back of a running horse. And that's good enough for me.

I really like how quick and easy this was. A great way to wrap up our Small World festival of posts! Until next time, may all your days be filled with fairy dust!

Saturday, May 14, 2016

DIY Mickey Oreo Pops


These are a labor of love, and definitely not a nap-time friendly project. But if you are a fan of Oreo cookies, or know someone who is, then it's totally worth it. These pops tend to be a bit fragile, so traveling with them can be tricky. They may be best left to party favors and at home magic. Still, the impact is great, so I still say give them a try.

I was inspired to try this when I ran across this pin on Pinterest. I tried a couple of different ways of doing this. The first and foremost recommendation is that if you are putting them on sticks, definitely get the double stuffed Oreos. They are easy to get the stick into and unlikely to break. (Wilton brand sticks can be found at your local craft store, or here.)

Getting the mini Oreos to stick onto the big ones was a bit of a challenge. I melted Wilton's light cocoa candies and used that as the glue. In retrospect, I would use the dark cocoa next time as it matches the Oreo color better. I found that melting the chocolate so that it wasn't runny was the best bet, as it provided a nice paste-like texture: enough to stick the cookies together, but not so thin it was running all over the mat and not staying on the pops. I also found the ideal tool for applying the chocolate was a small spreader.

Although these look fun and taste great, I was not pleased with the fragility factor, as I wanted to take these with us to Disney. Even surviving airport security, let alone the flight, seemed a bit perilous. I tried covering them in chocolate, but the Wilton's didn't spread evenly and they looked lumpy. (Although Doc said they tasted great!) I also tried using magic shell, but that didn't set up properly. I might try melting chocolate chips next time.

If you give this idea a try, I'd love to hear how it worked for you! And if you have any tips on how to make these a bit more resilient, please, please, share. Until next time, may all your days be filled with fairy dust!

Saturday, May 7, 2016

Tinkerbell Treasures: Disney Door Hanger DIY

As I have mentioned, I LOVE giving Tinkerbell Treasures while in Disney. There is something so magical about the idea of Tink delivering a little something while you sleep. I can't resist it.

These door hangers would be so fantastic for those little giftees that need a special presentation. I like to use them on the bedroom doors in our villa. It's a sure-fire way to get the kids' day started off right. This would be an especially good way to tell the kiddos what's on the agenda for the day. You could fill them with a map of the park you are headed to (these are free and always available at the front desk), a new pair of shades, a snack, a new trading pin, a few Disney Dollars, a gift card to the arcade, the possibilities are endless. We always try to schedule a non-park day while in Walt Disney World, and this is a great way to add a little excitement to those less intense days. (I can also see them used as sleepover party favors, or birthday morning goodie bags.)

I used my Silhouette SD to make these. It was SO simple. I used design shapes 3d Door Hanger (id #21330) and House of 3: Dream Scallop Seal (id# 6821). I resized the door hanger so the box portion was as large as I could make it:


I had to then move the hanger shape to another page. After that I just cut and put it together. Easy peasy! I would recommend using the heaviest card stock you have if you plan on filling this with anything heavier than a map and some Disney Dollars. It wants to come off the handle fairly easily. You could also solve this problem by taping it together once it's on the door.

I hope you find lots of ways to use these versatile door hangers. Until next time, may all your days be filled with fairy dust!

Tuesday, April 26, 2016

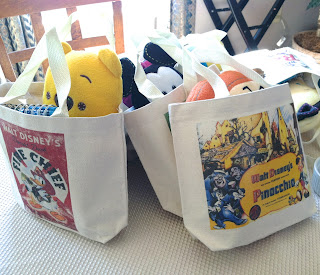
DIY Disney Tote Bags

The links for the posters in this post are no longer available. But you can find some great Disney poster art on the Disney Movie Rewards website under digital rewards. They seem to rotate in and out with some regularity, but if you keep a look out, you can find some very fun and unique stuff in there! And of course you can run an Etsy search to see what else might be out there. Enjoy this rerun of one of my favorite Disney gift ideas!

___________________________________________


Breaking up is hard to do, and it's always hardest when we have to say goodbye to Walt Disney World. We all tend to be tired and cranky, and we usually like to maximize our time there, so we are leaving on the last plane home - our friends like to call it the Disney Express. It's a plane filled with other tired, cranky, bloody stumps of people. I think it's incredibly important to have a little something special for the ride home.


I decided to make these cute little tote bags for each kid for "leaving day." I filled them with homemade Rice Krispie treats, a game to pass the time, and a few other little treats I found along the way. If you have a dining plan with snacks left on it, this is a great way to use them up. Stop by any gift shop and pick up bags of pretzels or other packaged goodies that fit within the plan.

For the tote bags I used Transfer MAGIC's Inkjet Transfer Paper for Light Colored, Light Weight Fabrics. I still got a plasticy finish to the transfer, but on the canvas bags, it was fine. The images are from the same series of vintage Disney poster images through Nukes at Etsy. These are top quality and big, so at a dollar an image, you can't go wrong. I used Photoshop to size and reverse the image for transfer. If you have text on your image, DON'T FORGET TO REVERSE your design before you print!

I found these tote bags fairly inexpensively at Hobby Lobby. I found a 4 pack for $8.00. (If you use your 40% off coupon, they are really a steal!) They are 100% cotton canvas, and the iron-on paper worked beautifully on them. Since I already had the transfer paper they were only $3.00 a bag. That's a price I can live with!

Leaving The Mouse is never easy, but a little goodie bag can help ease the transition home. Until next time, may all your days be filled with fairy dust!


Saturday, April 23, 2016

Disneyland Snickerdoodle Knockoff Recipe

Sometimes it seems like a really long time between visits; that's when a little kitchen magic can really come in handy. I found this Disneyland Main Street Bakery Snickerdoodle knock-off recipe on Pinterest and decided a rainy afternoon was the perfect time for a little Disney pick-me-up. The family was happy to oblige!

It was simple to make them into Mickey heads. Instead of rolling only one ball, I rolled one larger and two smaller balls and laid them out on the cookie sheet as such. I tried not to smash the ears on too much, as they do spread in the oven.

They took a little longer to assemble than regular snickerdoodles would, so I was able to assemble one pan while the other was baking. It was just about the perfect amount of time. Be sure to let the cookies cool just a bit on the pan before moving them to the cooling racks - we lost a couple ears by being impatient! (Although, it was a good excuse for an early taste!) My apprentice chef became quite good at rolling and pressing out the Mickeys.
One small deviation from the recipe - I like a lot of cinnamon sugar on my snickerdoodles, so we employed the Joy of Cooking technique of rolling each ball of cookie dough in a bowl of cinnamon sugar, instead of sprinkling the tops as the original recipe suggests. A personal preference, but worth it, in my humble opinion.

And because someone will ask, the WDW serving tray was one of my parents' first souvenirs. It lived in our motor home until it died and now it comes out whenever we need a little shot of Disney magic! Until next time, may all your days be filled with fairy dust!

Thursday, April 21, 2016

DIY Disney Gift Bag from Upcycled Park Map

Every now and then you need emergency gift wrapping while in Disney: someone in the party reveals it's their birthday, you find the perfect just-because gift, or you remembered the gift and the occasion, but forgot to pack wrapping paper. Whatever the situation, I know I've had need before. Well, here is your solution.

Every park, every resort and many other places around Walt Disney World have free maps available. I always grab two or three when we enter a park because I know my family, and they have a tough time keeping track of theirs. This means I usually come back to the hotel with extras. Even if you don't, just stop by the check-in desk. They always have them. This map is your new gift bag - it just needs to be folded. You may need to stop at guest services and ask if they have a glue stick (or tape) and a ruler you can borrow - or scope out the gift shop. It's Disney. Someone is bound to help a guest in need.

I'll save you the double post and simply direct you over to How About Orange's awesome tutorial on how to make a gift bag from a newspaper. The steps are easy to follow. The only change you will want to make is in the folding dimensions. The Disney maps are a bit bigger than the rectangle she uses. Instead of the sides of the bag measuring 4 1/2", you will want to make them 6 5/8". Everything else is the same.

Viola! You have the perfect wrapping for the perfect Disney gift, and it was upcycled to boot. Wouldn't Jiminy Cricket be proud? Until next time, may all your days be filled with fairy dust.

Thursday, March 10, 2016

DIY Small World Passporter Envelope

This is a repost from years ago, but as we are getting ready for our first cruise I have my PassPorter out again and am planning like crazy! This little pouch has again come in very handy. And now that I am a Certified Disney Travel Planner, you don't need a BA in Disney Planning anymore, just give me a call (or send me an email) and I'll get you on your way to an amazing Disney vacation! All you have to do is pack your bags. Enjoy this re-post today.
_________________________________________________

As one of my dear Disney Buddies likes to say, it feels like you need a Bachelors Degree in Disney Planning to take your first trip to Walt Disney World, and an Associates in Disney Dining. We know it can be overwhelming for the first time planner. If you are unfamiliar with our friends over at PassPorter, please head over and take a look. They are THE planning tool for our friends and family. Even after 36 trips, we find the PassPorter a useful tool before and during our stay in Walt Disney World. I always get one for any new family traveling with us.

It should come as no surprise, that I have my PassPorter with me at every planning session. I like to have sticky notes, or post-it flags, and my favorite pen with me too. (I have a bit of a pen obsession!) So this fabric envelope from Bolt was the perfect solution for my PassPorter. Follow the link for the excellent tutorial. I made just a couple adjustments of my own.

I chose to do a button and loop closure on my envelope, and adjusted the length of the fold over elastic to measure 14.5" in order to fit over my PassPorter cover. This will accommodate the deluxe cover, or the entire book of the regular PassPorter. If you've never used fold over elastic, it's really great stuff! It comes in all sorts of colors and patterns. And Amazon has a nice selection of it too.

The fabric is November Books Kokka Children of the World. It reminds me of the It's A Small World attraction (one of my favorites!). I have only been able to find it on Etsy, and it can be expensive, but I love it so much I don't mind spending a little extra. The contrasting fabric (seen on the envelope flap) was purchased at JoAnn's. It's their store label.

Because this project requires very little fabric, it would be a great stash-busting project. And it's quite budget friendly too. I had everything I needed except the fold over elastic, and that was in the $6.00 range. Not bad at all for such a cute and useful item. If you make one of these for your Disney trip, please leave us a link to it in the comments. We love to see what our followers are doing! Until next time, may all your days be filled with fairy dust.

Wednesday, September 16, 2015

Bringing Honor To Us All Mulan Inspired Design on RedBubble

I have a soft spot in my heart for the story of Mulan. She is not one of the well-loved Disney Princesses but her story is every bit as brave as Merida's and spunky as Rapunzel's. She was just a bit ahead of her time.

This new design, now available on RedBubble, was inspired by Mulan. I think it's fun and functional and looks great on so many of the great products at RedBubble. And now they are featuring laptop sleeves as well as all the other great stuff they carry! Head on over for a quick look.

Until next time, may all your days be filled with fairy dust!