Showing posts with label nap time friendly. Show all posts

Thursday, September 1, 2016

DIY Small Zippered Mickey Mouse Pouch

As you know, I'm a fan of little bags and pouches for travel. I saw this little beauty and thought it could be Disney-fied with a little alteration. And while I would work a bit on the shapes of the ears, this came together very easily and I would certainly do it again!

I found the original pattern from Dog Under My Desk on Pinterest. I had all the necessary supplies already in my stash, so this project was definitely budget friendly! If you don't already have what you need, I would say this can easily come in under $5.00 a pouch. Still well within my Tinkerbell Treasure limit. And wouldn't it be so cute for all your pressed pennies? Of course the author of the pattern, Erin, suggests using it as a housing for your earbuds. I also love this idea. Keeping those things from tangling with everything else in my bag is forever my mission! And a great solution for the kids! Especially since this isn't too girly - Doc would even use it.

I tried using different circle shapes for the ears, and in the end, went with this: 


As I mentioned before, I would probably choose to go with bigger circles next time. It's always a bit tricky sewing around circles, but over all, I was still pleased with the way this pouch turned out. It will definitely get used! And I can imagine an endless stream of variations for the fabrics and for making it fit different Disney characters.

Until next time, may all your days be filled with fairy dust!

Saturday, August 27, 2016

Upcycled Disney T-shirt Trinket Bag

I have shared this tutorial on the blog before, but it is amazing to me how many of these little bags we use and how handy they are in my travel gear. So I hop you enjoy this rerun from March of 2014!

We are gearing up for another road trip, this time to Disney's Hilton Head Island Resort! In preparation for that, I am getting out all our road trip goodies. I realized that my previous case for all my electronics was woefully lacking in space for my new gadgetry. I needed something with a little more room that I could slip in my knitting basket or my purse without a lot of fuss. And I like having it all in one place, but not a tangled mess in my purse! As I was scavenging through my bin of t-shirts and clothing to recycle, I noticed a t-shirt that Little Chef was not too fond of because the printing on the front was uncomfortable. I didn't even put it in the rotation for Minnie. It was an 18-month Mickey T-shirt and perfectly suited for the job!

This was the easiest project I've done in some time. I simply cut the sleeves and bottom off the shirt, centering the Mickey image, and leaving the neck in tact as a ready-made casing for the drawstring. I used an overlock stitch and sewed up the three sides of the shirt. I then angled the corners in and cut them off, because I like a flat-bottomed bag. This is certainly a step you don't need to take, it just adds a nice touch. If it intimidates you, leave it out.

I then opened up a hole in the collar seam using my seam ripper, and slipped a ribbon through the casing the same way you would in a pair of pants. Because this is jersey, you really don't need to worry about the fabric unraveling, so I simply left the hole in the collar! I tied the two ends of the ribbon together with a knot, turned the bag right-side out and there you have it! Easy as can be!

Now I have a place for all my iPhone, Kindle and iPad cords, earbuds, etc., and they won't be a tangled mess when I want them! These would also be terrific bags for Tinkerbell Treasures, either to give filled with goodies or to give as a goody! And if you don't have an ample supply of 12-18M shirts in your cottage, the Goodwill is an excellent place to get exactly this sort of thing for a bargain price. In fact, I have found some wonderful park merchandise there that we wear in the parks! (No one has to know!) I do love a good bargain. Until next time, may all your days be filled with fairy dust!

Thursday, August 18, 2016

DIY Disney Road Trip Plastic Bag Dispenser

Disney Themed Plastic Bag Dispenser from Lysol Wipes Canister
This may be the first thing I ever pinned on Pinterest. I thought it was BRILLIANT! Seriously. We are always looking for a trash bag, a puke bag, a doggie pick-up-the-mess bag, a toss the diaper bag,  you name it. Traveling with the family can be messy! And now that I have an empty Lysol wipes can it's time to get to work!

If you have young ones in the house and are as Disney-crazed as we are, chances are you know all about the Handy Helpers. If not, let me fill you in. Disney Jr. made a genius decision when it started running The Mickey Mouse Clubhouse. Finally a way to connect a younger audience with the classic characters. It's fun, educational (as much as these things can be), and pleasant to listen to (unlike certain other Nick Jr. explorers). In the clubhouse, Mickey's Handy Helpers do everything from answering the door, to getting the mail, to finding Goofy's stinky shoes. A sort of butler system. So naturally, I thought of the Handy Helpers when I was creating this Road Trip Bag Dispenser.

To get the how to on rolling the bags to fit the canister, check out this tutorial from Tatertots and Jello. It's really easy. Don't worry if you have air bubbles as you roll the bags. It didn't have an adverse effect on ours in any way.

And of course I used my Silhouette SD to cut out the vinyl for the canister. I created a png of the hand from some clip art I found on line. And I used the font Minnie to create the lettering. Once I cut it out and removed the excess vinyl, I used the transfer tape to adhere it to the canister. Realizing this canister is going to be rolling around on the floor of our van for the rest of it's life, I decided to keep the transfer tape on it to help keep the vinyl on and legible! And that's all there is to it! Quick, easy and very handy.

Until next time, may all your days be filled with fairy dust!

Tuesday, August 16, 2016

DIY Disney Incredible Superhero Cuffs

With Halloween on the horizon (I like to plan ahead!), I thought this would be a great rerun for today. Enjoy!

Both of our littles have been very into playing dress up lately; especially pretending they have super powers! It's something the big one never really liked. So we were a little sparse in the costume/superhero department. When I started scouring the inter-webs for some quick and dirty costumes and accessories, I found these incredibly easy (pardon the pun!) superhero cuffs from Kate's Creative Space. How could I say no?

When I say easy, I mean it. This fits well into the department of nap-time friendly crafts. Kate has the tutorial and the printables all on her blog. All you need is a couple of empty toilet paper tubes and some glue, and you're all set. She shows you how to embellish them a bit too, if you're so inclined. I just love how these turned out. And talk about budget friendly too! I don't care what Happy decides to do with them. I didn't invest much time and they didn't cost me a dime. It's hard to beat that kind of Disney magic. It might even make you feel a little Super.

Until next time, may all your days be filled with fairy dust!

Tuesday, July 12, 2016

DIY Alice In Wonderland Disney Tea Cup

I found a wonderful glass mug at the Dollar Store recently, just big enough to do a glass etching on it. And it seemed to say Alice In Wonderland to me. And so this project was born! I used my Silhouette SD to create a stencil that says "Drink Me" using the font Started By A Mouse. It reminds me of Fantasyland - where you can find some fabulous spinning tea cups!

This mug was big enough that I didn't have to finagle the stencil too much around the curves. Once the stencil was on I applied the Armor Etch with a popsicle stick and 10 minutes later, the mug was done! I really love how quickly the etching cream works. This definitely qualifies as a nap-friendly project. And it's budget friendly too! The mug cost a dollar and I already had everything else I needed. You can't beat that!

As an added bonus, I thought I'd share my favorite sleepy time tea recipe, developed right here in the cottage!

Merryweather's Night Time Tea
makes one tea bag (two infusions)

2 lemon verbena leaves, crushed
1/2 tsp. lavender
1/2 tsp. lemon balm
1/2 tsp. peppermint
1/2 tsp. ceylon tea (optional)

Until next time, may all your days be filled with fairy dust!

Saturday, July 9, 2016

DIY Infinity Scarf from Upcycled Disney T-shirts Tutorial

I have to admit right up front, I'm not much of a scarf wearer outside of winter. They just seem in the way to me. But a scarf from jersey? That I can get into. And one that has more than one way to wear it? Even better. And one that showcases my old Disney Ts? Now we're talking! I'm even playing around with the idea of wearing this to the parks in the evening in October. It could happen!

This project was conceived mainly because I wanted to see the logos of the shirts I was using. Most tutorials I came across online were made with the bottom half of the T-shirt. That wasn't going to work for me. So I whipped up a practice scarf using some shirts destined for the rag bag and found that my idea worked! Here's the tutorial on how to make a Disney T-shirt Circle Scarf:


You will need:
  • 3 adult sized T-shirts (this would work with any T size 5 and up; the smaller they are, the more you need)
  • Good pair of scissors
  • coordinating thread
  • pins

Begin by turning your T-shirts inside out and measuring a 12" swath down the middle. Be sure any logos or designs you want to keep are inside that 12" area.


I then marked with white pencil (or a fabric marker on the white shirt) a line all the way down both sides. This is my stitch line. Once you have all your shirts marked, take them to the sewing machine and stitch down each line creating a tube. You don't have to be too precise with this; remember it's going to drape so no one has to know that your side seams are a little wavy.

Once all your shirts have been sewn up the sides, cut off the excess fabric on the sides leaving a 1/4" to 1/2" seam allowance.

I then cut off the collar of T-shirt and the bottom hem so that I had a nice tube. **I also took the tag off the Pirates shirt so I could reuse it on the outside, a little bit later.**


Begin sewing you first two shirts together. Turn one tube right side out and keep the other one inside out. Sandwich them together, right sides together. This is a good time to check that your logos are lined up the way you want them to be.

Pin the side seams together and pin the middle of each side together. Sew this seam using a 1/2" or 5/8" seam allowance. If the two pieces of fabric don't line up perfectly, you can stretch the fabric as you sew it so it lines up a bit better.


If you wish to insert the tag from the T-shirt so it shows on the outside, sandwich it into one of these seams, aligning all the raw edges. When you turn it right side out it should look something like this:


Continue sewing this way until you have sewn the last piece on. You should have one giant tube. 
To connect it, turn the scarf in on itself so that you can line up the last pice with the first piece just as you did all the others: right sides together, aligning the raw edges, and pin. When you sew this up, remember to leave about at 3" gap so you can turn the scarf right side out.

Once you have turned your scarf right side out, you can either sew the gap closed by hand (which looks best) or use the machine. I chose to use the machine. I invoke my grandmother once again: if you can't see it from the back of a running horse, it'll be just fine.

And that's it! I'd say this took me about 3 hours from start to finish on this project. Not bad for a rainy afternoon. If you want some tips on how to wear your circle scarf, check out this wonderful graphic. While this one isn't the sort you can wear as a dress, you could certainly work it in many of the other ways.


Enjoy experimenting with your circle scarf! And until next time, may all your days be filled with fairy dust!

Tuesday, July 5, 2016

DIY Disney Travel Game

When I saw this idea on Pinterest, I knew I wanted to recreate it using the Disney ephemera I had collected over the years. I tend to be a pack rat - every now and again, this winds up being a good thing. It's nice when that happens! If you are a pack rat too, then this project is free to create. I know I love a budget friendly DIY.
I had an old sturdy tube from some Silhouette stencil vinyl that was just right for this project, perfect for outlining the shapes of some old Disney stickers I had lying around. (I believe these are from the 90s - when I was still paper scrapbooking. Disney had a terrific scrapbooking store back then; I'm not sure if it's still around today.) If you don't have any stickers, they are very easily obtained from the Dollar Store, or a craft store. And they are usually fairly inexpensive, especially if you have a coupon.

The idea here is simple. I removed the outer edge of the sticker paper, leaving the actual stickers on the page. Then I used the "blanks" as a stencil to trace the shapes of the stickers onto the paper tube. I used a fat Sharpie to trace them and then a fine point Sharpie to label the shapes. (I have a bit of a pen addiction as well. I love my Sharpies!) Happy isn't quite able to read yet, and I wanted Poppins or Doc to be able to help him if I wasn't available.  So now there are several Disney shapes and characters to match to the shapes on the tube. I figure this could last him a good 20 minutes if he takes to it! Stickers are generally a favorite for him. For our family, the trick is finding new and different things to keep the little ones occupied on our drive. It's a LONG way to Orlando from our cottage in the midwest! I'll let you know if this works for us. And if you try it, let us know how it worked for you!

Until next time, may all your days be filled with fairy dust!

Saturday, July 2, 2016

DIY Disney Storybook Road Trip Magnet Game

DIY Disney Magnets

If you have ever been on the road with kids for any length of time, then you know that a variety of activities can save your sanity. And this my friends, is road trip season at the cottage! In preparation for our trips I have been scouting out activities on Pinterest that will keep our car entertained. When I ran across this one, I realized I already had all the supplies necessary to give it a try. I am so glad I did! If you ever played with colorforms as a child, this will feel familiar.

I found a couple of scribbled on, torn up Disney Readers in a garage sale this spring. I wasn't sure how I would use them, but I knew I could find a way. I took several of the salvageable pages and cut roughly around them. I then adhered them to some Adhes-a-mag I had hanging around the studio. You could certainly use any sticky-backed magnet sheets. I then went back around the illustrations with more precision to cut out the characters I was interested in.

It was a little bit time consuming, but I'm glad I did it. We'll take a small cookie sheet with us and use these to make up stories together on the way. There are a number of other magnet based games that can be played with a small cookie sheet in the car. I'll be investigating these as well and reporting back if there are any I plan on using this fall. If you've done something similar, I'd love to hear about it. We are always looking for fun car games to play!

Until next time, may all your days be filled with fairy dust!

Thursday, June 23, 2016

DIY Disney Mickey Mouse Sippy Cup Leash

Mickey Mouse Sippy Cup Leash
This is one of those things that makes a huge difference with little effort. The last time we were in Walt Disney World, our 2-year-old loved throwing his sippy cup down when he was done with it. Chasing those rolling cups in the parks was not fun, and not a thought I relished doing again. But never fear, Make It & Love It has a tutorial that will save the day! I love that this little sippy cup leash is extremely lightweight and won't take up any extra room in the storage compartment when you are done with it. So, so smart.

This tutorial is so easy that I was able to bang it out in less than 20 minutes. THAT'S a project I can love! I scored this ribbon at Walmart, prepackaged in 3 yard increments. Unfortunately, I don't remember the cost, but I'd be surprised if it was more than $5.00. I've since seen it at JoAnn's too. I've also had luck with Etsy and Ebay for deals on Disney ribbon, some really rare, some not so much. Shop around; I assure you, you'll find more than you bargained for!

I already had my elastic on hand, so this project was well under $5.00. I consider that a great deal! You could use this in the car on a road trip as well as on the stroller or backpack in the parks. We've tried it on a number of different sippy cups, and all of them seem to work well. These Nuby ones are Happy's favorites, so I made sure it would hold these easily. We'll be taking several with us again this October! If you see our decked out stroller, stop and say hi! We love to hear from our readers.

Until next time, may all your days be filled with fairy dust!

Tuesday, June 21, 2016

DIY Disney Stroller Cup Holder

Who doesn't need another water bottle holder at Disney? I know we never seem to have enough places to store everything when we are in the parks, and I love the idea of having the stroller do most of the work for us. This is one solution I just had to try.

I used this tutorial from Sew Can Do to create my cup holder. I love that it's large enough to hold my aluminum water bottle and this combo snack/sipper cup I found through Zulily!

I did tweak this pattern a bit. Instead of using oil cloth, I used quilting cotton. To give it a little more heft, I inserted a piece of scrap canvas (you could use a bit of denim from an old pair of jeans as well) between the two sides, and one in the bottom; and I used pellon interfacing on all the cotton pieces. Pellon is an iron-on interfacing and I use it for a LOT of sewing projects. If you can't find it in your local fabric shop, ask at the cutting desk. They will know exactly what you are looking for. I loved the stiffness and absorbency of the fabric when it was all done. I hate sweaty drinking glasses and bottles.

I also made an extension piece for our stroller handlebar. I thought about making the entire piece bigger, but I like the idea of having the size option. The only caveat to that is with the extension, the holder swung around a bit, and Mr. Photos From The Parks says it hits him in the navel whenever he uses the stroller. I'm a bit shorter and it doesn't seem to do that for me. You may want to make some adjustments according to your own stature.

A note about water in Disney:
I think the water in Disney (well, in Orlando) is a bit skunky. I am usually a fan of filling my own water bottle at the drinking fountain wherever we are - or at least out of the tap. But in Disney, that just won't cut it for me. I need the filtered water to get the odd smell out. If you are opposed to paying "Disney prices" for water, there is another solution. Almost every Disney Resort room has a mini fridge. Stop and get a case of water before you arrive on property. This is obviously easy if you drive, but even if you fly (as we often do), it's not as complicated as it might seem. Tiffany Towncar - a company we HIGHLY recommend - will make a 30 min. grocery stop as part of their ground transportation service. If you would rather take the Magical Express, you can always have Garden Grocer deliver groceries right to your room. In either case, you have water at your disposal and much cheaper than if you would buy it in the parks.

Thursday, June 9, 2016

DIY Mickey's Kitchen Pot Holders

Some of us are a little more "out" with our Disney obsession than others. We have great friends with a Mickey themed kitchen. There are all sorts of gadgets and cookware that can give your kitchen a Disney feel. In fact, Disney has an entire store in Downtown Disney devoted to such things. And for those of us who can't get to said brick and mortar store, Disney has conveniently provided a virtual store for our every shopping need. Check it out here.

Today we feature a project that would be perfect for the Mickey's Kitchen devotees: pot holders. I love the size of these. They are perfect for holding a hot mug of soup or a bowl that's been zapped in the microwave. It's also the ideally sized for the tea kettle handle. And it's easy enough that older kids can help with this project.

You could customize this project for any Disney character's color scheme (red, white, blue & yellow for Donald; green, blue, orange & black for Goofy; etc.) - but since most of the Disney kitchen accessories are in a Mickey color scheme, we chose to stick with red, black, yellow & white.

If you don't already have a potholder loom, they are fairly inexpensive and easy to come by. I found mine at the local JoAnn's, but they are available online as well. Check out Amazon for a wide selection, or just google potholder loom & use the shopping link. I have had good luck finding the loops in the kid's crafting area of any major craft or education store. But if you are finding it difficult to locate some (or get out of the house!), you can purchase them here.

Experiment with color and pattern. Doc helped me weave these two patterns and we loved the way they turned out. After completing these two, we had a few helpful hints to pass along:

1. The last couple rows of weaving are tricky, as the loops will want to pop off the loom. Go slowly.
2. To finish edges we used an H crochet hook started in the top right hand corner. Pull first loop off and leave on your hook; pull the second loop off and single crochet. Continue around the entire loom, pulling the last loop all the way through so it sticks out.
3. The last edge of the potholder wanted to pull off the loom; try to prevent that by using your left hand to hold it down while you finish the edge (assuming you are right handed).

And that's it! We were able to make 2 of these in an hour. If it's your first attempt at using the loom, give yourself a bit more time. And most importantly have fun! Until next time, may all your days be filled with fairy dust!

Saturday, June 4, 2016

DIY Disney Closet Divider Tags

DIY Disney Closet Tags
When I saw these shapes in the Silhouette store, I knew I would need them. I am an organizer, a planner and I prepare. And this is never more true than when we are going to Walt Disney World. When I pack, I pack in outfits. I like to know that I'll have everything I need to look put together all in one place. It all gets laid out by day, and then put together in the suitcase as one. Ziplock baggies are especially helpful in this department and come in handy if you have wet bathing suits to bring home. And I love not having to think about things like what to wear when we are at the parks.

As an aside, I highly recommend unpacking your suitcase when you arrive at your resort. There is nothing worse than trying to decipher which clothes are dirty and which are clean when you are running late to your ADR. (And we are always running late. I assure you.) Also, I always designate an empty bag or drawer for dirty clothes. That way we are not tripping over one another's ish in a tiny space.

With these tags, I can easily mark which outfits are to be worn on what days; no more arguing with the kids. Even better, I can see at a glance if I have packed enough clothing, or not. Once it's all together, it goes in a big ziplock bag, tag included. When we arrive at the resort I simply hang the entire outfit together on a hanger and pop the tag over it. Done! Everyone knows which outfit is for which day. I can even plan an outfit for a special character meal that I know will look good in the photos later on. So no matter who is helping Happy get dressed, they know what he should wear and I don't have to interrupt what I'm doing to pull out clothes. Let's foster independence where we can, shall we?

I used my basic scrapbooking supplies to create these tags; mostly using paper and ribbon. I themed them to the Classic Disney Characters, but you could do these for any set of characters that mean something to your family. I may try and do a set based on Phineas and Ferb for Doc; his clothes will be in a separate room from ours. These tags represent, Sunday - Minnie, Monday - Mickey, Tuesday - Donald, Wednesday - Goofy, Thursday - Pluto, and Friday - Daisy. I know, I don't have Saturday; won't be needing that one on this trip. Too bad. We'll just have to remedy that another time!

And for those who may need to know, the design ID numbers for these Hanger Tags are: 32018, 32017, 32016, 32015, 32014, 32012, 32011. Until next time, may all your days be filled with fairy dust!

Thursday, June 2, 2016

DIY Disney Tshirt Upcycled Bib

When you travel to Walt Disney World as much as we do, you can wind up with a lot of old Tshirts that are stained, too small, or simply "not your thing" (as Doc likes to say.) You certainly could donate them to a good cause, or you could choose to upcycle them. Being drawn to the crafty side of life, I like to upcycle.

The cottage is full of baby and toddler paraphernalia at the moment, and bibs are always in high demand. I especially appreciate the absorbent ones, as Happy seems to have been teething for a year solid and the drool has become an issue. Making bibs from too small Ts is a great way to get a little more life out of them. I know I find it sad when the last kid has outgrown that cute shirt we purchased in the parks several years ago. I also think these would be an awesome shower gift for the Disney enthusiast in your life. You know who they are; and trust me, these would be greatly appreciated.

I used this great tutorial from A Little Tipsy. It's very straightforward and even the novice seamstress could make a few of these at minimal cost. Instead of backing mine with Minky, I chose to use old towels that had made their way to the scrap bin. They are are nice solution to all the drool. I also found it difficult to cut around the existing neck of the T shirt. I actually cut out the Cars bib by placing the pattern on the tshirt so I could cut out the design, but then cut out the straps of the bib from a separate area of the tshirt. It meant sewing a few extra seams, but it was less frustrating for me that way. Michelle addresses this in the tutorial. I also found it easier to trace the pattern onto the shirt and then cut it out, instead of the traditional way of laying the paper patten on the fabric and cutting around it.

This little Tinkerbell shirt had a cute ruffle around the neck that I wanted to preserve. My pattern got a little funky, but I was able to save it. At first it really wanted to turn up at the neck, but after I topstitched all the way around the bib, the ruffle stayed in place.

If you decide to try this, drop us a picture in the comments, or link to our instagram feed so we can see what you're up to. Until next time, may all your days be filled with fairy dust!

Tuesday, May 31, 2016

DIY Disney Camera Buddy

DIY Winnie The Pooh Camera Buddy
I've been wanting to give this idea a try for a while now, but didn't want to screw up a $20 souvenir! So when I recently stumbled upon Tuesday Morning's clearance sale, I knew it was time to give this a try. Have you ever tried getting a little one to look at your camera? It can be pretty tricky. This camera buddy will turn your clunky black box into a soft fluffy Pooh Bear. A much nicer and interesting object to look at, don't you think?

I found this Winnie The Pooh plush for only $4; a steal if you ask me! And I used this very easy to follow tutorial on  making lens creatures. Seriously, it only took me an hour. And the tutorial only calls for scissors, pins, needle & thread, and enough elastic to wrap around your lens twice. THAT'S IT.

My seams were not so lovely, but since they are facing the lens, it doesn't really matter. I will say, I was surprised at how hesitant I was to cut into Pooh. I suppose Doc McStuffins has it's affect on a Mama.

Overall, I couldn't be happier with how this Camera Buddy turned out. I had no idea it would come together so quickly! I think this would be a fantastic gift for a new mom, a scrapbooker, or a Tinkerbell Treasure for your resident Disney photographer. It would also be a great way to upcylce those Disney souvenirs that get neglected. If you have a passing thought that this would be of interest to a fellow Disney mama, you absolutely should give it a try. Until next time, may all your days be filled with fairy dust!

Thursday, May 26, 2016

DIY Disney Road Trip Travel Clips

Happy Memorial Day Weekend Musketeers! In honor of the long road trip we have ahead of us, I'm running this great road trip idea! I hope you enjoy it and have a beautiful holiday weekend wherever you are.


Say Hello To Good Behavior!
We have traveled to Walt Disney World in just about every way possible, although I'm still holding out for the auto train. When I was younger, we rode down in our MT Motorhome. In my opinion, there is no better way to go! Of course, I wasn't driving, so that may have something to do with that. We've gone by airplane, driven through the night, even taken a conversion van and tents. Our next trip will be in our new minivan. I'm not exactly dreading the trip; in fact, there are several things I am looking forward to about it (not the least of which is that our own Mary Poppins will be able to come with us!) But we all know that a long road trip can wear on the best of us, so I've taken some precautionary measures. When your traveling from a cottage in the Midwest to Florida, it pays to have every advantage you can get!

This was an inspired idea from Julie at Less Than Perfect Life of Bliss. I took it and Disney-fied it. I used our blog names and created a tag for each of us -- yes, even the adults. The idea here is that everyone starts with his or her clip on the visor. Good behavior = clip stays up. Bad behavior = clip comes down. (Your elementary teacher probably had a similar system.) It's up to you how you enforce this, but we give the opportunity to earn your clip going back on the visor, by being helpful, polite, etc. Just make sure everyone is clear on the rules at the start. At the next stop (gas, rest area, restaurant) whoever has a clip still on the visor gets a goodie. (This is where that Tinkerbell Treasure hunting can come in handy!) I'm all for bribery - especially in the case when 6 people are trapped in a van for 18 hours, two of whom are strapped into carseats.

One caveat, our visor was too thick for the clothespins to clip onto it. I took some elastic and made a band that fit over the visor. We clipped the clothespins to that. If you need to do the same, make sure you subtract a couple inches from the band measurement; you want it to be nice and tight against the visor. Those clips can get heavy!

I love this idea. Simple and cute! Until next time, may all your days be filled with fairy dust!

Tuesday, May 24, 2016

DIY Disney Pressed Penny Push Pins


I am a self-professed pressed penny enthusiast. I always head to Disney armed with rolls of quarters and pennies. It's a great way to keep the littles busy while we wait for the thrill-seekers to to finish their attractions. I especially love to hit the penny machines in the shops on Sunset Boulevard in Disney's Hollywood Studios. The wait for The Rockin' Roller Coaster and Hollywood Tower of Terror can be LONG. If we didn't get fast passes and we've already finished the Disney Jr. show, this is where I go to keep the kiddos busy. Of course, there are penny machines throughout the entire Disney Resort. Some of the best pressed pennies can be had at some of the less-visited places. A pressed penny hunt can be a great activity for a non-park day.

And what's better than a 51 cent souvenir? This also means, however, that I have quite a collection of pressed pennies. And that I am always looking for something to do with them. It occurred to me that I could glue them to some flat head push pins to create a unique (and useful) souvenir. I LOVE a useful souvenir. I feel better about it taking up space in my house. So these fantastic little beauties were born! I used Gorilla Glue, but I think an epoxy or even Super Glue would do the trick.

So simple and so fun. I think they'd be the perfect stocking stuffer, don't you? Or perhaps a graduation gift? After all, the traditional graduation gift is money, right? Wrap these up in a sweet little box and include a couple of bills in there too. Voila! Thoughtful and easy - my kind of gift! And these certainly fall into the nap time friendly and budget friendly category as well. I just love these little gems. I see many sets in our future!

I hope you have fun making these, and until next time, may all your days be filled with fairy dust!

Thursday, May 19, 2016

Tinkerbell Treasures: Coin Rolls

I saw this idea on pinterest, via Martha Stewart, as a stocking stuffer and thought it would be great for a Tinkerbell Treasure! I love the pressed penny machines in Disney. I think they are a great way to spend your waiting time -- waiting for a dinner reservation, waiting for the taller kiddos to finish their thrill rides, waiting for mom to check out at the shops. I'll buy that kind of patience for 50¢ any day of the week! Plus, there are all sorts of games you can play with the pressed pennies once you've collected a few (more on that in a later post).


For these coin rolls I decided to just wrap them in scrapbook paper scraps, but you could certainly decide to use a solid paper and ribbons that match your child's favorite Disney character, or specifically Disney paper. And I was tempted to skip the cellophane, but it really makes a big difference in keeping the ends of the rolls together and adding a sweet touch. A roll of quarters ($10) and a roll of pennies (50¢) should keep two kids busy for at least a couple of days (that's 10 pressed pennies each), that is, if they don't develop an obsession for collecting pressed pennies!

If you want to make these for the pressed penny lover in your life, I have a downloadable page of tags for you to use. Just click here, or click on the thumbnail below to download. Until next time, may all your days be filled with fairy dust!

Saturday, May 7, 2016

Tinkerbell Treasures: Disney Door Hanger DIY

As I have mentioned, I LOVE giving Tinkerbell Treasures while in Disney. There is something so magical about the idea of Tink delivering a little something while you sleep. I can't resist it.

These door hangers would be so fantastic for those little giftees that need a special presentation. I like to use them on the bedroom doors in our villa. It's a sure-fire way to get the kids' day started off right. This would be an especially good way to tell the kiddos what's on the agenda for the day. You could fill them with a map of the park you are headed to (these are free and always available at the front desk), a new pair of shades, a snack, a new trading pin, a few Disney Dollars, a gift card to the arcade, the possibilities are endless. We always try to schedule a non-park day while in Walt Disney World, and this is a great way to add a little excitement to those less intense days. (I can also see them used as sleepover party favors, or birthday morning goodie bags.)

I used my Silhouette SD to make these. It was SO simple. I used design shapes 3d Door Hanger (id #21330) and House of 3: Dream Scallop Seal (id# 6821). I resized the door hanger so the box portion was as large as I could make it:


I had to then move the hanger shape to another page. After that I just cut and put it together. Easy peasy! I would recommend using the heaviest card stock you have if you plan on filling this with anything heavier than a map and some Disney Dollars. It wants to come off the handle fairly easily. You could also solve this problem by taping it together once it's on the door.

I hope you find lots of ways to use these versatile door hangers. Until next time, may all your days be filled with fairy dust!

Tuesday, April 26, 2016

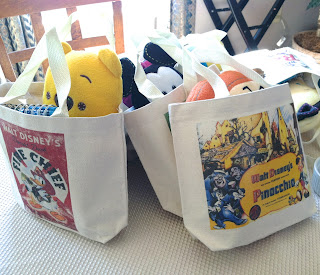
DIY Disney Tote Bags

The links for the posters in this post are no longer available. But you can find some great Disney poster art on the Disney Movie Rewards website under digital rewards. They seem to rotate in and out with some regularity, but if you keep a look out, you can find some very fun and unique stuff in there! And of course you can run an Etsy search to see what else might be out there. Enjoy this rerun of one of my favorite Disney gift ideas!

___________________________________________


Breaking up is hard to do, and it's always hardest when we have to say goodbye to Walt Disney World. We all tend to be tired and cranky, and we usually like to maximize our time there, so we are leaving on the last plane home - our friends like to call it the Disney Express. It's a plane filled with other tired, cranky, bloody stumps of people. I think it's incredibly important to have a little something special for the ride home.


I decided to make these cute little tote bags for each kid for "leaving day." I filled them with homemade Rice Krispie treats, a game to pass the time, and a few other little treats I found along the way. If you have a dining plan with snacks left on it, this is a great way to use them up. Stop by any gift shop and pick up bags of pretzels or other packaged goodies that fit within the plan.

For the tote bags I used Transfer MAGIC's Inkjet Transfer Paper for Light Colored, Light Weight Fabrics. I still got a plasticy finish to the transfer, but on the canvas bags, it was fine. The images are from the same series of vintage Disney poster images through Nukes at Etsy. These are top quality and big, so at a dollar an image, you can't go wrong. I used Photoshop to size and reverse the image for transfer. If you have text on your image, DON'T FORGET TO REVERSE your design before you print!

I found these tote bags fairly inexpensively at Hobby Lobby. I found a 4 pack for $8.00. (If you use your 40% off coupon, they are really a steal!) They are 100% cotton canvas, and the iron-on paper worked beautifully on them. Since I already had the transfer paper they were only $3.00 a bag. That's a price I can live with!

Leaving The Mouse is never easy, but a little goodie bag can help ease the transition home. Until next time, may all your days be filled with fairy dust!


Saturday, April 23, 2016

Disneyland Snickerdoodle Knockoff Recipe

Sometimes it seems like a really long time between visits; that's when a little kitchen magic can really come in handy. I found this Disneyland Main Street Bakery Snickerdoodle knock-off recipe on Pinterest and decided a rainy afternoon was the perfect time for a little Disney pick-me-up. The family was happy to oblige!

It was simple to make them into Mickey heads. Instead of rolling only one ball, I rolled one larger and two smaller balls and laid them out on the cookie sheet as such. I tried not to smash the ears on too much, as they do spread in the oven.

They took a little longer to assemble than regular snickerdoodles would, so I was able to assemble one pan while the other was baking. It was just about the perfect amount of time. Be sure to let the cookies cool just a bit on the pan before moving them to the cooling racks - we lost a couple ears by being impatient! (Although, it was a good excuse for an early taste!) My apprentice chef became quite good at rolling and pressing out the Mickeys.
One small deviation from the recipe - I like a lot of cinnamon sugar on my snickerdoodles, so we employed the Joy of Cooking technique of rolling each ball of cookie dough in a bowl of cinnamon sugar, instead of sprinkling the tops as the original recipe suggests. A personal preference, but worth it, in my humble opinion.

And because someone will ask, the WDW serving tray was one of my parents' first souvenirs. It lived in our motor home until it died and now it comes out whenever we need a little shot of Disney magic! Until next time, may all your days be filled with fairy dust!