
Showing posts with label Christmas. Show all posts
Showing posts with label Christmas. Show all posts
Thursday, December 25, 2014
Tuesday, December 23, 2014
12 Days of DIY Disney Holiday Goodies | Grapefruit Cake from the Brown Derby

The Grapefruit Cake very dense and the frosting is of the cream cheese variety. I also tend to like my sweets a little less sweet and a little more savory or tangy. So there you have it. If you like a dense cake with cream cheese frosting, give this recipe a try. It could really surprise you. I think it's the perfect thing for finishing off your Christmas Dinner. Oh, and I make two cakes so my layers aren't super thin. Here's the recipe:
Disney's Hollywood Studios Grapefruit Cake:
Ingredients:
1-1/2 C sifted cake flour
3/4 C sugar
1-1/2 t baking powder
1/2 t salt
1/4 C water
1/4 C vegetable oil
3 eggs separated
3 T grapefruit juice
1/2 t grapefruit zest
1/4 t cream of tartar
Prepare:
Sift together flour, sugar, baking powder, and salt into mixing bowl. Make a well in center of dry ingredients. Add water, oil, egg yolks, grapefruit juice, and lemon rind. Beat until smooth. Beat egg whites and cream of tartar separately, until whites are stiff but not dry. Gradually pour egg yolk mixture over whites, folding gently with a rubber spatula until just blended. Do no stir the mixture. Pour into an ungreased pan. Bake at 350 for 25-30 min., or until cake springs back when lightly touched with a finger. Invert pan on cake rack until cool. Run spatula around edge of cake. Carefully remove from pan.
Yield 4-6 portions
Cream Cheese Frosting:
Ingredients:
2 6-oz packages of cream cheese
2 t lemon juice
1 t lemon zest
3/4 C powdered sugar
1 16 oz can grapefruit sections (or one grapefruit, sectioned)
Prepare:
Let cream cheese soften at room temperature. Beat cheese until fluffy. Add lemon juice and zest. Gradually blend in sugar. Beat until well blended. Crush several grapefruit sections to measure 2 T. Blend into frosting (this makes it so pretty!). Spread frosting on bottom half of cake, cover with second layer of cake. Frost top and sides. Garnish with grapefruit sections.
It's a bit of work, but SO worth it! Until next time, may all your days be filled with fairy dust!
Thursday, December 11, 2014
12 Days of DIY Disney Holiday Goodies | Mickey's Strawberry Santa Hats

I found these delicious looking strawberry santa hats on the Disney Family website. And this is a direct lift from their page. These look great and I fully intended to make them, but Miss Minnie ate all my strawberries before I had the opportunity to give it a try! (She absolutely loves her berries!) I hope I will be able to get to it before the season is over, if not, we may have ourselves a little Christmas in July celebration this summer!
Enjoy this post from Family.Disney.com, and until next time, may all your days be filled with fairy dust!
What You’ll Need
•
•
•
•
How To Make It
- 1Wash the strawberries with cool water, and carefully remove the hulls. Pat the fruit dry with a paper towel.
- 2Melt some white chocolate in the microwave or on the stovetop, following the directions on the package.
- 3Working with one wafer cookie at a time, dip the surface in the melted candy so that it is generously coated. If needed, dip it twice.
- 4Place the dipped cookie on wax paper (coated side up), and immediately set a strawberry (hulled side down) on top. Quickly, but gently, push two small chocolate disks against the base of the berry for ears, holding them in place for a few seconds to make sure they stick. If they don’t hold, use a little more melted candy to attach them.
- 5Repeat steps 3 and 4 to make as many more hats as you want, reserving some of the melted white chocolate for the pom-pom tops. When you’re ready to add the pom-poms, let the melted white chocolate cool slightly so that it will thicken a bit. Then spoon a small blob onto each strawberry tip.
- 6Finally, add a little texture to the hat trim, if you like, by using a fork to gently “scramble” what’s left of the partially cooled white chocolate (it should resemble flaked coconut). Gently press some of the white chocolate flakes onto the candy hat brims while they are still warm so they will stick in place. Once the candy is completely set, arrange the finished hats on a plate to serve.
Tuesday, December 9, 2014
12 Days of DIY Disney Holiday Goodies | Matterhorn Macaroons

A caveat: I find macaroons tricky to make. They take patience and this is an area in which I lack. When I saw this recipe for Matterhorn Macaroons (from Rumbly in My Tumbly), I decided I would give them a try. They don't sound difficult, and I am always looking for a new and different cookie recipe for the annual cookie exchange in my sorority. Unfortunately, these were a bust for me. Well, mostly a bust. The resulting cookie tastes delicious! But I could not get them to make peaks. Once in the oven they flattened right out. I didn't bother with the topping since they didn't hold their shapes. And don't forget to store them in an air tight container. If you don't they will get very hard on the outside.
Here's the recipe if you want to give it a try:
Matterhorn Macaroons
A Rumbly in my Tumbly original
Ingredients:
4 egg whites
3/4 teaspoon vanilla extract
3/4 teaspoon almond extract
1/8 teaspoon cream of tartar
1 1/2 cups white sugar
1 cup all purpose flour
1/4 teaspoon salt
2 1/2 cups flaked coconut
Topping:
1 bag of white chocolate chips (or white candy melts)
2 tablespoons milk or cream
confectioners sugar for dusting
Directions:
Preheat the oven to 300°. Line a cookie sheet with parchment paper.
In a medium bowl or mixer, beat egg whites, vanilla, almond extract, and ream of tartar until soft peaks form. Gradually beat in sugar and whip until stiff.
In a separate bowl, combine the flour, salt, and coconut. Fold into the egg whites. Drop by heaping tablespoons onto prepared cookie sheets, shaping each one into a “matterhorn mountain.” This is messy, and I found it worked best if I wetted my hands before shaped each one.
Bake for 20-30 minutes (depending on size) until slightly golden.
Melt the white chocolate with the cream over a double broiler, and dip the top of each cooled macaroon into the melted chocolate. Sprinkle with confectioners sugar.
Saturday, December 6, 2014
12 Days of DIY Disney Holiday Goodies | White Chocolate Raspberry Cookies

These cookies are some of the best we have baked, bar none. I mean it. They live up to all the hype around them and they are really fairly easy to put together. The hardest part is not over mixing the jam! Everyone in the cottage (and that's a fair amount of people right now!) raved about them. And they are vanishing into thin air. Proof positive that this is a keeper.
If you are looking for a new recipe for your traditional cookie exchange, this one will have the other members of your organization begging for the recipe. Thanks to bakerlady for this one.
Disneyland’s White Chocolate Raspberry Cookie
adapted from Rumbly In My Tumbly
2 1/2 C Flour
1/4 tsp baking soda
1/4 tsp baking powder
1/4 tsp cream of tartar
1/2 C butter, room temperature
1/2 C granulated sugar
1/2 C brown sugar
1 egg + 1 egg yolk
1/4 tsp salt
1 tsp vanilla extract
1/4 tsp almond extract
Raspberry Jam (I used about 4 TBSP)
3/4 cup white chocolate chips
3/4 cup semi-sweet chocolate chips
Directions
1. Cream the butter & sugars until light and fluffy. Add egg/yolk, vanilla and almond extracts. Mix well. Add dry ingredients and mix until just combined. Add white & semi-sweet chocolate chips.
2. Scoop out about 1/4 of the dough into a smaller bowl. Add about 1 T of jam and cut it in using a butter knife. Be careful not to MIX it, or your dough will turn pink, you want more of a swirl.
3. Take the jam swirled dough and scoop by spoonfuls (I used a large melon baller/ice cream scoop) onto a cookie sheet lined with parchment paper. Flatten slightly with the back of a spoon or spatula and place in a 350° oven for 12-17 minutes. *Your bake time may be less depending on the size of cookie you make. I wanted mine big and bakery sized, so they took a little longer. Take them out when the edges are set but the center is still puffy and soft. Cool on baking sheet 5 minutes then transfer to a wire rack to cool completely.
4. Repeat steps 2 & 3 until all the dough is used.
Thursday, December 4, 2014
12 Days of DIY Disney Holiday Goodies | Mickey Mouse Snickerdoodles

Sometimes it seems like a really long time between visits; that's when a little kitchen magic can really come in handy. I found this Disneyland Main Street Bakery Snickerdoodle knock-off recipe on Pinterest and decided a rainy afternoon was the perfect time for a little Disney pick-me-up. The family was happy to oblige!
 It was simple to make them into Mickey heads. Instead of rolling only one ball, I rolled one larger and two smaller balls and laid them out on the cookie sheet as such. I tried not to smash the ears on too much, as they do spread in the oven.
 They took a little longer to assemble than regular snickerdoodles would, so I was able to assemble one pan while the other was baking. It was just about the perfect amount of time. Be sure to let the cookies cool just a bit on the pan before moving them to the cooling racks - we lost a couple ears by being impatient! (Although, it was a good excuse for an early taste!) My apprentice chef became quite good at rolling and pressing out the Mickeys.
One small deviation from the recipe - I like a lot of cinnamon sugar on my snickerdoodles, so we employed the Joy of Cooking technique of rolling each ball of cookie dough in a bowl of cinnamon sugar, instead of sprinkling the tops as the original recipe suggests. A personal preference, but worth it, in my humble opinion.
And because someone will ask, the WDW serving tray was one of my parents' first souvenirs. It lived in our motor home until it died and now it comes out whenever we need a little shot of Disney magic! Until next time, may all your days be filled with fairy dust!
Tuesday, December 2, 2014
12 Days of DIY Disney Holiday Goodies | Disney's Famous Gingerbread

If you've never made gingerbread cookies, I will start by saying, this is a process! The dough can be made ahead and refrigerated for up to a week. And this dough is stiff. It takes some real muscle to roll it out! But the payoff is TOTALLY worth it. Here is the recipe for the cookies and the icing. They are good without the icing; they are incredible with it! And if you don't have a pastry bag and tip for the icing, don't fret. Just put it in a ziplock bag and snip a hole in the corner of the bag as demonstrated here.
Until next time, may all your holidays be filled with fairy dust!
 Gingerbread Mickey
yield: approx. 3 dozen cookies
1/4 C unsalted butter
1/2 C brown sugar
1/2 C dark molasses
3 1/2 C all-purpose flour
1 tsp baking soda
1/2 tsp ground cloves
1 tsp ground cinnamon
3 tsp ground ginger
1/2 tsp salt
1/4 tsp ground cardamom
1/2 C water
In a lage mixing bowl, cream butter and brown sugar. Add dark molasses and blend until completely absorbed.
Sift all dry ingredients together and add to butter mixture in thirds, alternating with water. Blend completely. (I added at least 2 tablespoons more of water and I think I could have even added more. the dough did not want to hold together.)
Store dough, wrapped in plastic, in refrigerator until well chilled.
Preheat oven to 350 degrees F.
Grease cookie sheet (or use Silpat mats)
Roll dough on a lightly floured surface and cut into desired shapes.
Bake on cookie sheet for 8-10 minutes, depending on size. Cool on a wire rack.
Cookies can be decorated before baking with nuts and candies, or when cool with royal icing.
Royal Icing
1 pinch (1/8 tsp) cream of tartar
2 egg whites
3 1/2 C powdered sugar, sifted
Add cream of tarter to egg whites. Beat egg whites in a small bowl with electric mixer at high speed until whites hold a soft peak. Reduce speed and gradually add sifted powdered sugar. Continue to whip frosting until a smooth, spreadable consistency is reached.
At this point, frosting can be separated into small bowls and colored with food coloring, as desired. Frosting will become very hard when dry.
Note: before preparation of frosting, make sure all utensils are free of any grease or oil and egg whites are free of any yolk. Egg whites will not whip if mixed with any type of oil or fat.
Saturday, November 29, 2014
12 Days of DIY Disney Holiday Goodies | Snow's Perfect Apple Punch

I like a recipe for which you can make just one glass at a time, or an entire batch for a party. I've included both recipes for you here! You could certainly use this recipe without the brandy, but I think it's a marvelous addition!
And of course you can skip the garnish if you wish, but do yourself a favor and don't skip it. A pretty drink always makes me feel a little more special. And who couldn't use that, especially at such a busy time of the year! Cheers to a yummy winter warm up! Until next time, may all your days be filled with fairy dust!
Snow's Perfect Apple Punch
For one glass:
pour 2/3 C cider into mug, heat in microwave until steaming hot
add 1 jigger brandy, stir well
sprinkle with cinnamon and cloves to taste
garnish glass with one apple wheel, a cinnamon stick
For one punch bowl:
pour one gallon cider into pot
add several tablespoons of mulling spices
Bring to a boil, turn heat down and simmer for about 20 minutes
remove from heat and allow to cool slightly
add 3 cups brandy
Pour into punch bowl and float apple slices on top
Wednesday, November 26, 2014
12 Days of DIY Disney Holiday Goodies | Pumpkin Fudge
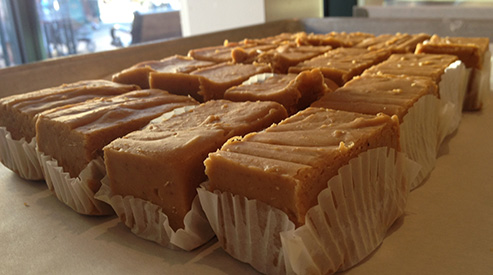
Today, since we are still so near to Thanksgiving, (and you may need an extra little something for your dessert table!) we will start off with Pumpkin Fudge! You can find this fudge at Marceline's Bakery in Downtown Disney at the Disneyland Resort in California, and the Main Street Bakery in Walt Disney World once fall rolls around! Thanks to Magical Recipes for the recipe. And until next time, may all your days be filled with fairy dust!
Ingredients
Ingredients
1 1/2 cups granulated sugar
1 1/2 cups packed light brown sugar
1 1/2 sticks unsalted butter, cut into small pieces
2/3 cup evaporated milk
2/3 cup pureed pumpkin
1 tsp cinnamon
1/4 tsp nutmeg
1/8 tsp cloves
2 cups white chocolate chips
1/2 lb marshmallows or marshmallow crème
3 Tbsp maple syrup
Instructions
Line a 12×8 inch baking dish with foil, letting it hang over the edges.
In a large sauce pan, whisk together the sugars, butter, evaporated milk, pumpkin, and spices.
Bring to a boil over medium heat, stirring constantly.
Continue boiling for 10-12 minutes or until the candy thermometer registers 235 degrees Fahrenheit – soft ball stage (soft ball stage occurs when you drop some of the mixture into a bowl of cold water, and it forms a “soft ball” when it cools and is removed from the water).
Stir in the white chocolate chips first, and then the marshmallows or marshmallow crème and maple syrup. Stir until melted, and then immediately pour into the prepared pan.
Let cool on a wire rack for 2 hours or until completely cooled.
To cut, lift the foil from the ends of the dish.
Cut the fudge into 1 inch squares.
Store in the refrigerator or freezer.
To cut, lift the foil from the ends of the dish.
Cut the fudge into 1 inch squares.
Store in the refrigerator or freezer.
Tuesday, April 22, 2014
Disney Park Map Project Round Up for Earth Day
Since it's Earth Day, I thought it would be nice to do a round up of all the Disney Park Map posts I've done in the last year or so. As we all know, Jimminy Cricket wants us all to be responsible with our resources and think about our environment! These projects are a fun Disney way to incorporate the three Rs into your Disney trips: reduce, reuse and recycle!
First up, make a Disney park map gift bag!

Or you could make some fun coasters from ceramic tiles and your Disney park maps.

You could use them as an insert for an insulated travel mug, so you always have a little Disney with you.

You could also insert a Disney park map into a three-ring binder for an instant Disney boost at work or at school!

You could decoupage an ornament for the holidays, or create this orb ornament.


You could decoupage a candle for your home (or a gift!) with Disney park maps too.

And finally, you could use your Disney park maps to make a block puzzle suitable for your coffee table or your next road trip box.

What ever you decide to do, we hope you remember to reduce, reuse and recycle those maps. Until next time, may all your days be filled with fairy dust!
First up, make a Disney park map gift bag!
Or you could make some fun coasters from ceramic tiles and your Disney park maps.
You could use them as an insert for an insulated travel mug, so you always have a little Disney with you.
You could also insert a Disney park map into a three-ring binder for an instant Disney boost at work or at school!
You could decoupage an ornament for the holidays, or create this orb ornament.
You could decoupage a candle for your home (or a gift!) with Disney park maps too.
And finally, you could use your Disney park maps to make a block puzzle suitable for your coffee table or your next road trip box.
What ever you decide to do, we hope you remember to reduce, reuse and recycle those maps. Until next time, may all your days be filled with fairy dust!
Wednesday, December 25, 2013
Merry Christmas!

Monday, December 23, 2013
Bouillabaisse from Epcot's France Pavilion For Your Christmas Dinner Menu
 |
| Bouillabaisse from Disney's Bistro de Paris |
On our most recent trip to Walt Disney World, I was in search of a new Disney cookbook. We've had Mickey's Gourmet Cookbook for years, and I still reference it regularly. But I was ready for a new collection of recipes. I came home with this wonderful book: Delicious Disney. I couldn't be happier. It has a wide variety of recipes and although this one seems extravagant, it was really simple to put together. I did this for a week night meal. I purchased seafood stock instead of making my own and used canned tomatoes since the fresh ones we get in winter are not worth eating. The bouillabaisse got rave reviews from everyone but the kids (which I expected). Here's the recipe:
Bouillabaisse Provençale
serves 8
2 cloves garlic
1 shallot, sliced
1 bay leaf
2 cups peeled fresh tomatoes (I used canned)
2 cups fish stock (I used packaged seafood stock)
1 cup dry white wine (I used a pinot grigio)
1/2 tsp fennel seeds
1/8 tsp saffron
1 tsp coarse salt
1/4 tsp freshly ground pepper
2 T chopped parsley
2 raw lobster tails, without the shell, cut in 4 pieces
1 lb cod, cut in 1 1/2 inch pieces
1 lb sea bass, cut in 1 1/2 inch pieces
1 lb snapper, cut in 1 1/2 inch pieces
12 medium shrimp
8 clams
8 mussels
loaf of crusty bread
1. Heal oil in large stockpot over medium-high heat. dd garlic and shallot, and cook until shallots are tender.
2. Add bay lear, tomatoes, fish stock, wine, fennel seeds, saffron, salt, pepper, and parsley; bring to a boil, reduce heart, and simmer for 20 minutes, stirring occasionally.
3. Ten minutes before serving, add lobster, cod, sea bass, and snapper, and cook 5 minutes. Add shellfish and cook 5 more minutes, or until shells open.
4. Ladle into wide serving bowls, and serve with crusty bread.
I hope you enjoy it as much as we did! Until next time, may all your holidays be filled with fairy dust!
Saturday, December 21, 2013
Disney Christmas Wrapping Papers & Protecting The Tree
 |
| Disney Wrapping Paper |
Plus, we need a LOT of wrapping paper, as we use giant boxes to bar the kids from ransacking the Christmas tree. We used this technique for Doc when he was a toddler; one of my former co-workers told me about it and it worked like a charm! And it's is working well for Little Chef and Minnie too. I don't put anything in the boxes, and I didn't put bows on them this year either - last year they were pulled off repeatedly! But if you need a little weight in the bottom of each box, a couple of heavy books (which we have a LOT of) work well for us. I like how it doesn't take away from the Christmasy look of our tree but still does the job of keeping them at arms length, especially with Minnie pulling up on everything right now!
I hope you are getting a little time to slow down and enjoy the holiday season. Until next time, may all your holidays be filled with fairy dust!
Tuesday, December 17, 2013
DIY Disney 12 Days of Christmas Ornaments | Park Map Pomander

If you are already a scrapbooker or paper crafter, then you probably have everything you need to create this ornament. I was able to create this one for under $2.00. That's budget friendly! (And possibly a beautiful, inexpensive, handmade gift for that Disney-loving friend!)
To create this ornament, I used:
- a 1" circle punch
- 2 Magic Kingdom maps
- a paper maché ball ornament (but you could use any ornament you have on hand)
- my tape runner for adhesive
This ornament was really easy to make too! The park map paper didn't always punch out smoothly, but I was able to clean up any circles that didn't punch out perfectly with my scissors. I made this ornament within 30 minutes. That's a project I can handle! Until next time, may all your holidays be filled with fairy dust!
Saturday, December 14, 2013
DIY Disney 12 Days of Christmas Ornaments | Felt Cookie Cutter Ornaments

Upon arrival, I realized, incredibly, that there was not a single usable pine tree among all three lots. Crushing! But not to be deterred, we found a small deciduous tree and decked it out to the hilt! It was the perfect thing for us to do with the adults got the campers situated. (There was always a lot of tension in getting the campers in just so. I think ours had to be cursed at just right before it would cooperate.)
Well let me be the first to admit, that tree was ugly! In that sort of hard-to-look-at ugly Christmas sweater way. But man were we proud of it! I wish someone had taken a picture. The one drawback was that every morning when the trash collection came around they would always slow down as they passed that tree, as if they were contemplating how it came to be and if they should just put it out of it's misery. I took to waking up with mom or dad to make the coffee so I could be outside and protect our ugly-tree from certain demise.
And this, dear friends, is the last remaining vestige of that awesome and glorified tree: my felt Mickey. It's completely hand sewn and kinda lumpy, but it has lived to tell a great tale.
To make this ornament, I folded a piece of white felt and traced around a cookie cutter. I then cut out two pieces. I hand stitched them together, leaving a small opening at the bottom. I turned him inside out, and stuffed him with fiberfil. I then closed up the opening and stitched on the sequins for embellishment. And I have to admit, that this is one of my more cherished ornaments on our tree! Simple and easy and chalk full of great memories.
Until next time, may all your holidays be filled with fairy dust!
Thursday, December 5, 2013
DIY Disney 12 Days of Christmas Ornaments | Sequined Monsters Inc. Pomanders

What you will need:
2 3" styrofoam balls
a package of mixed sequins
1 googly eye
3 packages of straight pins with pearl heads
thread for hanging
I was surprised at how many pins this project took! I needed 1 1/2 packages for each pomander. And because I layered the sequins on each pin 2 or 3 at a time, these are fairly heavy ornaments.
For the Mike Wazowski ball, I started with the googly eye. I then started layering sequins on straight pins and pushing them directly into the ball. One thing I love about this project is that it requires no glue! I had fun layering these sequins this way and that, all around the ball. I did the same thing for the Sully themed ornament without using the googly eye. I decided to make the sequins tighter around the Sully ornament, as the white from the styrofoam was more obvious with the darker colors. I didn't mind the gaps between the sequins as much on the Mike Wazowski ball.
To hang, I made a loop of thread, tied it around one of the pins (and under a sequin or two) and pushed it in. That's it. They've been hanging for a week now with no evidence that it will pull the pin out, despite the weight of the ornaments.
And that's it! Shiny happy Christmas ornaments reminding you that laughter is the best medicine, what could be better? Until next time, may all your holidays be filled with fairy dust!
Tuesday, December 3, 2013
Disney DIY 12 Days of Christmas Ornaments | It's A Small World Cross Stitch Ornament
 from Merryweather's Cottage")
I found a kit for a cross stitched ornament in the clearance bin at JoAnn's. It was less than a dollar. It was for a beach chair, but that didn't really matter, as all I wanted was the canvas and frame.
I then used my own It's A Small World boy pattern to stitch the image of the little boy on the canvas. I decided to have him holding a green pine spring instead of the white sheet music from the other image. He wasn't quite big enough to fill the frame alone, so I created a small border around him and voila! It was done! If you want the pattern, simply click on the photo to enlarge it. It should be big enough to copy.
I followed the directions in the kit for how to assemble it, which entailed cutting out the canvas, adhering the backing and then adhering the canvas to the frame. In all I was able to stitch the design during nap time (45 minutes) and put together in about 20 minutes, including drying time. If you already have the floss colors you need, and the super glue to adhere it, then you have a handmade ornament for under a dollar! Not bad for such a unique gift.
I hope you are finding some time to enjoy the holidays, and until next time, may all your holidays be filled with fairy dust!
Wednesday, November 27, 2013
Disney DIY 12 Days of Christmas Ornaments | Park Maps Star
 I started with a paper mache star from the $1 bin at Michaels, and a map from Disney's Hollywood Studios. I traced the star onto the map making sure the parts of the map I wanted (i.e. The Sorcerer's Hat and Star Tours) would be visible. I then used Gel Medium to adhere the map to the star. If you don't have that, Mod Podge would work equally as well. I made sure to give it a good two coats and dried it thoroughly between each one. When it was dry, I went over the edges of the star with gold craft paint. It seemed to fit the glamor of Hollywood. As I have mentioned, I also love sparkly ornaments on the tree! And that's it! Once it was dry it was ready for display. You could further embellish this with a date from a family trip, or glitter and sequins. It's really all up to your creative whims!
I love the holidays, and I hope this project inspires you to infuse a bit of Disney magic into your holiday season. Until next time, may your holidays be filled with fairy dust!
Monday, November 25, 2013
DIY Disney 12 Days of Christmas Ornaments | Silhouette Mickey Paper Ornament
 Welcome back to our next 12 Days of Christmas project! You are going to love this ornament project; it was so easy! And if you have the supplies already, it might even be free! I didn't have the paper I wanted, so I went to my local JoAnn's and purchased this Disney themed paper for $1 a sheet. That felt expensive, until I realized I could make 9 ornaments from my 5 sheets of paper. That makes these ornaments 55¢ each. Not too shabby for trimming your tree on a budget! (Or for giving inexpensive gifts, or as a special embellishment for your gifts....)
 To create this ornament I used the 3D Traditional Christmas Tree Ornament shape by Lori Whitlock (design ID 34926) for my Silhouette SD. I used the 7 setting on the blade for both the Disney paper, which seemed thicker than other scrapbooking paper, and the glitter card stock. It worked like a dream. I used bakers twine to create the hanger, but you could use any other ribbon or string you have on hand. I simply made a loop and taped it to the inside of the ornament. I used my tape runner to adhere the sides together and that was it! This is most certainly a nap time friendly craft. It took me under 15 minutes to make this from start to finish.
Until next time, may your holidays be filled with fairy dust!
Saturday, November 23, 2013
Disney DIY 12 Days of Christmas Ornaments | Geodesic Ornament
 Today we look at a beautiful geodesic orb ornament. And if cost-cutting is your objective this Christmas, you are gonna love this ornament! I was able to make if from completely free supplies and embellish it with objects I already owned. Nothing says "budget friendly" like "FREE!"
Here's the nitty gritty details:
I started with this tutorial from Balzer Designs.
My materials were all the same as those listed with the exception of scrapbooking papers; I used paint chip samples instead. I love them because the are nice and stiff and best of all, free! I used the larger ones, as I knew I would need to get a circle with a 1.75" diameter out of them. I also added a few supplies:
a bead for the end of the ribbon (from my mom's stash), a castle punch for embellishing (which I picked up at the parks years ago), a sharpie for personalizing the ornament, and glitter glue for the edges (both of which I already had on hand).
I followed the tutorial exactly. I wasn't too concerned about getting an exact match for the folds of the triangles. Because of this, my edges were a little uneven in some places. I solved this problem by adding the glitter glue to the edges. It worked like a charm. I also decided to add some writing to commemorate the trip we took in 2012. If you decide to do this too, write on the pieces BEFORE you adhere them to one another. It's much easier!
The entire project took me about an hour, with the exception of the glitter glue which takes a while to dry. One could easily make several of these over the course of two nap times. All in all, not a bad way to add beautiful ornaments to your tree for free!
I used colors that were inspired by Cinderella and her castle, but you could easily alter this to reflect your favorite Disney character, park, resort, ship, etc. I hope you enjoy creating your own unique Disney ornament. Until next time, may all your days be filled with fairy dust!
Subscribe to:
Posts (Atom)