Showing posts with label Tinkerbell Treasures. Show all posts

Tuesday, August 8, 2017

DIY Figment Sleep Mask


Over the past year or so the 4 year old has been struggling with fear of the dark and "sleeping alone" (although she shares a room with her brother, I suspect she would rather be in the same bed and not just the same room). I have tried to implement several ideas to make bedtime more appealing and less stressful for us both! So far we have created a curtain that surrounds her bed (she's on the bottom bunk), started a kid's meditation (4 quick minutes, you can find the app here), used a dream spray for good dreams (an essential oil and water spray I just whipped up), and use of a sleep mask (remember these Meeko ones?). Most nights it has not been a struggle. This is a good thing!

I was watching her sleeping with her Figment stuffy one night and thought, wouldn't it be awesome to make a sleep mask of Figment? He is her recent obsession and it seemed like one more enticement for bedtime! So I got to work. I simply used the pattern from the Meeko mask for the right size and started altering it to look like Figment. I love how this turned out and so does she! It's a little bigger than I would want it to be but nevertheless she loves it. And it actually sticks out from her nose so it's not as suffocating as the picture makes it look!

I am sure there will be more Figment crafting in the cottage as this is one character we just can't get enough of lately. Until next time, may all your days be filled with fairy dust!

Sunday, February 19, 2017

Magical Coffee | Tinkerbell Coffee Cup Cozy


Sometimes a project just falls into your lap: you realize that you have all the supplies you need and suddenly you go from idea to finished project in less than 48 hours. This Tinkerbell Coffee Cozy is just such a project. and I really love the way it turned out!

Last Thursday I ran into a friend I hadn't seen in a while. As we were chatting with one another we suddenly realized that we went to the same very small college but had just missed one another by a year! It's not something that happens too often and so we had to do all the requisite reminiscing about our alma mater. Later, she mentioned that she loved my Mickey Coffee Cozy (which I almost always have with me!) and further mentioned how she needed one (like NEEDED one) that was Tinkerbell. So how could I resist? I knew I needed a new project for the blog too, so voila! Here you go! Magical Tinkerbell coffee at your service!

This one is not knit, it's crocheted; so you'll need to get your hooks out! But if memory serves, March is national crochet month, so it's the perfect time to dust them off and get this party started! If you want all the details on how to make one for yourself, you can see my notes on Ravelry. I didn't make an actual pattern for it, but if you are willing to do a little guess work, and you don't mind fudging a little bit on the pattern, it's fairly simple. 

I'm really pleased with how this project turned out! I would love to hear if you have done anything like this yourself. Let me know in the comments. And until next time, may all your days be filled with fairy dust!

Saturday, September 17, 2016

Customizing Your MagicBands with My Fantasy Bands

If you have been to Walt Disney World lately you will notice that the DIY and customized Disney experience is at an all time high! LOADS of us are sporting our special shirts, hats, bags and now MagicBands. Of course, we at the cottage are TOTALLY into that!

Today I wanted to introduce you to one of my favorite products for customizing your MagicBand: My Fantasy Bands. These decals are professionally printed and can withstand the abuse of my family! We are still using these same magic bands a year later. And they have all been in the pool and the shower/bath and remain on the bands with no peeling. I am really impressed with the quality of these decals. In fact, if you have booked a trip with me in the last few months, you may have received a surprise package of these for your very own MagicBands!

These decals were really easy to apply, and they come with instructions on how to make them last. Plus she has ALL SORTS of great themes, some seasonal, some Disney related, some just for fun! I can't recommend these highly enough. And if you are on Instagram, you can see lots of her designs modeled by actual guests by following @myfantasybands. Have fun perusing Erin's site! Until next time, may all your days be filled with fairy dust!

Saturday, September 10, 2016

Another Great DIY Disney Luggage Tag!

Thursday's post has inspired me to create another cute DIY felt luggage tag for our family's upcoming Fall Break Trip!

I give you Donald Duck. I was a little worried about sewing around a shape with a lot more definition than the simple three circles of the Mickey head in the last post. But it was not as difficult as I first thought. As long as I went slow it was fine! Here's the trick, I like to make the stitches in the zig-zag closer together. So if your machine can shorten the distance between stitches, I would recommend it. It looks a bit more uniform in the end. I also love how the yellow felt pops on the blue background. You will DEFINITELY be able to spot your luggage on that carousel!

If you want the full description on the how-to, check out my original post DIY Disney Felt Luggage Tags. Until next time, may all your days be filled with fairy dust!

Thursday, September 1, 2016

DIY Small Zippered Mickey Mouse Pouch

As you know, I'm a fan of little bags and pouches for travel. I saw this little beauty and thought it could be Disney-fied with a little alteration. And while I would work a bit on the shapes of the ears, this came together very easily and I would certainly do it again!

I found the original pattern from Dog Under My Desk on Pinterest. I had all the necessary supplies already in my stash, so this project was definitely budget friendly! If you don't already have what you need, I would say this can easily come in under $5.00 a pouch. Still well within my Tinkerbell Treasure limit. And wouldn't it be so cute for all your pressed pennies? Of course the author of the pattern, Erin, suggests using it as a housing for your earbuds. I also love this idea. Keeping those things from tangling with everything else in my bag is forever my mission! And a great solution for the kids! Especially since this isn't too girly - Doc would even use it.

I tried using different circle shapes for the ears, and in the end, went with this: 


As I mentioned before, I would probably choose to go with bigger circles next time. It's always a bit tricky sewing around circles, but over all, I was still pleased with the way this pouch turned out. It will definitely get used! And I can imagine an endless stream of variations for the fabrics and for making it fit different Disney characters.

Until next time, may all your days be filled with fairy dust!

Saturday, August 27, 2016

Upcycled Disney T-shirt Trinket Bag

I have shared this tutorial on the blog before, but it is amazing to me how many of these little bags we use and how handy they are in my travel gear. So I hop you enjoy this rerun from March of 2014!

We are gearing up for another road trip, this time to Disney's Hilton Head Island Resort! In preparation for that, I am getting out all our road trip goodies. I realized that my previous case for all my electronics was woefully lacking in space for my new gadgetry. I needed something with a little more room that I could slip in my knitting basket or my purse without a lot of fuss. And I like having it all in one place, but not a tangled mess in my purse! As I was scavenging through my bin of t-shirts and clothing to recycle, I noticed a t-shirt that Little Chef was not too fond of because the printing on the front was uncomfortable. I didn't even put it in the rotation for Minnie. It was an 18-month Mickey T-shirt and perfectly suited for the job!

This was the easiest project I've done in some time. I simply cut the sleeves and bottom off the shirt, centering the Mickey image, and leaving the neck in tact as a ready-made casing for the drawstring. I used an overlock stitch and sewed up the three sides of the shirt. I then angled the corners in and cut them off, because I like a flat-bottomed bag. This is certainly a step you don't need to take, it just adds a nice touch. If it intimidates you, leave it out.

I then opened up a hole in the collar seam using my seam ripper, and slipped a ribbon through the casing the same way you would in a pair of pants. Because this is jersey, you really don't need to worry about the fabric unraveling, so I simply left the hole in the collar! I tied the two ends of the ribbon together with a knot, turned the bag right-side out and there you have it! Easy as can be!

Now I have a place for all my iPhone, Kindle and iPad cords, earbuds, etc., and they won't be a tangled mess when I want them! These would also be terrific bags for Tinkerbell Treasures, either to give filled with goodies or to give as a goody! And if you don't have an ample supply of 12-18M shirts in your cottage, the Goodwill is an excellent place to get exactly this sort of thing for a bargain price. In fact, I have found some wonderful park merchandise there that we wear in the parks! (No one has to know!) I do love a good bargain. Until next time, may all your days be filled with fairy dust!

Tuesday, July 12, 2016

DIY Alice In Wonderland Disney Tea Cup

I found a wonderful glass mug at the Dollar Store recently, just big enough to do a glass etching on it. And it seemed to say Alice In Wonderland to me. And so this project was born! I used my Silhouette SD to create a stencil that says "Drink Me" using the font Started By A Mouse. It reminds me of Fantasyland - where you can find some fabulous spinning tea cups!

This mug was big enough that I didn't have to finagle the stencil too much around the curves. Once the stencil was on I applied the Armor Etch with a popsicle stick and 10 minutes later, the mug was done! I really love how quickly the etching cream works. This definitely qualifies as a nap-friendly project. And it's budget friendly too! The mug cost a dollar and I already had everything else I needed. You can't beat that!

As an added bonus, I thought I'd share my favorite sleepy time tea recipe, developed right here in the cottage!

Merryweather's Night Time Tea
makes one tea bag (two infusions)

2 lemon verbena leaves, crushed
1/2 tsp. lavender
1/2 tsp. lemon balm
1/2 tsp. peppermint
1/2 tsp. ceylon tea (optional)

Until next time, may all your days be filled with fairy dust!

Saturday, July 2, 2016

DIY Disney Storybook Road Trip Magnet Game

DIY Disney Magnets

If you have ever been on the road with kids for any length of time, then you know that a variety of activities can save your sanity. And this my friends, is road trip season at the cottage! In preparation for our trips I have been scouting out activities on Pinterest that will keep our car entertained. When I ran across this one, I realized I already had all the supplies necessary to give it a try. I am so glad I did! If you ever played with colorforms as a child, this will feel familiar.

I found a couple of scribbled on, torn up Disney Readers in a garage sale this spring. I wasn't sure how I would use them, but I knew I could find a way. I took several of the salvageable pages and cut roughly around them. I then adhered them to some Adhes-a-mag I had hanging around the studio. You could certainly use any sticky-backed magnet sheets. I then went back around the illustrations with more precision to cut out the characters I was interested in.

It was a little bit time consuming, but I'm glad I did it. We'll take a small cookie sheet with us and use these to make up stories together on the way. There are a number of other magnet based games that can be played with a small cookie sheet in the car. I'll be investigating these as well and reporting back if there are any I plan on using this fall. If you've done something similar, I'd love to hear about it. We are always looking for fun car games to play!

Until next time, may all your days be filled with fairy dust!

Tuesday, June 28, 2016

DIY Disney's Frozen Arendelle Notebooks

Here is another great use for the Frozen Travel Posters available at the Disney Movie Rewards site. (I swear, I'm not getting paid to promote them; I just love that they have all this stuff available for free!)

While we do have a younger set of kids traveling with us to Disney this fall, we also have an older set. This means that the coloring pages and activity sheets just aren't going to cut it for them. They needed something a little more grown up. And I really like how these are not gender specific. I think these could easily go to a boy or a girl.

I decided to make notepads for them from some of the old paper we have lying about. (Do you have all sorts of unused school supplies that come home too?!) I put in regular lined paper, but I also included some graph paper and some 3-D drawing paper too. I made sure to cut it down to about 1/4" smaller than the covers. I printed the covers out on card stock as a booklet in Adobe Reader. If you are looking for a source for the heavy book boards for the covers, check with a local photographer. Sometimes they have it for free! You can also search for "book board" on Etsy or Ebay for suppliers. And of course, you could recycle some from existing composition books and notebooks around the house!

I loved to doodle and journal as a kid (well, as an adult too!), so I'm hoping these will be just the thing for the older kids in our travel party. And of course, they could be used as autograph books too should the need arise!

Until next time, may all your days be filled with fairy dust!

Saturday, June 11, 2016

DIY Amagarumi Squirt from Finding Nemo

With the release of Finding Dory on the horizon, I thought it would be fun to revisit this post. Enjoy!

If you like amagarumi and you are not familiar with Roxycraft and Tammie O., let me introduce you. These patterns are very well written and easy to follow and she has quite a selection to choose from. I loved doing this Big Poke as a version of Squirt, from Finding Nemo.

I haven't really worked much with amagarumi. I've dabbled a little for my nieces and Doc, but nothing that I really had a vision for how it should turn out. This project was different. I really wanted it to look like Squirt when I was all done. I'm happy with the end result, but as with most first-time projects, I learned a lot about amagarumi along the way. Here are a few tips I wish I had known before I started:
  1. don't go up a hook size; next time if I don't have the hook I am looking for I will go down a size or buy the hook(s) I need. I don't love how open the stitching is.
  2. Safety Eyes and Suncatcher Eyes are totally the way to go! If you need some, look no further than The Tiny Garden on Etsy. Leslie had a great selection and wonderful customer service. Plus they were really easy to use.
  3. follow the directions; I over stuffed the head and little Squirt won't stand up without a little help - also, the up-a-hook-size thing may have made this more of a problem.
  4. cotton yarn is soft and lovely, but it doesn't fill in the way the acrylic blend does. (I would assume wool would fill in better too.) I'll try a different yarn the next time.
But having said all that, I like this little character. He definitely reminds me of Squirt! Here's what I did to alter the pattern:

I used 30mm Suncatcher Eyes instead of the 18mm recommended in the pattern. I used Scrapbook & Cards today's tutorial to create the crocheted flowers. And obviously I used a different color assortment for the yarn. 

I hope you'll take some time to check out Roxycraft for yourself. And if you make up one of her patterns, we'd love to see it! Tag us on Instagram (@merryweatherscottage) or post a picture here in the comments. Until next time, may all your days be filled with fairy dust!

Saturday, June 4, 2016

DIY Disney Closet Divider Tags

DIY Disney Closet Tags
When I saw these shapes in the Silhouette store, I knew I would need them. I am an organizer, a planner and I prepare. And this is never more true than when we are going to Walt Disney World. When I pack, I pack in outfits. I like to know that I'll have everything I need to look put together all in one place. It all gets laid out by day, and then put together in the suitcase as one. Ziplock baggies are especially helpful in this department and come in handy if you have wet bathing suits to bring home. And I love not having to think about things like what to wear when we are at the parks.

As an aside, I highly recommend unpacking your suitcase when you arrive at your resort. There is nothing worse than trying to decipher which clothes are dirty and which are clean when you are running late to your ADR. (And we are always running late. I assure you.) Also, I always designate an empty bag or drawer for dirty clothes. That way we are not tripping over one another's ish in a tiny space.

With these tags, I can easily mark which outfits are to be worn on what days; no more arguing with the kids. Even better, I can see at a glance if I have packed enough clothing, or not. Once it's all together, it goes in a big ziplock bag, tag included. When we arrive at the resort I simply hang the entire outfit together on a hanger and pop the tag over it. Done! Everyone knows which outfit is for which day. I can even plan an outfit for a special character meal that I know will look good in the photos later on. So no matter who is helping Happy get dressed, they know what he should wear and I don't have to interrupt what I'm doing to pull out clothes. Let's foster independence where we can, shall we?

I used my basic scrapbooking supplies to create these tags; mostly using paper and ribbon. I themed them to the Classic Disney Characters, but you could do these for any set of characters that mean something to your family. I may try and do a set based on Phineas and Ferb for Doc; his clothes will be in a separate room from ours. These tags represent, Sunday - Minnie, Monday - Mickey, Tuesday - Donald, Wednesday - Goofy, Thursday - Pluto, and Friday - Daisy. I know, I don't have Saturday; won't be needing that one on this trip. Too bad. We'll just have to remedy that another time!

And for those who may need to know, the design ID numbers for these Hanger Tags are: 32018, 32017, 32016, 32015, 32014, 32012, 32011. Until next time, may all your days be filled with fairy dust!

Tuesday, May 31, 2016

DIY Disney Camera Buddy

DIY Winnie The Pooh Camera Buddy
I've been wanting to give this idea a try for a while now, but didn't want to screw up a $20 souvenir! So when I recently stumbled upon Tuesday Morning's clearance sale, I knew it was time to give this a try. Have you ever tried getting a little one to look at your camera? It can be pretty tricky. This camera buddy will turn your clunky black box into a soft fluffy Pooh Bear. A much nicer and interesting object to look at, don't you think?

I found this Winnie The Pooh plush for only $4; a steal if you ask me! And I used this very easy to follow tutorial on  making lens creatures. Seriously, it only took me an hour. And the tutorial only calls for scissors, pins, needle & thread, and enough elastic to wrap around your lens twice. THAT'S IT.

My seams were not so lovely, but since they are facing the lens, it doesn't really matter. I will say, I was surprised at how hesitant I was to cut into Pooh. I suppose Doc McStuffins has it's affect on a Mama.

Overall, I couldn't be happier with how this Camera Buddy turned out. I had no idea it would come together so quickly! I think this would be a fantastic gift for a new mom, a scrapbooker, or a Tinkerbell Treasure for your resident Disney photographer. It would also be a great way to upcylce those Disney souvenirs that get neglected. If you have a passing thought that this would be of interest to a fellow Disney mama, you absolutely should give it a try. Until next time, may all your days be filled with fairy dust!

Tuesday, May 24, 2016

DIY Disney Pressed Penny Push Pins


I am a self-professed pressed penny enthusiast. I always head to Disney armed with rolls of quarters and pennies. It's a great way to keep the littles busy while we wait for the thrill-seekers to to finish their attractions. I especially love to hit the penny machines in the shops on Sunset Boulevard in Disney's Hollywood Studios. The wait for The Rockin' Roller Coaster and Hollywood Tower of Terror can be LONG. If we didn't get fast passes and we've already finished the Disney Jr. show, this is where I go to keep the kiddos busy. Of course, there are penny machines throughout the entire Disney Resort. Some of the best pressed pennies can be had at some of the less-visited places. A pressed penny hunt can be a great activity for a non-park day.

And what's better than a 51 cent souvenir? This also means, however, that I have quite a collection of pressed pennies. And that I am always looking for something to do with them. It occurred to me that I could glue them to some flat head push pins to create a unique (and useful) souvenir. I LOVE a useful souvenir. I feel better about it taking up space in my house. So these fantastic little beauties were born! I used Gorilla Glue, but I think an epoxy or even Super Glue would do the trick.

So simple and so fun. I think they'd be the perfect stocking stuffer, don't you? Or perhaps a graduation gift? After all, the traditional graduation gift is money, right? Wrap these up in a sweet little box and include a couple of bills in there too. Voila! Thoughtful and easy - my kind of gift! And these certainly fall into the nap time friendly and budget friendly category as well. I just love these little gems. I see many sets in our future!

I hope you have fun making these, and until next time, may all your days be filled with fairy dust!

Thursday, May 19, 2016

Tinkerbell Treasures: Coin Rolls

I saw this idea on pinterest, via Martha Stewart, as a stocking stuffer and thought it would be great for a Tinkerbell Treasure! I love the pressed penny machines in Disney. I think they are a great way to spend your waiting time -- waiting for a dinner reservation, waiting for the taller kiddos to finish their thrill rides, waiting for mom to check out at the shops. I'll buy that kind of patience for 50¢ any day of the week! Plus, there are all sorts of games you can play with the pressed pennies once you've collected a few (more on that in a later post).


For these coin rolls I decided to just wrap them in scrapbook paper scraps, but you could certainly decide to use a solid paper and ribbons that match your child's favorite Disney character, or specifically Disney paper. And I was tempted to skip the cellophane, but it really makes a big difference in keeping the ends of the rolls together and adding a sweet touch. A roll of quarters ($10) and a roll of pennies (50¢) should keep two kids busy for at least a couple of days (that's 10 pressed pennies each), that is, if they don't develop an obsession for collecting pressed pennies!

If you want to make these for the pressed penny lover in your life, I have a downloadable page of tags for you to use. Just click here, or click on the thumbnail below to download. Until next time, may all your days be filled with fairy dust!

Thursday, May 12, 2016

DIY Upcycled Disney T-shirt Pool Bag


I know I've mentioned this about a bazillion times, but I'll say it again, I hate those plastic-y graphics on T-shirts. Like, a lot. But sometimes you can't help but end up with one from a trip with friends. What to do? I say make a cute pool bag for your next trip! Doc needs a small bag (that's hard to miss!) to keep his sunscreen, hat, phone and arcade card in while he's at the pool. This would be perfect!

I saw this idea on Pinterest and immediately knew it was the project for this T-shirt. The shirt has sentimental value, but I can't bear to wear it. Perfect solution. I followed Jill's tutorial from One Good Thing. I particularly liked how she braided the handles of her bag. Great detail.

Modifications I made to her tutorial: I sewed two diagonal seams at the corner of the bag to give it the shape I was looking for; I also took a strip of fabric from the sleeve and sewed it over the braided seam. It just hid all my imperfect sewing! You can see a close up of it in the photo to the right.

All in all this was a terrifically easy project and certainly nap-time friendly! And for you budget conscious Disney travelers, this project is FREE if you already own the T-shirt. It doesn't get better than that! Until next time, may all your days be filled with fairy dust!

Saturday, May 7, 2016

Tinkerbell Treasures: Disney Door Hanger DIY

As I have mentioned, I LOVE giving Tinkerbell Treasures while in Disney. There is something so magical about the idea of Tink delivering a little something while you sleep. I can't resist it.

These door hangers would be so fantastic for those little giftees that need a special presentation. I like to use them on the bedroom doors in our villa. It's a sure-fire way to get the kids' day started off right. This would be an especially good way to tell the kiddos what's on the agenda for the day. You could fill them with a map of the park you are headed to (these are free and always available at the front desk), a new pair of shades, a snack, a new trading pin, a few Disney Dollars, a gift card to the arcade, the possibilities are endless. We always try to schedule a non-park day while in Walt Disney World, and this is a great way to add a little excitement to those less intense days. (I can also see them used as sleepover party favors, or birthday morning goodie bags.)

I used my Silhouette SD to make these. It was SO simple. I used design shapes 3d Door Hanger (id #21330) and House of 3: Dream Scallop Seal (id# 6821). I resized the door hanger so the box portion was as large as I could make it:


I had to then move the hanger shape to another page. After that I just cut and put it together. Easy peasy! I would recommend using the heaviest card stock you have if you plan on filling this with anything heavier than a map and some Disney Dollars. It wants to come off the handle fairly easily. You could also solve this problem by taping it together once it's on the door.

I hope you find lots of ways to use these versatile door hangers. Until next time, may all your days be filled with fairy dust!

Tuesday, April 26, 2016

DIY Disney Tote Bags

The links for the posters in this post are no longer available. But you can find some great Disney poster art on the Disney Movie Rewards website under digital rewards. They seem to rotate in and out with some regularity, but if you keep a look out, you can find some very fun and unique stuff in there! And of course you can run an Etsy search to see what else might be out there. Enjoy this rerun of one of my favorite Disney gift ideas!

___________________________________________


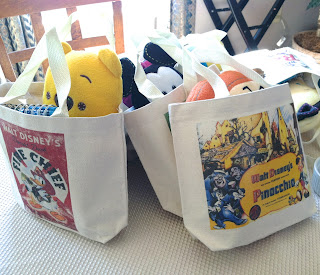
Breaking up is hard to do, and it's always hardest when we have to say goodbye to Walt Disney World. We all tend to be tired and cranky, and we usually like to maximize our time there, so we are leaving on the last plane home - our friends like to call it the Disney Express. It's a plane filled with other tired, cranky, bloody stumps of people. I think it's incredibly important to have a little something special for the ride home.


I decided to make these cute little tote bags for each kid for "leaving day." I filled them with homemade Rice Krispie treats, a game to pass the time, and a few other little treats I found along the way. If you have a dining plan with snacks left on it, this is a great way to use them up. Stop by any gift shop and pick up bags of pretzels or other packaged goodies that fit within the plan.

For the tote bags I used Transfer MAGIC's Inkjet Transfer Paper for Light Colored, Light Weight Fabrics. I still got a plasticy finish to the transfer, but on the canvas bags, it was fine. The images are from the same series of vintage Disney poster images through Nukes at Etsy. These are top quality and big, so at a dollar an image, you can't go wrong. I used Photoshop to size and reverse the image for transfer. If you have text on your image, DON'T FORGET TO REVERSE your design before you print!

I found these tote bags fairly inexpensively at Hobby Lobby. I found a 4 pack for $8.00. (If you use your 40% off coupon, they are really a steal!) They are 100% cotton canvas, and the iron-on paper worked beautifully on them. Since I already had the transfer paper they were only $3.00 a bag. That's a price I can live with!

Leaving The Mouse is never easy, but a little goodie bag can help ease the transition home. Until next time, may all your days be filled with fairy dust!


Saturday, April 9, 2016

DIY Disney Inspired Knitted To Go Cup Cozy

I like to advertise my love of Disney everywhere I go. Let's face it: it's good for business! I wanted to have a little something for when I am at meetings. I can't always wear my Disney Inspired T-shirts from my Redbubble shop! So this little guy was born. It's just about one of the simplest knit projects I've ever done. If you can knit and purl in the the round then you can do this. It took me 40 minutes from start to finish. I found these little buttons in my stash; they are 1/2" for those wanting to duplicate this look.

I posted the simple pattern for this on my Ravelry project page. Feel free to knit and modify it to your heart's content! It would be a terrific gift for fish extenders or as Tinkerbell Treasures! I'd love to see a picture of your completed cozy when you make one! Be sure to tag me if you do.

Until next time, may all your days be filled with fairy dust!

Thursday, March 10, 2016

DIY Small World Passporter Envelope

This is a repost from years ago, but as we are getting ready for our first cruise I have my PassPorter out again and am planning like crazy! This little pouch has again come in very handy. And now that I am a Certified Disney Travel Planner, you don't need a BA in Disney Planning anymore, just give me a call (or send me an email) and I'll get you on your way to an amazing Disney vacation! All you have to do is pack your bags. Enjoy this re-post today.
_________________________________________________

As one of my dear Disney Buddies likes to say, it feels like you need a Bachelors Degree in Disney Planning to take your first trip to Walt Disney World, and an Associates in Disney Dining. We know it can be overwhelming for the first time planner. If you are unfamiliar with our friends over at PassPorter, please head over and take a look. They are THE planning tool for our friends and family. Even after 36 trips, we find the PassPorter a useful tool before and during our stay in Walt Disney World. I always get one for any new family traveling with us.

It should come as no surprise, that I have my PassPorter with me at every planning session. I like to have sticky notes, or post-it flags, and my favorite pen with me too. (I have a bit of a pen obsession!) So this fabric envelope from Bolt was the perfect solution for my PassPorter. Follow the link for the excellent tutorial. I made just a couple adjustments of my own.

I chose to do a button and loop closure on my envelope, and adjusted the length of the fold over elastic to measure 14.5" in order to fit over my PassPorter cover. This will accommodate the deluxe cover, or the entire book of the regular PassPorter. If you've never used fold over elastic, it's really great stuff! It comes in all sorts of colors and patterns. And Amazon has a nice selection of it too.

The fabric is November Books Kokka Children of the World. It reminds me of the It's A Small World attraction (one of my favorites!). I have only been able to find it on Etsy, and it can be expensive, but I love it so much I don't mind spending a little extra. The contrasting fabric (seen on the envelope flap) was purchased at JoAnn's. It's their store label.

Because this project requires very little fabric, it would be a great stash-busting project. And it's quite budget friendly too. I had everything I needed except the fold over elastic, and that was in the $6.00 range. Not bad at all for such a cute and useful item. If you make one of these for your Disney trip, please leave us a link to it in the comments. We love to see what our followers are doing! Until next time, may all your days be filled with fairy dust.

Thursday, January 15, 2015

DIY Mickey Bookmarks/Tinkerbell Treasures

These little items were so quick to make I even surprised myself! I'd seen versions of this on Pinterest, and have been wanting to try it myself for a while. Piece of cake! I had all the supplies I needed right at home and if you are a crafter, I bet you do too! These would be a fun little Tinkerbell Treasure for any Disney trip, especially if you have an avid reader in your travel party! I'd totally pair this with one of the Peter And The Starcatchers books!

Here's how I did it:

Supplies:

black felt
large paper clips
embroidery floss (I used red and black)
needle
scissors


1. Cut out a pattern to use. I just hand drew this Mickey head. You could also print and use this one:

2. Fold your felt in half so you only cut once, but get 2 pieces.
3. Pin or trace your pattern to your folded felt and cut out.
4. Using your embroidery floss, stitch all the way around both silhouettes, stitching them together, starting one arrow and ending at the other arrow. Don't cut your thread!

5. Insert the paper clip at this point and continue to stitch around the silhouette completely. Make a knot and tie it off. Now you can cut your thread.
6. Your paper clip will probably still be loose. I took some black embroidery floss and secured the paper clip by sewing it right in the middle of the silhouette. You can barely see it!

And you're done! Simple as that. This was definitely a nap-time friendly project and I am certain I could make several of these in an hour while watching my favorite TV show! Until next time, may all your days be filled with fairy dust!