Showing posts with label travel tips. Show all posts

Friday, June 30, 2017

How To Handle The Unexpected Travel Delays

When you travel as much as we do, you are bound to run into bad travel delays. Most of the time there is really not much you can do to resolve the situation. You are at the mercy of the weather, the airline, or the local department of transportation. Whatever the case may be, you are going to have hiccups. On our latest Disney trek, there was weather all up and down the east coast affecting over 50% of the hubs for our preferred airline. So even though we enjoy all the privileges of my husband's airline status there was no way we were going to make our connection. So what is a poor traveler without much experience to do when this happens? Here is what I have learned traveling with a seasoned business traveler.

Cancelled Flights

Instead of following the herd to the customer service line, get on your cell immediately and try to get rebooked. Call or use the app. Check your email to see if the airline has sent you an alternative to book quickly. The idea here is to get to the head of the electronic line, not the physical line. And then use your phone to find a hotel if you will need one. Be sure to confirm it before leaving the airport. And ask what will happen to your luggage so you know where to pick it up the next morning.

Missing Disney Reservations

It happens. Travel delays cause you to have to miss a dining reservation or some fastpasses. The first thing to do is call or text your travel agent. They will be able to fix the dining issues for you. If you haven't booked with an agent (why is that??), if you are still within the 24 hour limit, you should be fine. If you are inside that limit, explain to Disney that missing your reservation is entirely out of your control. It's likely they will be accommodating and waive the fee for canceling within the 24 hour time frame. Your fastpasses don't come with a penalty, but it is courteous to let them go. Someone else will be so glad you did!

Stay Rested and Fed

If at all possible, keep the children fed and rested. And get some sleep yourself. Also, give yourself permission to recover once you arrive at your destination. You don't have to jump right into your plans. Take an hour, take half a day, do what you need to do to make the rest of your vacation enjoyable.

Check Your Attitude

It's so hard to stay positive when things seem to be falling apart around you, but it helps to remember that the one thing you always are in control of is yourself. You have the power to decide how you will respond to what is happening around you. Give yourself permission to be frustrated and then move on. Treat yourself to a new movie on your mobile device, purchase that book you've been wanting to read, allow yourself to use more data than you would because this is a special circumstance. Do whatever it is you need to do to keep yourself from falling apart along with your travel plans.


Wednesday, June 28, 2017

What's Your Favorite Candy Bar? Or Why Crowdsourcing Your Trip on FaceBook Is A Bad Call

You've seen it before; someone on your Facebook feed asks for recommendations for their upcoming trip to Walt Disney World. It's likely they have never been and are looking for tips and tricks to get them started. This post may or may not phase you. Maybe you get all excited and recommend all your favorite attractions, and where your favorite parade seats are, and where they just have to get dining reservations. Or you may just scroll right past thinking, that's a nightmare I don't want to get involved with. When I see those posts, I cringe. I cringe because not only will there be a ton of erroneous information, I cringe because their friends are cheerfully letting them know all the things they liked (and didn't) while in no way considering your family's needs and desires. They are telling you what their favorite candy bar is, not telling you where you can find your favorite.

Remember that jingle from Almond Joy and Mounds? Sometimes you feel like a nut; sometimes you don't. This is what a good travel planner can parse out for you. When you are considering a trip to Walt Disney World the last thing you need is the conflicting advice from your friends; some of them like nuts, some don't. What you really need is the help of a Disney travel planner. These people are trained in all things Disney. They have experience and knowledge your friends who went two years ago don't. You need to think about what it is your family likes, what your needs are, how you like to travel, and where you like to stay.

Consider this: Are you foodies, and if so, do you have food allergies? Are you the family that likes to go till you drop, or do you like a more leisurely pace? Does your family like to swim, or do you prefer a playground? Are you into broadway shows, or thrill rides, or both? Do you like a high level of convenience in your trip, or do you want to travel on a shoestring? Do you want autonomy, or do you like to have someone else handle the details? Maybe you want a resort with a lot of kitsch and activity, or maybe you like to stay in a quiet, out of the way place. These are not the questions your friends are considering when they recommend their favorite candy bars. They are assuming you like the same ones they do. Maybe you do, but odds are, there are some things that you like that they just don't.

So the next time you see a Facebook post asking for Disney recommendations, the best recommendation you can give is to refer them to a Disney travel planner, preferably one like me who has been over 50 times and can offer sound advice with up to date, accurate, information on all the policies and practices at Walt Disney World. I can't tell you the number of times I have seen downright incorrect information given by well meaning individuals. It's not that they are trying to sabotage your vacation, but if you listen to only the advice of friends, you are bound to be disappointed. Walt Disney World is constantly changing. They add and take away experiences on a regular basis. It's an amazing trip, but it can also be a disaster. It would be such a shame to think you are going to get one sort of candy bar and end up with your least favorite in return. Call a Disney travel planner. You will be so thankful you did.

Tuesday, February 21, 2017

Walt Disney World 101 | 10 Of Our Favorite Touring Tips

We are gearing up in the cottage for a Spring Break trip to Walt Disney World! It's been a while since we have braved the madness of a packed theme park. And a little refresher is always a good idea! So today I share my Top 10 WDW Touring Tips with you.

These are tried and true and used on every Walt Disney World vacation we take. Some are obvious, some are not. Some have taken us a while to realize, some have been with us from the very beginning (and I do mean from the VERY beginning!). I can still hear my dad shouting, "Left side, Amy!" I hope you enjoy them and they come in useful for you and your touring party too.


  1. Stay To The Left. This may be the single most important tip we have. Our American tendency is to stay to the right. And most tourists will choose the line or the attraction that is to their right. As we've continued to travel to WDW this rule has morphed somewhat into, take the path farthest from the door (or humanity). You'd be surprised how much faster you can get your burger and fries if you just move to the farthest line.
  2. Wait To Leave The Parks. It sounds a little nutty, but if you don't have toddlers having historic melt downs, then stay a bit after the fireworks and linger in the shops or buy one last sweet treat. Let the transportation crush happen without you. Waiting to leave the park (especially the Magic Kingdom) can make everyone's night much better.
  3. Arrive Early. If you can't manage the late nights, consider arriving for rope drop. The MK has a fun celebration prior to opening and all parks are clean and sparkling early in the morning; often you can get some nice photos with just your family in them.
  4. Make A Dining Reservation For The Hour Before Park Opening. Some character meals allow for early entry to the parks. You must have a reservation and all the members of your party before you can go in, but you can eat in the park before it is officially open. This has two advantages; obviously you can maximize your time in that first line or two and you can get some really great photos without the crush of humanity.
  5. Get A Haircut At The Harmony Barber Shop. This is strictly a Magic Kingdom experience, but I love doing this! Our first kid had the privilege of having his first haircut there. I HIGHLY recommend this! There was all sorts of kitsch and celebration and they are excellent with a wiggly kid.
  6. Watch The Parade From Frontierland. Again, this is specific to the Magic Kingdom, but we have had excellent luck finding a good spot for viewing the parade and it's usually much less hectic. This is not the best plan if you want to see the fireworks after the parade. And as an added bonus, we can hit the Pirates of the Caribbean on the way out!
  7. Hit Your Favorite Rides During the Evening Entertainment. If you are not watching the parade, the fireworks, or Illuminations, this is an excellent time to ride your favorite (usually crowded) rides. E-ticket rides were the most expensive and usually most desired rides when Disneyland and Walt Disney World opened. We still have a tendency to refer to them as such around the cottage.
  8. Use The Single Rider Lines. If you are not opposed to riding next to someone you don't know, the single rider line can be a great time saver. Usually Mr. Photos From The Parks and Doc can ride the same coaster, or consecutive coasters and come out beaming. 
  9. Grab A Button At Guest Relations. Especially if you are celebrating a birthday, first visit, or anniversary, get a button! The cast members are wonderful at making a little extra magic happen. You can even request a birthday phone call at your resort when checking in! 
  10. Talk To Cast Members. They are incredibly willing to help, share Disney trivia, tell jokes, trade pins, hand out stickers and trading cards, and just in general make your trip enjoyable. One of my favorite interactions was with a street sweeper in Animal Kingdom who kept my kids entertained with jokes as we were all headed to the exit together. 
Remember to try and stay positive while you're touring and enjoy the time you have, even in the small moments. It's the happiest place on Earth, and you deserve a great vacation! Until next time, may all your days be filled with fairy dust!

Thursday, February 16, 2017

Life Get's In The Way

You know, I had this great blog post all written up about this amazing Adventures By Disney trip that I was going to take with my niece. We were going to head to London and Paris and be pampered like queens. We were going to meet Beefeaters, and make our own English tea and cycle around Versailles. I was SOOOO looking forward to it. And then, our oven broke, and our furnace crapped out and there goes my vacation budget right down the drain! I'm not going to pretend I'm fine with the whole thing, I really wanted to go on that trip! But, I am going to brush myself off and get busy saving again so we can try to go next time.
And here's my plug for travel insurance. You just never know when things like this are going to happen. I feel like a healthy gal like me probably wouldn't need to "waste my money" on something like travel insurance. But today, if you ask me if it was worth the $700 to get the other $9000 back? Yes it was. Every single penny. Did it seem superfluous at the time? Yes. Was I hesitant to get it? You bet I was. Am I glad I did? So glad.

Life happens. Parents get sick, kid's fall and break bones, and furnaces decide to give up the ghost. We can't control that sort of thing. But we can invest in our own peace of mind. I highly recommend getting the travel insurance. As a travel agent I have seen far too many trips have to be cancelled for circumstances out of our own control. Do yourself a favor and don't skimp.

Have you ever had to cancel your Disney vacation? I'd love to hear your horror stories too! Leave them in the comments below. And until next time, may all your days be filled with fairy dust!

Saturday, September 10, 2016

Another Great DIY Disney Luggage Tag!

Thursday's post has inspired me to create another cute DIY felt luggage tag for our family's upcoming Fall Break Trip!

I give you Donald Duck. I was a little worried about sewing around a shape with a lot more definition than the simple three circles of the Mickey head in the last post. But it was not as difficult as I first thought. As long as I went slow it was fine! Here's the trick, I like to make the stitches in the zig-zag closer together. So if your machine can shorten the distance between stitches, I would recommend it. It looks a bit more uniform in the end. I also love how the yellow felt pops on the blue background. You will DEFINITELY be able to spot your luggage on that carousel!

If you want the full description on the how-to, check out my original post DIY Disney Felt Luggage Tags. Until next time, may all your days be filled with fairy dust!

Thursday, September 8, 2016

DIY Disney Felt Luggage Tags

Are you headed to a Disney Destination for Fall Break this year? If so, this is the perfect little project to get you in the Disney spirit!

You know how excited you are to get to Disney, and then you get to the airport and everyone's bag looks pretty much the same? Even with those snazzy Disney luggage tags they send you, your bag still looks like everyone else's, because they got the same tags you did!

September is National Sewing Month and as such, I thought it would be fun to share this easy Disney luggage tag. You can make it in any color your choose, but it will make your bag stand out as your own. That's a particularly good thing when you have antsy, anxious children pulling your pant leg, ready to get to Disney!

You could hand stitch this project or machine stitch it. I chose to use the machine simply for the sake of time. I was able to whip this up in half an hour. That's well within our nap-time window here at the cottage!

I first did a Google search for a Mickey Mouse silhouette, printed it, and used it as a template for this tag. I then cut out my Mickey from black felt, used it to determine the size for the background and cut out two rectangles of felt. (I chose yellow for the other side of this tag because that's what I had, but get creative and let your tag be entirely yours.)

I then took the red felt, pinned the Mickey silhouette to that and used a zigzag stitch to appliqué it to the background. I then pinned the yellow felt to the back of the red felt and used the overlock stitch to sew them together. You could also play around with the decorative stitches on your machine for sewing the two rectangles together. I love using felt for this project, because even if you use a strait stitch to finish this project, your edges will look good.

I'd love to get several of these together for our next trip, each one themed to our favorite characters. Until next time, may all your days be filled with fairy dust!

Thursday, September 1, 2016

DIY Small Zippered Mickey Mouse Pouch

As you know, I'm a fan of little bags and pouches for travel. I saw this little beauty and thought it could be Disney-fied with a little alteration. And while I would work a bit on the shapes of the ears, this came together very easily and I would certainly do it again!

I found the original pattern from Dog Under My Desk on Pinterest. I had all the necessary supplies already in my stash, so this project was definitely budget friendly! If you don't already have what you need, I would say this can easily come in under $5.00 a pouch. Still well within my Tinkerbell Treasure limit. And wouldn't it be so cute for all your pressed pennies? Of course the author of the pattern, Erin, suggests using it as a housing for your earbuds. I also love this idea. Keeping those things from tangling with everything else in my bag is forever my mission! And a great solution for the kids! Especially since this isn't too girly - Doc would even use it.

I tried using different circle shapes for the ears, and in the end, went with this: 


As I mentioned before, I would probably choose to go with bigger circles next time. It's always a bit tricky sewing around circles, but over all, I was still pleased with the way this pouch turned out. It will definitely get used! And I can imagine an endless stream of variations for the fabrics and for making it fit different Disney characters.

Until next time, may all your days be filled with fairy dust!

Saturday, August 27, 2016

Upcycled Disney T-shirt Trinket Bag

I have shared this tutorial on the blog before, but it is amazing to me how many of these little bags we use and how handy they are in my travel gear. So I hop you enjoy this rerun from March of 2014!

We are gearing up for another road trip, this time to Disney's Hilton Head Island Resort! In preparation for that, I am getting out all our road trip goodies. I realized that my previous case for all my electronics was woefully lacking in space for my new gadgetry. I needed something with a little more room that I could slip in my knitting basket or my purse without a lot of fuss. And I like having it all in one place, but not a tangled mess in my purse! As I was scavenging through my bin of t-shirts and clothing to recycle, I noticed a t-shirt that Little Chef was not too fond of because the printing on the front was uncomfortable. I didn't even put it in the rotation for Minnie. It was an 18-month Mickey T-shirt and perfectly suited for the job!

This was the easiest project I've done in some time. I simply cut the sleeves and bottom off the shirt, centering the Mickey image, and leaving the neck in tact as a ready-made casing for the drawstring. I used an overlock stitch and sewed up the three sides of the shirt. I then angled the corners in and cut them off, because I like a flat-bottomed bag. This is certainly a step you don't need to take, it just adds a nice touch. If it intimidates you, leave it out.

I then opened up a hole in the collar seam using my seam ripper, and slipped a ribbon through the casing the same way you would in a pair of pants. Because this is jersey, you really don't need to worry about the fabric unraveling, so I simply left the hole in the collar! I tied the two ends of the ribbon together with a knot, turned the bag right-side out and there you have it! Easy as can be!

Now I have a place for all my iPhone, Kindle and iPad cords, earbuds, etc., and they won't be a tangled mess when I want them! These would also be terrific bags for Tinkerbell Treasures, either to give filled with goodies or to give as a goody! And if you don't have an ample supply of 12-18M shirts in your cottage, the Goodwill is an excellent place to get exactly this sort of thing for a bargain price. In fact, I have found some wonderful park merchandise there that we wear in the parks! (No one has to know!) I do love a good bargain. Until next time, may all your days be filled with fairy dust!

Tuesday, August 9, 2016

DIY Disney Trip Command Center for WDW

Today we are reviewing one of our favorite posts on how to create a command center for your next WDW trip! Enjoy this entry from fall 2014.

When we decided to go to Hilton Head for our Spring Break trip back in April, we created a command center for the trip. A place for the entire family to see our vacation plans and get excited for the trip. You can read about that trip here. (It was one of our top 10 for sure!) The command center worked so well for the last trip, I decided to do the same thing for this fall's excursion to Walt Disney World!

Here's the breakdown of what I included:

Map of Resort
We are staying at Kidani Village at the Animal Kingdom Lodge this trip. I was able to find a print this map of the resort area simply by doing a google image search for Animal Kingdom Lodge Map. I also added a few animal masks to the lamp to try and make it more festive. You can see the gorilla maskwarthog mask, and leopard mask in the Silhouette online store.

Height Chart
I used the Silhouette to cut out the height chart using the shape growth chart. I cut out the numbers and then backed them with a patterned paper. I tried to tie in the papers to the Animal Kingdom, but I also wanted to use what I had on hand. I then used the height chart from PreschoolEars to mark the heights that the kids needed to reach to be able to ride certain attractions.

Countdown 
I printed out this FREE countdown sheet from one of my favorite bloggers and IG friends: Designs by Nicolina. It's perfect for watching the days get closer to Disney!

ADRs and Fastpass+ 
I wanted to remind the kids (the older ones) of all the fun things we had planned, including the ADRs and Fastpass+ reservations. So I printed out this FREE fastpass+ planning sheet from Lovely Commotion. If you are into the planning thing, you really need to check her out. She has LOTS of Disney planning resources available on her blog!

And who could resist this adorable serving tray with Mickey announcing our Advanced Dining Reservations! I am really excited to take our own Little Chef to Chefs de France, Epcot in hopes of meeting Remy. It is Food & Wine Festival time, so I am hopeful we will see him. I will definitely report back if we do!

Since we have a quick service dining plan, this is our only table service reservation. We have never had a bad meal at Chefs de France and I (the unabashed francophile!) am certainly looking forward to it! Stay tuned for a later post on how I made this really fun Mickey tray for less than $10!

Disney World Subway Art
I love eighteen25 for the subway art alone. I downloaded this from their website and stuck it in a frame. Instant Disney magic!

Passporter
My go to planner for any Disney trip is the PassPorter. My friends call it my Franklin Planner for Disney. If you don't have one and you have never been to Disney, this is the guidebook for you! I left it out on our command center for quick and easy reference.

We are clearly getting excited for our next big family trip this fall! Do you have a command center? If so, I'd love to know what you put in yours! Until next time, may all your days be filled with fairy dust!

Thursday, August 4, 2016

Walt Disney World 101 | 10 Of Our Favorite Touring Tips


It's been 100% crazy here in the cottage this week with school starting, family visits and the planning of a super secret surprise trip to WDW! Even so,  I still wanted to get a post out for today, so I thought I would share 10 WDW Touring Tips with you.

These are tried and true and used on every Walt Disney World vacation we take. Some are obvious, some are not. Some have taken us a while to realize, some have been with us from the very beginning (and I do mean from the VERY beginning!). I can still hear my dad shouting, "Left side, Amy!" I hope you enjoy them and they come in useful for you and your touring party too.


  1. Stay To The Left. This may be the single most important tip we have. Our American tendency is to stay to the right. And most tourists will choose the line or the attraction that is to their right. As we've continued to travel to WDW this rule has morphed somewhat into, take the path farthest from the door (or humanity). You'd be surprised how much faster you can get your burger and fries if you just move to the farthest line.
  2. Wait To Leave The Parks. It sounds a little nutty, but if you don't have toddlers having historic melt downs, then stay a bit after the fireworks and linger in the shops or buy one last sweet treat. Let the transportation crush happen without you. Waiting to leave the park (especially the Magic Kingdom) can make everyone's night much better.
  3. Arrive Early. If you can't manage the late nights, consider arriving for rope drop. The MK has a fun celebration prior to opening and all parks are clean and sparkling early in the morning; often you can get some nice photos with just your family in them.
  4. Make A Dining Reservation For The Hour Before Park Opening. Some character meals allow for early entry to the parks. You must have a reservation and all the members of your party before you can go in, but you can eat in the park before it is officially open. This has two advantages; obviously you can maximize your time in that first line or two and you can get some really great photos without the crush of humanity.
  5. Get A Haircut At The Harmony Barber Shop. This is strictly a Magic Kingdom experience, but I love doing this! Our first kid had the privilege of having his first haircut there. I HIGHLY recommend this! There was all sorts of kitsch and celebration and they are excellent with a wiggly kid.
  6. Watch The Parade From Frontierland. Again, this is specific to the Magic Kingdom, but we have had excellent luck finding a good spot for viewing the parade and it's usually much less hectic. This is not the best plan if you want to see the fireworks after the parade. And as an added bonus, we can hit the Pirates of the Caribbean on the way out!
  7. Hit Your Favorite Rides During the Evening Entertainment. If you are not watching the parade, the fireworks, or Illuminations, this is an excellent time to ride your favorite (usually crowded) rides. E-ticket rides were the most expensive and usually most desired rides when Disneyland and Walt Disney World opened. We still have a tendency to refer to them as such around the cottage.
  8. Use The Single Rider Lines. If you are not opposed to riding next to someone you don't know, the single rider line can be a great time saver. Usually Mr. Photos From The Parks and Doc can ride the same coaster, or consecutive coasters and come out beaming. 
  9. Grab A Button At Guest Relations. Especially if you are celebrating a birthday, first visit, or anniversary, get a button! The cast members are wonderful at making a little extra magic happen. You can even request a birthday phone call at your resort when checking in! 
  10. Talk To Cast Members. They are incredibly willing to help, share Disney trivia, tell jokes, trade pins, hand out stickers and trading cards, and just in general make your trip enjoyable. One of my favorite interactions was with a street sweeper in Animal Kingdom who kept my kids entertained with jokes as we were all headed to the exit together. 
Remember to try and stay positive while you're touring and enjoy the time you have, even in the small moments. It's the happiest place on Earth, and you deserve a great vacation! Until next time, may all your days be filled with fairy dust!

Saturday, July 23, 2016

DIY Disney Mousekeeping Envelopes

For those of you Disney newbies, Mousekeeping is the Disney version of housekeeping. These are the people who make your room look like new when you walk in. They even make some fun shapes with towels and play funny games with your stuffed animals. Tip them well. They work very hard.

Side note, if you are staying in one of the DVC villas, you should note that housekeeping does not come every day unless you request them to. We find the standard service to be enough. Others in our Disney family do not. It's something to consider as you plan your next stay at the Disney Resorts. If you do wish to have addition Mousekeeping services, remember to request them at check-in, or press the mousekeeping button on your room phone.

And on that note, WDW Prep School has some terrific Disney themed Mousekeeping envelopes free to download! There are several designs to choose from, so have some fun printing these out. It helps Mousekeeping know that the money is for them, and it keeps my little guys from trying to give it back to me! (Or pocketing it for themselves!)

Be sure to check out Shannon's entire site for all sorts of really helpful Disney planning tips, especially if you are just starting out. As my dear friend Fauna says, it feels you need a B.A. in Disney Planning, and a minor in Disney Dining to make your first trip successful! WDW Prep School can take some of the edge off of that for you.

Until next time, may all your days be filled with fairy dust!

Tuesday, July 19, 2016

DIY Disney Dinner | Catfish and Grits from the Coral Reef

I think one of the best kept secrets for Disney Dining is the Coral Reef at Epcot's Living Seas. If you have never taken the opportunity to dine there and you even remotely like seafood, you are missing out! Book an ADR for your next trip. You'll be glad you did. Not only is the menu outstanding, the atmosphere is complete unique from any other restaurant on property. Where else can you dine inside a living coral reef? And they even give you souvenir guides so you know what fishes you are looking at. (Don't forget to spot that hidden Mickey on the ocean floor!)

This recipe is from Magical Recipes, a truly great resource for Disney recipes from around the "World." If you are looking for something specific, I would search there first. Although I'd stay away from the Crystal Palace Lemon Bars. Just saying.

Mr. Photos from the Parks is an amazing chef and his spin on this recipe was simply delicious. Although I'm not sure I would recommend this wine for this meal, as we both felt it was more like a Pinot Grigio than a Chardonnay; we would go with Francis Coppola's Diamond Collection Chardonnay instead. It's one of my standbys. (And if you even get the chance to visit that winery I HIGHLY recommend it!)

Until next time, may all your days be filled with fairy dust!

Thursday, July 14, 2016

DIY Savings Bank for Disney

Here in the cottage, we have always followed the same rule my parents set up for me regarding buying souvenirs in the parks. They gave us a set amount (and later we earned our own money). That was all we had to spend. If they purchased something for us it was their prerogative, but we knew even before asking that the answer was probably going to be no. (This didn't prevent my sister from asking - ever.)

For Doc, out of sight is out of mind; and before you know it we are leaving and he is complaining that he didn't know it was so close to Disney and why didn't we remind him? (Of course, we did; he just doesn't remember; ever.) When I saw this idea on Pinterest, I knew I would be using it for Doc. At least this way, there's a tangible reminder that Disney is coming!

I started with an 8"x8" shadow box, a dremel tool with a rotary cutting bit, and this gorgeous Disney subway art available for download from Eighteen25.

Cutting through the frame was weird. It wasn't wood, and it smelled like it was plastic; but given enough time I was able to get it cut. I had to cut an opening much larger than I expected in order to get the change to fall in easily, but once it was cut and sanded it was easy to get the money to drop right in. I used a dentist pick tool to help line up the cut lines and to scrape away some stubborn shaving bits.

I printed out the subway art and cut it to fit the 8x8 frame. I decided to cut off "Disneyland" since we would be going to Walt Disney World - and Doc is a stickler for details. As an added bonus, the more change we put in it, the sturdier the frame bank became. I assume there will be a tipping point for this. We may have to encourage paper money instead of coins!

All in all, the bank was a fairly easy project (once the littles were well away)! I highly recommend trying it. Imagine the possibilities! Until next time, may all your days be filled with fairy dust!

Tuesday, July 5, 2016

DIY Disney Travel Game

When I saw this idea on Pinterest, I knew I wanted to recreate it using the Disney ephemera I had collected over the years. I tend to be a pack rat - every now and again, this winds up being a good thing. It's nice when that happens! If you are a pack rat too, then this project is free to create. I know I love a budget friendly DIY.
I had an old sturdy tube from some Silhouette stencil vinyl that was just right for this project, perfect for outlining the shapes of some old Disney stickers I had lying around. (I believe these are from the 90s - when I was still paper scrapbooking. Disney had a terrific scrapbooking store back then; I'm not sure if it's still around today.) If you don't have any stickers, they are very easily obtained from the Dollar Store, or a craft store. And they are usually fairly inexpensive, especially if you have a coupon.

The idea here is simple. I removed the outer edge of the sticker paper, leaving the actual stickers on the page. Then I used the "blanks" as a stencil to trace the shapes of the stickers onto the paper tube. I used a fat Sharpie to trace them and then a fine point Sharpie to label the shapes. (I have a bit of a pen addiction as well. I love my Sharpies!) Happy isn't quite able to read yet, and I wanted Poppins or Doc to be able to help him if I wasn't available.  So now there are several Disney shapes and characters to match to the shapes on the tube. I figure this could last him a good 20 minutes if he takes to it! Stickers are generally a favorite for him. For our family, the trick is finding new and different things to keep the little ones occupied on our drive. It's a LONG way to Orlando from our cottage in the midwest! I'll let you know if this works for us. And if you try it, let us know how it worked for you!

Until next time, may all your days be filled with fairy dust!

Saturday, July 2, 2016

DIY Disney Storybook Road Trip Magnet Game

DIY Disney Magnets

If you have ever been on the road with kids for any length of time, then you know that a variety of activities can save your sanity. And this my friends, is road trip season at the cottage! In preparation for our trips I have been scouting out activities on Pinterest that will keep our car entertained. When I ran across this one, I realized I already had all the supplies necessary to give it a try. I am so glad I did! If you ever played with colorforms as a child, this will feel familiar.

I found a couple of scribbled on, torn up Disney Readers in a garage sale this spring. I wasn't sure how I would use them, but I knew I could find a way. I took several of the salvageable pages and cut roughly around them. I then adhered them to some Adhes-a-mag I had hanging around the studio. You could certainly use any sticky-backed magnet sheets. I then went back around the illustrations with more precision to cut out the characters I was interested in.

It was a little bit time consuming, but I'm glad I did it. We'll take a small cookie sheet with us and use these to make up stories together on the way. There are a number of other magnet based games that can be played with a small cookie sheet in the car. I'll be investigating these as well and reporting back if there are any I plan on using this fall. If you've done something similar, I'd love to hear about it. We are always looking for fun car games to play!

Until next time, may all your days be filled with fairy dust!

Tuesday, June 21, 2016

DIY Disney Stroller Cup Holder

Who doesn't need another water bottle holder at Disney? I know we never seem to have enough places to store everything when we are in the parks, and I love the idea of having the stroller do most of the work for us. This is one solution I just had to try.

I used this tutorial from Sew Can Do to create my cup holder. I love that it's large enough to hold my aluminum water bottle and this combo snack/sipper cup I found through Zulily!

I did tweak this pattern a bit. Instead of using oil cloth, I used quilting cotton. To give it a little more heft, I inserted a piece of scrap canvas (you could use a bit of denim from an old pair of jeans as well) between the two sides, and one in the bottom; and I used pellon interfacing on all the cotton pieces. Pellon is an iron-on interfacing and I use it for a LOT of sewing projects. If you can't find it in your local fabric shop, ask at the cutting desk. They will know exactly what you are looking for. I loved the stiffness and absorbency of the fabric when it was all done. I hate sweaty drinking glasses and bottles.

I also made an extension piece for our stroller handlebar. I thought about making the entire piece bigger, but I like the idea of having the size option. The only caveat to that is with the extension, the holder swung around a bit, and Mr. Photos From The Parks says it hits him in the navel whenever he uses the stroller. I'm a bit shorter and it doesn't seem to do that for me. You may want to make some adjustments according to your own stature.

A note about water in Disney:
I think the water in Disney (well, in Orlando) is a bit skunky. I am usually a fan of filling my own water bottle at the drinking fountain wherever we are - or at least out of the tap. But in Disney, that just won't cut it for me. I need the filtered water to get the odd smell out. If you are opposed to paying "Disney prices" for water, there is another solution. Almost every Disney Resort room has a mini fridge. Stop and get a case of water before you arrive on property. This is obviously easy if you drive, but even if you fly (as we often do), it's not as complicated as it might seem. Tiffany Towncar - a company we HIGHLY recommend - will make a 30 min. grocery stop as part of their ground transportation service. If you would rather take the Magical Express, you can always have Garden Grocer deliver groceries right to your room. In either case, you have water at your disposal and much cheaper than if you would buy it in the parks.

Saturday, June 4, 2016

DIY Disney Closet Divider Tags

DIY Disney Closet Tags
When I saw these shapes in the Silhouette store, I knew I would need them. I am an organizer, a planner and I prepare. And this is never more true than when we are going to Walt Disney World. When I pack, I pack in outfits. I like to know that I'll have everything I need to look put together all in one place. It all gets laid out by day, and then put together in the suitcase as one. Ziplock baggies are especially helpful in this department and come in handy if you have wet bathing suits to bring home. And I love not having to think about things like what to wear when we are at the parks.

As an aside, I highly recommend unpacking your suitcase when you arrive at your resort. There is nothing worse than trying to decipher which clothes are dirty and which are clean when you are running late to your ADR. (And we are always running late. I assure you.) Also, I always designate an empty bag or drawer for dirty clothes. That way we are not tripping over one another's ish in a tiny space.

With these tags, I can easily mark which outfits are to be worn on what days; no more arguing with the kids. Even better, I can see at a glance if I have packed enough clothing, or not. Once it's all together, it goes in a big ziplock bag, tag included. When we arrive at the resort I simply hang the entire outfit together on a hanger and pop the tag over it. Done! Everyone knows which outfit is for which day. I can even plan an outfit for a special character meal that I know will look good in the photos later on. So no matter who is helping Happy get dressed, they know what he should wear and I don't have to interrupt what I'm doing to pull out clothes. Let's foster independence where we can, shall we?

I used my basic scrapbooking supplies to create these tags; mostly using paper and ribbon. I themed them to the Classic Disney Characters, but you could do these for any set of characters that mean something to your family. I may try and do a set based on Phineas and Ferb for Doc; his clothes will be in a separate room from ours. These tags represent, Sunday - Minnie, Monday - Mickey, Tuesday - Donald, Wednesday - Goofy, Thursday - Pluto, and Friday - Daisy. I know, I don't have Saturday; won't be needing that one on this trip. Too bad. We'll just have to remedy that another time!

And for those who may need to know, the design ID numbers for these Hanger Tags are: 32018, 32017, 32016, 32015, 32014, 32012, 32011. Until next time, may all your days be filled with fairy dust!

Thursday, May 26, 2016

DIY Disney Road Trip Travel Clips

Happy Memorial Day Weekend Musketeers! In honor of the long road trip we have ahead of us, I'm running this great road trip idea! I hope you enjoy it and have a beautiful holiday weekend wherever you are.


Say Hello To Good Behavior!
We have traveled to Walt Disney World in just about every way possible, although I'm still holding out for the auto train. When I was younger, we rode down in our MT Motorhome. In my opinion, there is no better way to go! Of course, I wasn't driving, so that may have something to do with that. We've gone by airplane, driven through the night, even taken a conversion van and tents. Our next trip will be in our new minivan. I'm not exactly dreading the trip; in fact, there are several things I am looking forward to about it (not the least of which is that our own Mary Poppins will be able to come with us!) But we all know that a long road trip can wear on the best of us, so I've taken some precautionary measures. When your traveling from a cottage in the Midwest to Florida, it pays to have every advantage you can get!

This was an inspired idea from Julie at Less Than Perfect Life of Bliss. I took it and Disney-fied it. I used our blog names and created a tag for each of us -- yes, even the adults. The idea here is that everyone starts with his or her clip on the visor. Good behavior = clip stays up. Bad behavior = clip comes down. (Your elementary teacher probably had a similar system.) It's up to you how you enforce this, but we give the opportunity to earn your clip going back on the visor, by being helpful, polite, etc. Just make sure everyone is clear on the rules at the start. At the next stop (gas, rest area, restaurant) whoever has a clip still on the visor gets a goodie. (This is where that Tinkerbell Treasure hunting can come in handy!) I'm all for bribery - especially in the case when 6 people are trapped in a van for 18 hours, two of whom are strapped into carseats.

One caveat, our visor was too thick for the clothespins to clip onto it. I took some elastic and made a band that fit over the visor. We clipped the clothespins to that. If you need to do the same, make sure you subtract a couple inches from the band measurement; you want it to be nice and tight against the visor. Those clips can get heavy!

I love this idea. Simple and cute! Until next time, may all your days be filled with fairy dust!

Tuesday, April 26, 2016

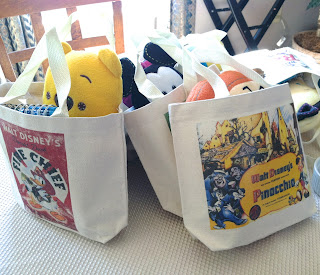
DIY Disney Tote Bags

The links for the posters in this post are no longer available. But you can find some great Disney poster art on the Disney Movie Rewards website under digital rewards. They seem to rotate in and out with some regularity, but if you keep a look out, you can find some very fun and unique stuff in there! And of course you can run an Etsy search to see what else might be out there. Enjoy this rerun of one of my favorite Disney gift ideas!

___________________________________________


Breaking up is hard to do, and it's always hardest when we have to say goodbye to Walt Disney World. We all tend to be tired and cranky, and we usually like to maximize our time there, so we are leaving on the last plane home - our friends like to call it the Disney Express. It's a plane filled with other tired, cranky, bloody stumps of people. I think it's incredibly important to have a little something special for the ride home.


I decided to make these cute little tote bags for each kid for "leaving day." I filled them with homemade Rice Krispie treats, a game to pass the time, and a few other little treats I found along the way. If you have a dining plan with snacks left on it, this is a great way to use them up. Stop by any gift shop and pick up bags of pretzels or other packaged goodies that fit within the plan.

For the tote bags I used Transfer MAGIC's Inkjet Transfer Paper for Light Colored, Light Weight Fabrics. I still got a plasticy finish to the transfer, but on the canvas bags, it was fine. The images are from the same series of vintage Disney poster images through Nukes at Etsy. These are top quality and big, so at a dollar an image, you can't go wrong. I used Photoshop to size and reverse the image for transfer. If you have text on your image, DON'T FORGET TO REVERSE your design before you print!

I found these tote bags fairly inexpensively at Hobby Lobby. I found a 4 pack for $8.00. (If you use your 40% off coupon, they are really a steal!) They are 100% cotton canvas, and the iron-on paper worked beautifully on them. Since I already had the transfer paper they were only $3.00 a bag. That's a price I can live with!

Leaving The Mouse is never easy, but a little goodie bag can help ease the transition home. Until next time, may all your days be filled with fairy dust!


Tuesday, April 5, 2016

Easy Upcycled DIY Disney Travel Game

When I saw this idea on Pinterest, I knew I wanted to recreate it using the Disney ephemera I had collected over the years. I tend to be a pack rat - every now and again, this winds up being a good thing. It's nice when that happens! If you are a pack rat too, then this project is free to create. I know I love a budget friendly DIY.
I had an old sturdy tube from some Silhouette stencil vinyl that was just right for this project, perfect for outlining the shapes of some old Disney stickers I had lying around. (I believe these are from the 90s - when I was still paper scrapbooking. Disney had a terrific scrapbooking store back then; I'm not sure if it's still around today.) If you don't have any stickers, they are very easily obtained from the Dollar Store, or a craft store. And they are usually fairly inexpensive, especially if you have a coupon.

The idea here is simple. I removed the outer edge of the sticker paper, leaving the actual stickers on the page. Then I used the "blanks" as a stencil to trace the shapes of the stickers onto the paper tube. I used a fat Sharpie to trace them and then a fine point Sharpie to label the shapes. (I have a bit of a pen addiction as well. I love my Sharpies!) Happy isn't quite able to read yet, and I wanted Poppins or Doc to be able to help him if I wasn't available.  So now there are several Disney shapes and characters to match to the shapes on the tube. I figure this could last him a good 20 minutes if he takes to it! Stickers are generally a favorite for him. For our family, the trick is finding new and different things to keep the little ones occupied on our drive. It's a LONG way to Orlando from our cottage in the midwest! I'll let you know if this works for us. And if you try it, let us know how it worked for you!

Until next time, may all your days be filled with fairy dust!