Showing posts with label Magic Kingdom. Show all posts

Thursday, September 15, 2016

The Chapeau | DIY Sleeping Beauty's Fairy Merryweather's Hat

In honor of Felt Hat Day (which is today for those of you unawares), I am rerunning this post about making my favorite fairy's fascinator! I hope you enjoy it!

I am in love with the hat shop on Main Street USA: The Chapeau. It's the place to find any hat your heart desires; as long as Disney makes it! I realize there are those who would never be caught dead in a Disney hat, and those of us who think they are AWESOME. If you fit into that latter category, then this post is for you!

I have an affinity with Merryweather, naturally, but she's not the easiest character to find in the parks. And neither is a Merryweather themed hat. So I put my DIY skills to use and created my very own Merryweather fascinator. This is my very first foray into the world of millinery, so I did a little research on hat making via YouTube. Just search for "how to make a fascinator" and you'll get plenty of videos to choose from! If you too are new to the hat making world, you'll want to become familiar with a product called sinamay. It's what the structure of the hat is made from. It helps it hold it's shape and gives it the body you need for it to stand up on it's own. The link will take you to several resources for purchasing sinamay.

I first created a pattern using scrapbooking paper (as it was large enough to experiment with, and I have TONS of it), a compass, and scotch tape. Once I had my basic shape together (which took several tries), I took it all apart and cut the pieces from the sinamay. I used a double layer of sinamay because I wasn't sure a single layer would hold the shape as well as I wanted it to. After all, that hat had to make it all the way to Florida without getting crushed!

After I had the sinamay cut out, I cut out felt about a 1/4" larger than the sinamay and machine stitched it to the sinamay. I then shaped the hat into it's 3-dimentional form and pinned it together. I hand sewed the hat together trying to hide my stitches where I could. Once it was together I realized it needed the organza on it to really make it work. What a difference that made! It went from ok, to cool. The devil is always in the details!

My hair is quite fine, so a comb was not going to work for me to wear this all day in the park. I decided to attach it to a thin, ribbon-covered headband I found at JoAnn's. It worked like a dream! The headband is small enough that it doesn't fight with my glasses for room behind my ears, is fairly well hidden in my hair, and comfortable enough to wear all day. For a first project, I couldn't be happier! I'd love to see any hats you may have altered or made for your trips to the Happiest Place On Earth.

Until next time, may all your days be filled with fairy dust!


Thursday, August 4, 2016

Walt Disney World 101 | 10 Of Our Favorite Touring Tips


It's been 100% crazy here in the cottage this week with school starting, family visits and the planning of a super secret surprise trip to WDW! Even so,  I still wanted to get a post out for today, so I thought I would share 10 WDW Touring Tips with you.

These are tried and true and used on every Walt Disney World vacation we take. Some are obvious, some are not. Some have taken us a while to realize, some have been with us from the very beginning (and I do mean from the VERY beginning!). I can still hear my dad shouting, "Left side, Amy!" I hope you enjoy them and they come in useful for you and your touring party too.


  1. Stay To The Left. This may be the single most important tip we have. Our American tendency is to stay to the right. And most tourists will choose the line or the attraction that is to their right. As we've continued to travel to WDW this rule has morphed somewhat into, take the path farthest from the door (or humanity). You'd be surprised how much faster you can get your burger and fries if you just move to the farthest line.
  2. Wait To Leave The Parks. It sounds a little nutty, but if you don't have toddlers having historic melt downs, then stay a bit after the fireworks and linger in the shops or buy one last sweet treat. Let the transportation crush happen without you. Waiting to leave the park (especially the Magic Kingdom) can make everyone's night much better.
  3. Arrive Early. If you can't manage the late nights, consider arriving for rope drop. The MK has a fun celebration prior to opening and all parks are clean and sparkling early in the morning; often you can get some nice photos with just your family in them.
  4. Make A Dining Reservation For The Hour Before Park Opening. Some character meals allow for early entry to the parks. You must have a reservation and all the members of your party before you can go in, but you can eat in the park before it is officially open. This has two advantages; obviously you can maximize your time in that first line or two and you can get some really great photos without the crush of humanity.
  5. Get A Haircut At The Harmony Barber Shop. This is strictly a Magic Kingdom experience, but I love doing this! Our first kid had the privilege of having his first haircut there. I HIGHLY recommend this! There was all sorts of kitsch and celebration and they are excellent with a wiggly kid.
  6. Watch The Parade From Frontierland. Again, this is specific to the Magic Kingdom, but we have had excellent luck finding a good spot for viewing the parade and it's usually much less hectic. This is not the best plan if you want to see the fireworks after the parade. And as an added bonus, we can hit the Pirates of the Caribbean on the way out!
  7. Hit Your Favorite Rides During the Evening Entertainment. If you are not watching the parade, the fireworks, or Illuminations, this is an excellent time to ride your favorite (usually crowded) rides. E-ticket rides were the most expensive and usually most desired rides when Disneyland and Walt Disney World opened. We still have a tendency to refer to them as such around the cottage.
  8. Use The Single Rider Lines. If you are not opposed to riding next to someone you don't know, the single rider line can be a great time saver. Usually Mr. Photos From The Parks and Doc can ride the same coaster, or consecutive coasters and come out beaming. 
  9. Grab A Button At Guest Relations. Especially if you are celebrating a birthday, first visit, or anniversary, get a button! The cast members are wonderful at making a little extra magic happen. You can even request a birthday phone call at your resort when checking in! 
  10. Talk To Cast Members. They are incredibly willing to help, share Disney trivia, tell jokes, trade pins, hand out stickers and trading cards, and just in general make your trip enjoyable. One of my favorite interactions was with a street sweeper in Animal Kingdom who kept my kids entertained with jokes as we were all headed to the exit together. 
Remember to try and stay positive while you're touring and enjoy the time you have, even in the small moments. It's the happiest place on Earth, and you deserve a great vacation! Until next time, may all your days be filled with fairy dust!

Saturday, July 9, 2016

DIY Infinity Scarf from Upcycled Disney T-shirts Tutorial

I have to admit right up front, I'm not much of a scarf wearer outside of winter. They just seem in the way to me. But a scarf from jersey? That I can get into. And one that has more than one way to wear it? Even better. And one that showcases my old Disney Ts? Now we're talking! I'm even playing around with the idea of wearing this to the parks in the evening in October. It could happen!

This project was conceived mainly because I wanted to see the logos of the shirts I was using. Most tutorials I came across online were made with the bottom half of the T-shirt. That wasn't going to work for me. So I whipped up a practice scarf using some shirts destined for the rag bag and found that my idea worked! Here's the tutorial on how to make a Disney T-shirt Circle Scarf:


You will need:
  • 3 adult sized T-shirts (this would work with any T size 5 and up; the smaller they are, the more you need)
  • Good pair of scissors
  • coordinating thread
  • pins

Begin by turning your T-shirts inside out and measuring a 12" swath down the middle. Be sure any logos or designs you want to keep are inside that 12" area.


I then marked with white pencil (or a fabric marker on the white shirt) a line all the way down both sides. This is my stitch line. Once you have all your shirts marked, take them to the sewing machine and stitch down each line creating a tube. You don't have to be too precise with this; remember it's going to drape so no one has to know that your side seams are a little wavy.

Once all your shirts have been sewn up the sides, cut off the excess fabric on the sides leaving a 1/4" to 1/2" seam allowance.

I then cut off the collar of T-shirt and the bottom hem so that I had a nice tube. **I also took the tag off the Pirates shirt so I could reuse it on the outside, a little bit later.**


Begin sewing you first two shirts together. Turn one tube right side out and keep the other one inside out. Sandwich them together, right sides together. This is a good time to check that your logos are lined up the way you want them to be.

Pin the side seams together and pin the middle of each side together. Sew this seam using a 1/2" or 5/8" seam allowance. If the two pieces of fabric don't line up perfectly, you can stretch the fabric as you sew it so it lines up a bit better.


If you wish to insert the tag from the T-shirt so it shows on the outside, sandwich it into one of these seams, aligning all the raw edges. When you turn it right side out it should look something like this:


Continue sewing this way until you have sewn the last piece on. You should have one giant tube. 
To connect it, turn the scarf in on itself so that you can line up the last pice with the first piece just as you did all the others: right sides together, aligning the raw edges, and pin. When you sew this up, remember to leave about at 3" gap so you can turn the scarf right side out.

Once you have turned your scarf right side out, you can either sew the gap closed by hand (which looks best) or use the machine. I chose to use the machine. I invoke my grandmother once again: if you can't see it from the back of a running horse, it'll be just fine.

And that's it! I'd say this took me about 3 hours from start to finish on this project. Not bad for a rainy afternoon. If you want some tips on how to wear your circle scarf, check out this wonderful graphic. While this one isn't the sort you can wear as a dress, you could certainly work it in many of the other ways.


Enjoy experimenting with your circle scarf! And until next time, may all your days be filled with fairy dust!

Thursday, July 7, 2016

Walt Disney's Favorite Chocolate Soda Recipe

I'm a fan of Ghirardelli chocolate. A HUGE fan. And I don't feel my trip to Walt Disney World is complete without stopping at the Ghirardelli store in Downtown Disney. (Incase you are unaware, they give out free samples! Worth the trip to Downtown Disney just for that, if you ask me.) I especially love their chocolate soda. It's not on the menu; you have to ask for it. Without a doubt, it's my favorite thing there. Except for the Pumpkin Spice Chocolate Squares; those are to die for. So I felt a kindred bond when I found out that Walt himself was a fan of the chocolate soda. So much so, that the Plaza Restaurant recreated his favorite Chocolate Soda.

Here's the recipe, perfect for bringing a little magic home:


Ingredients:

  • 1/3 Cup chocolate syrup
  • 2 scoops vanilla ice cream
  • 6 oz. soda or seltzer water
  • Maraschino cherry

Directions:

  • Pour chocolate syrup in the bottom of an 8-ounce milk shake glass.
  • Smoosh in 1 scoop of ice cream.
  • Slowly pour in soda water almost to top of glass.
  • Perch another scoop of ice cream on top.
  • Add a cherry and a colorful straw or two.

Now we don't do Maraschino cherries here (Doc has a sensitivity to artificial dyes), but we are happy to report that the cottage approves even without the cherry on top. Personally, I can't get enough! We used our Soda Stream to make as much soda water as we needed. (A seriously great product!) And, while we didn't have any Ghirardelli syrup in the cottage at the moment, we highly recommend Trader Joe's Midnight Moo. It's delicious!

Until next time, may all your days be filled with fairy dust!

Saturday, April 23, 2016

Disneyland Snickerdoodle Knockoff Recipe

Sometimes it seems like a really long time between visits; that's when a little kitchen magic can really come in handy. I found this Disneyland Main Street Bakery Snickerdoodle knock-off recipe on Pinterest and decided a rainy afternoon was the perfect time for a little Disney pick-me-up. The family was happy to oblige!

It was simple to make them into Mickey heads. Instead of rolling only one ball, I rolled one larger and two smaller balls and laid them out on the cookie sheet as such. I tried not to smash the ears on too much, as they do spread in the oven.

They took a little longer to assemble than regular snickerdoodles would, so I was able to assemble one pan while the other was baking. It was just about the perfect amount of time. Be sure to let the cookies cool just a bit on the pan before moving them to the cooling racks - we lost a couple ears by being impatient! (Although, it was a good excuse for an early taste!) My apprentice chef became quite good at rolling and pressing out the Mickeys.
One small deviation from the recipe - I like a lot of cinnamon sugar on my snickerdoodles, so we employed the Joy of Cooking technique of rolling each ball of cookie dough in a bowl of cinnamon sugar, instead of sprinkling the tops as the original recipe suggests. A personal preference, but worth it, in my humble opinion.

And because someone will ask, the WDW serving tray was one of my parents' first souvenirs. It lived in our motor home until it died and now it comes out whenever we need a little shot of Disney magic! Until next time, may all your days be filled with fairy dust!

Thursday, April 14, 2016

DIY Disney Monorail Scavenger Hunt Cards

I've always had a love-affair with the monorail system in Walt Disney World. It's magical in it's own right, and such a cool way to travel! As a kid I longed to stay in the Contemporary Resort so we could see the monorail swishing through the concourse on a regular basis.

And as a kid, we always played a monorail version of the license plate game, keeping track of the different colors we'd seen. Today there are twelve monorails operating in WDW. Rarely are they all on-line at once. But if you are lucky, you could see most of the following: Red, Orange, Yellow, Gold, Peach, Coral, Green, Lime, Blue, Teal, Silver and Black.

In the spirit of making the most of our wait time (there can be A LOT of wait time in Disney, depending on your travel dates), I created these scratch-off cards for the kids in our party. I used a heavy card stock to print these, and I would recommend making several extras as you may need them for those adults kids who tend to lose theirs in the parks, or for a learning curve with the scratch-off paint.

Then, I used this tutorial from Artmind to make scratch-off paint. A couple of tips regarding the scratch-off paint: 1.) It bubbled up when I applied it, but most of the bubbles went away as it dried. The more you agitate the paint, the more bubbles you will get. 2.) A lighter color of paint is recommended. I used copper and it didn't scratch off cleanly - as you can see in the photo below. The gold was much better.

To create the actual card, I used a scanned image of the monorail from a promotional Disney flyer. You may want to clean up the edges of the image in Photoshop. To create the different colored monorails, I selected the color stripe so it could be changed to the different colors I needed. Due to copyright laws, I can do this for my own personal use, but not, I am sorry to say, to distribute it to others. Therefore, I cannot offer you a PDF as I would like to. I can, however, refer you to my March 5th post about how to select an image and create a PNG from your own photo, and this tutorial on how to select an area of a scanned image in Photoshop and change its color. It was much easier than it sounds. Give it a try. And remember that if you are scaling down your image significantly, you will not have to be so worried about little detail areas that don't look right on a larger scale. Some of them just disappear. Don't stress yourself out about the little things.

Of course, it was only logical that each kid got a pressed penny to use as a scratch-off tool! The edge was perfect for removing the paint. I hope you give this scavenger hunt a try. We had a blast using them. Until next time, may all your days be filled with fairy dust.

Tuesday, March 8, 2016

DIY Disney Pirate Onesie T-shirt

I've mentioned before that we love having plenty of T-shirts while at Disney; this is especially true for our toddler set. And I especially love coordinating the onesies with the Quick Change Trousers I've made for them.

I have been able to find packages of plain onesies at Dollar General very reasonably priced. I would look around at your favorite discount shops for the best deal. This is great budget-friendly project. And it's another quick project (for those of you who have to find your creativity during nap time). I found this Yo Ho image all ready to go in the Silhouette shop. For those interested parties, it's pirate swords, image id 9329. From there it was as easy as downloading, printing on heat transfer paper, sending it through the Silhouette, and ironing it onto a plain onesie. 

Not only was this a great outfit for our little one in the Magic Kingdom at Mickey's Not So Scary Halloween Party (a seriously easy "costume" to pack), it would be perfect for Disney's Pirate Adventure. Don't forget about these children's activities hosted throughout the resorts. They are the perfect thing for a non-park day. Your little one can experience a bit of themed magic and you can take an hour or so for yourself. Now that's what I call a win-win! To hear what other veteran Disney Mom's think of these children's activities, take a listen to this PassPorter podcast about child care in Walt Disney World. There are some great bits of advice in there.

Until next time, may all your days be filled with fairy dust.

Saturday, June 13, 2015

What Are The Best FastPass+ Selections? | Wish With Amy

If you are headed to any of the Disney Parks, then you may be wondering about FastPasses and how to choose them. FastPasses are a reserved time slot for a particular ride or experience at one of the Disney Parks. If you are staying at a Disney Resort, you will be able to make your reservations 60 days in advance of your trip. If you are not staying at a Disney Resort, you can make your FastPass reservations 30 days in advance. This is another reason I highly recommend staying at a Disney Resort.

This is a question I get all the time: What are the best FastPass+ selections? And while the answer completely depends on your touring style, the ages and heights of the people you travel with and your personalities, there are a few ways to figure it out.

First: There are some rides that have wait times that consistently exceed the 60 minute mark no matter the time of day or time of year. If you are at all interested in them (and tall enough to ride them), these are the FastPasses to get first. Peter Pan's Flight (MK), Seven Dwarfs Mine Train (MK), Meet & Greet with Anna & Elsa (MK), Toy Story Midway Mania (DHS), Test Track (EP) and Soarin' (EP) are all in this category. If you want to do these things without spending and hour or two, a FastPass is your best option.

Secondly: If your children have high expectations and don't deal well with adjusting and/or being flexible, you might want to consider opting for their favorite(s) at the best time(s) for them (like making sure you are there after breakfast but before nap).

Third: Decide if you are willing to use one of these strategies to go without a FastPass:

  • Use the single rider line; if you don't mind riding as a single rider, you can easily cut your wait time in half.
  • Be at the park for rope drop; if you can get up early and walk in as the park opens, you can go straight to your favorite ride. This has worked for us at several of the biggies with less than a 30 minute wait.
  • Utilize extra magic hours; as a resort guest you can often get into a park an hour before it opens to the public, or stay an hour (or more) after the park closes to the general public. This allows for much shorter lines, and wait times.
  • simply wait in line; sometimes it's just what you need to do. Arm yourself with snacks and games and just wait. More and more queues are becoming interactive too, with things to do/games to play as you wait.
If you are trying to make your decisions for FastPass selections, feel free to use this FastPass+ Selection printable we give to our clients. And until next time, may all your days be filled with fairy dust!

Saturday, May 30, 2015

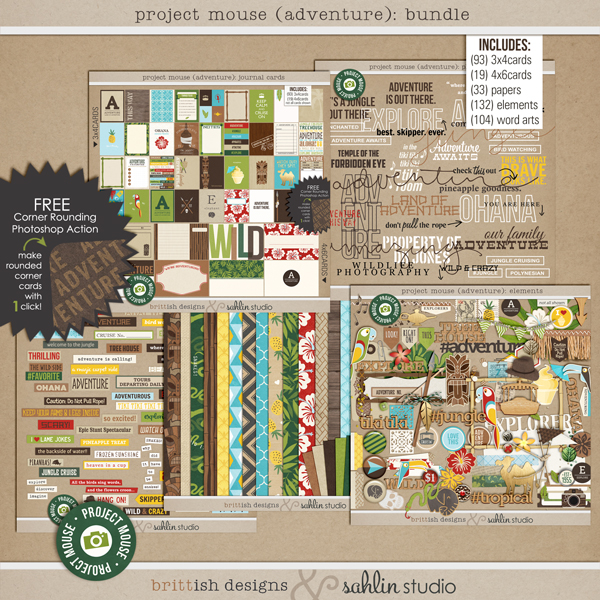
Scrapbooking WDW | NEW Project Mouse Adventure Bundle Released!

Just yesterday my favorite scrapbook designers brittish designs and  sahlin studio released a new Project Mouse kit themed to Adventureland in Disney's Magic Kingdom! My regular readers will know how very excited I am to snap it up and add it to my ever growing collection of digital scrapbook supplies!

I think Disney scrappers will also be able to use parts of this kit for those Animal Kingdom layouts as well as some Animal Kingdom Lodge pictures! This one is definitely a keeper! And you don't have to be a digital scrapper to use the kit. It comes with print files if you want to print them and use them for your Project Life albums as well.

Be sure to stop by the sahlin studio blog and the brittish designs blog for inspiration and to grab the freebie that goes along with this kit! (There is a lot of scrolling through the post, but it's worth it!) And right now the whole kit and caboodle is on sale at The Lilypad! Up to 30% off!

I have no affiliation with Project Mouse, I just love this digital scrapbooking product and want to share all the Disney goodness with my readers. Until next time, may all your days be filled with fairy dust!

Thursday, February 5, 2015

Trip Report: WDW Contemporary Resort | Atrium Club Level

View From Our Balcony

I visited the Walt Disney World Resort in Florida for my birthday this year with a friend who's birthday is one day before mine, and her daughters. This was my first trip without my family (although we consider these friends family) and I was beyond excited to experience Disney in a whole new way! Our all-girl trip was the perfect birthday celebration for me, and the accommodations were out of this world!


I have to start by saying the Contemporary Resort is one of my favorite places to stay "in the World." It has flair, nostalgia, and the best location, location, location for me and my money. You are within walking distance of the Magic Kingdom (there's a foot path to guide you), and you're the first stop on the monorail when leaving the Magic Kingdom. But I have always said that for me, a stay at the Contemporary isn't worth the money without the Magic Kingdom view. I don't usually care what our view is when we stay at Disney, with two exceptions: The Animal Kingdom Lodge, and the Contemporary Resort. I want to wake up seeing that castle and go to bed watching the fireworks! This trip did not disappoint!

Check-In

Upon checking in we were greeted at the door and taken up to a separate check-in desk on the 12th floor, the Atrium level. Once there we were helped right away. Our magic bands were activated and our room was ready and waiting for us. 

We were also given a card with a number to call or text any time we needed something, so our personal concierge service extended to us in the parks! This was a perfect Disney touch, and it worked! We made dining arrangements for a princess meal while on the fly. So Disney.

The Lounge

We were given a quick tour of the lounge area upon check-in. There was always a cast member on duty there and every request we made was readily handled. There were snacks and drinks conveniently available whenever we were there. We had breakfast in the lounge each morning, and the kids were delighted to have cookies and milk when we came back in the afternoons. I was delighted to see the wine and cocktails out before we went back to the parks in the evenings! Beverages were available all day, and they even provided us with small water bottles to take into the parks (upon request). The full schedule of offerings in the lounge are as follows:

7:00 a.m. - 10:30 a.m.  coffee, pastries, fruit, cereal
11:30 a.m - 4 p.m.  cookies, chips, beverages
5:00 - 7:00 p.m.  hot item samples, children's corner, crudites, cheese tray, beverages, wine, beer
8:00 p.m. - 10:00 p.m.  cordials and desserts

Our Room

We were treated with a box of chocolates upon our arrival, one even had the image of the resort screen printed on it! There were 5 of us, and we all fit quite comfortably in the room, with the exception of the bathroom. Five girls and no counter/vanity space in the bathroom was a challenge to say the least! We improvised and used one sink at a counter and one as a sink. They are incredibly large and look very cool and contemporary, but they are not so functional. That bathroom is one of the biggest drawbacks I see in the room. And apparently, I'm not alone. Several other reports on the resort have mentioned them as well.

The beds were quite comfortable and I even had the daybed to sleep in. The bed itself was very comfortable, but the vent was blowing directly on me at night. I would request an extra blanket right off the bat if you are sleeping there, and sleep so your head it toward the balcony!

I've included a floorpan of the room, courtesy of Your First Visit, so you can see how everything is laid out.

Perhaps because we were at the end of the hall (and far away from the wireless point?) the wireless access in our room was spotty at best. But I found that the signal was quite strong in the lounge and there were plenty of tables and sofas to work from and download our Memory Maker photos each day. 

What more can I say but that the view was worth every penny! It's the number one thing I'm paying for. Waking up to Cinderella's castle and seeing the fireworks each night were a dream come true! And nothing is better than seeing the fireworks, complete with music from your balcony, and then cozying up in your bed without fighting through a crowd to get home.

Overall, the experience was really special. Would I do this every time? Probably not. But for a special occasion this was definitely memorable and a great way to plus the magic! I loved all the special attention and Disney magic associated with being on Club Level. 

Until next time, may all your days be filled with fairy dust!


Thursday, January 29, 2015

DIY Disney's Small World Inspired Cable Cozy

I recently discovered this Cable Cozy tutorial by Live It. Love It. Make It., via Pinterest and I knew it would be a blog post eventually! I love this sort of thing - a place for everything and everything in it's place. It's my dream.

In the past I have used one of my handy little T-shirt drawstring bags for all my cables, and chargers, and such. This is still an excellent choice if it's just me and Mr. Photos From The Parks traveling together; but if the whole family is traveling en masse, that little bag gets very full, very quickly! This cable cozy seems like the perfect thing for the massive quantities of cables and chargers this family needs to survive on the road!

And as fate would have it, I've been holding on to some canvas fabric for a while now that reminded me of the It's A Small World attraction in the Magic Kingdom. The moons are part of the Heather Ross Collection Far Far Away. Unfortunately, I don't know the name of the hippo fabric. I picked it up at a local fabric store over a year ago. I had intended to use these for a bucket hat, but the fabric seemed so hot for a hat I frogged that idea. But this cable cozy is perfect for the canvas. The pattern calls for interfacing, but I scrapped that since my fabric was so heavy.


I also used a button/loop closure instead of the buckle, because it looked better with my fabric. If you have never used dungaree buttons, do not be afraid of them: they snap right together and require no sewing! They are very easy to use. Otherwise, I followed the tutorial on line. It was very well written and easy to follow. I finished it in one afternoon. This would be the perfect gift for anyone who travels often and could easily be personalized depending on the fabric you choose.

I'd love to see any of the versions you come up with. Until next time, may all your days be filled with fairy dust!

Thursday, August 14, 2014

Walt Disney World 101 | 10 Of Our Favorite Touring Tips


It's been 100% crazy here in the cottage this week with school starting, family visits and the ubiquitous potty alarm! (I am so hoping that the potty training will sink in soon!) But I still wanted to get a post out for today, so I thought I would share 10 WDW Touring Tips with you.

These are tried and true and used on every Walt Disney World vacation we take. Some are obvious, some are not. Some have taken us a while to realize, some have been with us from the very beginning (and I do mean from the VERY beginning!). I can still hear my dad shouting, "Left side, Amy!" I hope you enjoy them and they come in useful for you and your touring party too.


  1. Stay To The Left. This may be the single most important tip we have. Our American tendency is to stay to the right. And most tourists will choose the line or the attraction that is to their right. As we've continued to travel to WDW this rule has morphed somewhat into, take the path farthest from the door (or humanity). You'd be surprised how much faster you can get your burger and fries if you just move to the farthest line.
  2. Wait To Leave The Parks. It sounds a little nutty, but if you don't have toddlers having historic melt downs, then stay a bit after the fireworks and linger in the shops or buy one last sweet treat. Let the transportation crush happen without you. Waiting to leave the park (especially the Magic Kingdom) can make everyone's night much better.
  3. Arrive Early. If you can't manage the late nights, consider arriving for rope drop. The MK has a fun celebration prior to opening and all parks are clean and sparkling early in the morning; often you can get some nice photos with just your family in them.
  4. Make A Dining Reservation For The Hour Before Park Opening. Some character meals allow for early entry to the parks. You must have a reservation and all the members of your party before you can go in, but you can eat in the park before it is officially open. This has two advantages; obviously you can maximize your time in that first line or two and you can get some really great photos without the crush of humanity.
  5. Get A Haircut At The Harmony Barber Shop. This is strictly a Magic Kingdom experience, but I love doing this! Our first kid had the privilege of having his first haircut there. I HIGHLY recommend this! There was all sorts of kitsch and celebration and they are excellent with a wiggly kid.
  6. Watch The Parade From Frontierland. Again, this is specific to the Magic Kingdom, but we have had excellent luck finding a good spot for viewing the parade and it's usually much less hectic. This is not the best plan if you want to see the fireworks after the parade. And as an added bonus, we can hit the Pirates of the Caribbean on the way out!
  7. Hit Your Favorite Rides During the Evening Entertainment. If you are not watching the parade, the fireworks, or Illuminations, this is an excellent time to ride your favorite (usually crowded) rides. E-ticket rides were the most expensive and usually most desired rides when Disneyland and Walt Disney World opened. We still have a tendency to refer to them as such around the cottage.
  8. Use The Single Rider Lines. If you are not opposed to riding next to someone you don't know, the single rider line can be a great time saver. Usually Mr. Photos From The Parks and Doc can ride the same coaster, or consecutive coasters and come out beaming. 
  9. Grab A Button At Guest Relations. Especially if you are celebrating a birthday, first visit, or anniversary, get a button! The cast members are wonderful at making a little extra magic happen. You can even request a birthday phone call at your resort when checking in! 
  10. Talk To Cast Members. They are incredibly willing to help, share Disney trivia, tell jokes, trade pins, hand out stickers and trading cards, and just in general make your trip enjoyable. One of my favorite interactions was with a street sweeper in Animal Kingdom who kept my kids entertained with jokes as we were all headed to the exit together. 
Remember to try and stay positive while you're touring and enjoy the time you have, even in the small moments. It's the happiest place on Earth, and you deserve a great vacation! Until next time, may all your days be filled with fairy dust!

Thursday, June 12, 2014

New Carousel of Progress Products Now on RedBubble

Just A Dream Away Tote Bag
One of my favorite attractions at Walt Disney World is the Carousel of Progress. It brings back such great memories and I love the vintage Disney feel of the whole thing. So I am delighted to announce that my "Just A Dream Away" design is now available on RedBubble on a whole host of new products!

You can now find this design on tote bags in three sizes (13x13, 16x16, and 18x18 - pictured to the left)! Perfect for heading into the parks and for all your local shopping needs.

You can also show your Disney side on your technology; this same design can now be found on iPhone 5s & 4s cases, iPhone 3GS cases, as well as Samsung Galaxy S4 & S3 cases.

And if you are an iPod Touch or iPad Retina or iPad 2 owner, you can find cases with this design too!

Finally, if you're all about Disney decor, you are in luck! RedBubble is now selling throw pillows! You can find this design on three different pillow sizes (16x16, 18x18, and 20x20). I hope you enjoy these products as much as I do! Until next time, may all your days be filled with fairy dust.

Just A Dream Away Throw Pillows

Just A Dream Away iPhone Case 

Just A Dream Away iPad Case


Saturday, June 7, 2014

DIY Disney Scrapbook Inspiration | Project Mouse & Walt Disney World

I have been working hard on getting some much needed scrapbooking done. It seems as though I am perpetually 18 months back in my scrapbooking. So be it; but the one rule I try to live by is to only have ONE Disney vacation to scrap at a time. It's too hard to remember all the different things between trips, especially since we tend to travel at the same time of the year! I am happy to report that I am finally to that point: only the 2013 pictures are in the hopper to be scrapped. These are pictures from our 2012 Fall Break Walt Disney World trip. I'll try not to overload you, dear reader, with too many layouts at once. We do play hard when we are at the Kingdom! These are just a few of the pages today. I'll post more another time.

As I have mentioned before, I am loving using these Project Mouse kits by Sahlin Studios and Britt-ish Designs. For these pages I used Project Mouse Bundles 1, 2,4, plus the Days & Washi Tape Bundle, the Halloween Bundle, and the Fantasy Bundle. I also used the Stuffed with Fluff kit from Britt-ish Designs, and the Now Showing Mini Kit from Tickled Pink Studios.

This is also the first time I actually took the time to scan in any of the ephemera that we always pick up from our trips. It was fun to be able to use things like our key cards and the Cinderella's Royal Table photos in my layouts! I also snagged some images from the web to use. As long as you are not selling them, you can use them for your own purposes with no problems! Just be sure to check on resolution as they may not print very well. I hope these pages can provide you with some inspiration for your own scrapbook pages, or as a resource for some truly wonderful scrapbooking supplies. (And I just have to say, I've fallen in love with Sahlin Studios. I've used her vintage Christmas bundle and Reflection kits as well.)

Until next time, may all your days be filled with fairy dust!


Tuesday, April 29, 2014

DIY Disney Pocket Scrapbooking American Frontier Kit NOW AVAILABLE!

Today I am thrilled to release a product I have been working hard on! As many of my regular readers will know, I am an avid digital scrapbooker. I have fallen head over heels for pocket scrapbooking! As such, I have been on the lookout for a kit that will accentuate my "Old West" pages. And not being able to find exactly what I was looking for, I made one for myself. So today, I am releasing it to the public!

This kit originally came about for some photos we had taken at a local museum that's all about the American West. I especially needed trains and cowboys, and what I was finding for sale was very cutesy. Not really what I had in mind. As this kit was evolving it occurred to me that it would be fantastic for those shots on the Walt Disney Railroad in the Magic Kingdom. And then I thought about how I would like to use it for the Frontierland pages and the Meet and Greet photos for Woody and Jessie. And then I remembered I had some Hoop Dee Doo photos (from the way-back machine) that needed some attention as well.

But you don't have to stop there. This kit could work for Fort Wilderness photos, Crocket's Tavern, the Circle D Petting Zoo (is that place still around?), even Mickey's Backyard BBQ. There's so much potential with this kit. If you're convinced you need it too, you can find it for sale in my Etsy Shop. It's got plenty of elements and word snippets to keep you busy, as well as a total of 33 cards in both 3x4 and 4x6 sizes.

You can see more detailed views of the kit here:


If you use the kit, I'd love to see what you come up with. Tag me on Instagram (@MerryweathersCottage) or leave me a comment on this post. Until next time, may all your days be filled with fairy dust!

Saturday, April 26, 2014

Scrapping Disney with Project Mouse - Digital Pocket Srapbooking

Obviously I've been doing a lot of scrapbooking lately! Do you find that you craft in spurts too? I get enthusiastic about something and sort of run with it. It's quite possible this is scrapbooking time as I have realized that I still have 2012 pictures to put in a book! Eep! I don't like having to remember that far back.


So to that end, I thought I would share with you my latest layouts of our 2012 Disney Trip. And I know I've said it a million times, but Project Mouse is saving my bacon on these layouts! It's so nice to have a Disney themed kit (or 4) to make the scrapping of these days quick and easy. It's like automatic inspiration! I love it. Here's a link to Britt-ish Designs blog where you can find all the information you need to get your own Digital Project Mouse kits. I know I can't get enough!!


For the Animal Kingdom layouts I adjusted the colors and added my own tree custom shape to make it really work for that park. And I noticed while doing this the HUGE difference between the iPhone 4 camera I was using then, and the iPhone 5 camera I am using now. WOW!

If you've used Project Mouse I would love to see your layouts too! Tag me on IG or leave me a comment here. Until next time, may all your days be filled with fairy dust!

Tuesday, April 15, 2014

DIY Disney's Main Street Bakery French Toast Loaf

We are huge fans of the Main Street Bakery. Many a snack credit has been used there for many a wonderful and sugary snack! I must admit, I have never actually had this French Toast Loaf there, I tend toward the chocolate croissants, every time. But this was a fairly simple and very delicious way to bring a little of that Disney magic to the breakfast table between visits.

I found this recipe on Allears.net, one of our all time favorite sites for trip planning. What you may not know, is that they also have large selection of Disney recipes too! It's definitely worth checking out.

As for this recipe, it's clearly written as a scaled down version of a larger "park-size" recipe. Next time, I would go with only 4-6 oz. of butter (1 to 1 1/2 sticks), about 6 oz. (or 1 Cup) of brown sugar, and 6-8 oz. of heavy cream. I used half and half and just eye-balled about a cup, but I know it was less than this recipe called for. And I always go heavy on the vanilla. Everything is better when it's doubled! I was a little concerned that there wouldn't be enough cinnamon flavor, but it was actually perfect. And be sure to keep a pan underneath it in the oven. We had a major incident with burning butter that required us to clean the oven! Always something!

That said, this French Toast Loaf was delicious and the family all raved about it. Ours didn't stay together enough for it to be turned out of the pan, so we served it like you would a lasagne. No one had a problem with it! It's very sweet, so it might be best served as part of a brunch with sweet and savory offerings, or reserved as a special occasion breakfast. It will certainly find a place in the regular rotation here at the cottage!

Here's the original recipe with my changes in parenthesis:


Ingredients:

12 slices day-old white bread; preferably a homestyle white, not Wonder Bread
type

8 oz. butter, chilled and sliced (reduce to 1 to 1-1/2 sticks)

Brown sugar batch:

9 oz, light brown sugar (reduce to 1 cup)
1 tsp. cinnamon

Mix together and set aside.

Batter:

10 oz. heavy cream (reduce to 1 cup)
4 large eggs
1/2 tsp. vanilla (increase to 1 tsp or more)
1/4 tsp. cinnamon

Mix together and refrigerate until ready to use. (we let it sit in the refrigerator overnight)

Method:

Liberally spray a loaf pan with Pam or other vegetable spray. Layer three slices day old bread on bottom of pan. Sprinkle 1/3 brown sugar mixture on top of bread, then layer 1/3 of the butter. Repeat these steps two more times. Top off with three more slices of bread (should have a total of 12 slices of bread). Press down with hand to compact bread into loaf pan.

Slowly pour 16 oz. of batter over top of loaf, covering completely. This may take a little time, to allow it to fully absorb into bread and flow into spaces at bottom. (Take
your time here and pour into corners. Lift bread at corners a little to get into bottom quicker if you want.)

Place loaf pan on some paper towel in case of overflow. Cover top of loaf with parchment paper and wrap top tightly with aluminum foil. Place in refrigerator and allow to sit overnight.

Heat oven to 325Āŗ F. Bake for approximately 1 hour or until internal temperature in center of loaf is 160 degrees. Uncover and bake for another 15 minutes. Remove from oven and let rest for 5-10 minutes. Place a plate on top of loaf pan and invert to remove from pan. Cut into 7 slices and serve.

Until next time, may all your days be filled with fairy dust!

Tuesday, February 4, 2014

Scrapbooking Disney | Be Our Guest

I've been working again with  Project Mouse (FANTASY edition) - a collaboration of Britt at britt-ish designs and sahlin studio. And I still love it! This is another layout from our trip last fall. We actually had the opportunity to dine with the Beast at Be Our Guest! Although I was under the impression that Beast and Belle would be circling around the dining rooms, as with most character meals. This is NOT a character meal; it is an opportunity to dine in the castle and eat a lovely meal. Then you may stand in line and get your picture taken with Beast. I just hadn't done my research on this (as the experience was still relatively new). I'll know better next time.

Getting an ADR for 16 was not easy - we had to arrange it through email with a special dining agent. But as is my way, we made it happen! And perhaps because of the early hour (4:30 pm) we were all seated at the same table, which was delightfully unexpected, and truly the Disney way. We had wonderful service. In fairness, Mr. Photos from the Parks and I can be rather tough dining critics, but the food was just so-so for us. We enjoyed our meal. Doc loved his lamb chops. But we payed the same for a meal that we could have had in Cinderella's Castle and had the added bonus of the Princesses joining us. I was disappointed. But I do think we will try the counter service next time. That is, if the line isn't beastly. (See what I did there?) I'd love to hear about your experience at Be Our Guest. Was it the same for you? Did we just have an off night?

Until next time, may all your days be filled with fairy dust!

Thursday, January 23, 2014

Walt Disney's Carousel of Progress T-shirt and Greeting Cards now on RedBubble

I am so excited to offer this brand new design through RedBubble! As always, this design is available on a number of shirt colors in a wide range of sizes and styles, including those for kids and babies!

Walt Disney's Carousel of Progress is one of our don't-miss attractions when we are in the Magic Kingdom. It's just not the same if we miss it. As an original, it still works. You can catch us singing "It's A Great Big Beautiful Tomorrow" in the parks or just hanging out in the cottage.

If you are a fan of vintage Disney, then this design is perfect for you. It's also available as a card, poster, canvas or sticker, just incase the mood strikes you. I am hoping to offer it for iPad and iPhone cases too in the very near future. I'll let you know when that happens!

Until next time, may all your days be filled with fairy dust!