Showing posts with label Holiday Decor. Show all posts

Tuesday, September 13, 2016

DIY Disney's Haunted Mansion Halloween Decor | Madame Leota Candle

As I have mentioned many a time, we like to use the Haunted Mansion as our inspiration for Halloween decor. And since we leave for Disney in just a couple weeks (yes, again!), it certainly puts us in the mood! I created a candle for my favorite spider candle holder (which it appears, PartyLite no longer makes.) This candle has Madame Leota's incantation printed on it. For those of you who may not be as steeped in Disney tradition as we are in the cottage, Madame Leota is the talking head in the crystal ball in the seance room of the Haunted Mansion, just before the ballroom in the attraction. What you may not also realize, is that Madame Leota was modeled after a long-time Disney Imagineer, Leota Toombs Thomas. You can read a little more about her over at Magical School House, in a wonderful interview with her sister-in-law.

Making this candle was easier that I expected. In fact, this decorative candle tutorial from Heidi Swapp was incredibly easy to follow! I love the endless possibilities it offers! So first, here's the tutorial:


Secondly, here's the print for my candle. You can download my Madame Leota's Candle jpg for free if you'd like to use it. It's made for a 4.5" tall candle with a 9" diameter. This is what it looks like flat:


I could go a little crazy with this! So many great things could be done. I love the idea of three different sized candles, each with a hitchhiking ghost! I'll let you know if I try any more. And please let us know if you try this too! We'd love to see what you come up with. Remember to tag us on Instagram, or leave us a comment below. Until next time, may all your days be filled with fairy dust!

Saturday, September 3, 2016

DIY Disney's Haunted Mansion Halloween Decor | Hitchhiking Ghost Windows


It's officially time to start thinking about Halloween Decor! I am running one of my favorite Halloween posts today! Enjoy!

 When it comes to Halloween, I like the tamer side of things. I think that's why I gravitate to Disney's Haunted Mansion. It's spooky and fun without traveling into horror in any way. That's my idea of Halloween. And so we tend to be the Haunted Mansion house in our neighborhood, in that we play a CD of the area music, have a fog machine, carve our pumpkins to resemble the hitchhiking ghosts, and now, we will have the same hitchhikers in our windows!

I created these Haunted Mansion Hitchhiking Ghosts PNG files using photoshop. If you would like to purchase them for your own uses (scrapbooking or otherwise) you can find them in my Etsy shop. For this project, I simply imported the shapes to my Silhouette Studio software. I traced them using the trace tool and cut them out of adhesive vinyl. Remember when you are cutting out anything with words, think about reversing the image before you cut it. It depends on whether you want them to be legible to those in the house, or those on the street.


Once they are cut use the transfer paper to adhere them to the windows. I did not and wound up tearing off the middle hitchhiker's arm at the elbow. I just pieced it together again, but it was disconcerting! Now you're done! You have recreated the ghosts in the graveyard scene from the Haunted Mansion attraction! For a sharp silhouette, pull the blinds or the sheer curtains and turn on all the lights in the room so the light shines through, but the rest of the room is obscured from view. I can't wait to see how many trick-or-treaters (or their parents) recognize our grim grinning ghosts!

Until next time, may all your days be filled with fairy dust!

Wednesday, September 9, 2015

Disney DIY Envelopes from Calendar Pages

Like many Disney fans, I have Disney calendars in the cottage. I love watching the months change throughout the year. And then, just like that, the new year is upon us and I have an old calendar with pictures I love but have no idea what to do with.

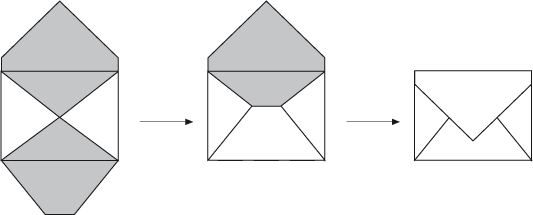
It occurred to me recently that these calendar pages would make great envelopes! They are fun, brightly colored and easy to make. All you need is a little glue or tape for the back flaps and you are all set! And being such an good environmentalist will certainly earn you your Environmentaility Badge from Jiminy Cricket!

These are easy to make, just follow these simple instructions for folding an envelope:


And you are all set! You can actually post these, or use them for teacher notes, hand delivered sentiments, enclosed in a gift, or for gift cards or certificates! They are a handy little way to put just a bit more Disney magic into the world.

Until next time, may all your days be filled with fairy dust!

Saturday, October 5, 2013

DIY Disney Haunted Mansion and Pirate Candles | Halloween Decor

Today we have another take on some Disney halloween candles. This time, I chose to work with flameless candles. They are a lot safe for the littles and they accept the adhesive vinyl! True confessions: I tried the adhesive vinyl on the real wax candles; it doesn't stick. Big surprise, I know!  To tell the truth, the vinyl had to be encouraged to stay on the flameless candles too, but it did work and stay put once it was on there. I'll have to see if they make it through the year in the Holiday Decor box in the garage for next year's display! I'm not sure they will.

I decided to stick with the Haunted Mansion theme with the larger candle, so I cut out the crystal ball shape with my Silhouette SD. I could have done two, one for the other side, but I decided not to since it wouldn't be seen the way we have our display. And because the smaller candles were so small, none of my other Haunted Mansion ideas were working. I decided instead to go with the pirate hook as a nod to the Pirates of the Caribbean. I really like the one-eyed pirates on the candle to the left! And they look really pretty the way they flicker and glow. I may have to try this for other holidays as well.

Until next time, may all your days be filled with fairy dust!


Thursday, October 3, 2013

DIY Disney's Haunted Mansion Halloween Decor | Madame Leota Candle

As I mentioned last time, we like to use the Haunted Mansion as our inspiration for Halloween decor. And since we leave for Disney in just a couple weeks, it certainly puts us in the mood! I created a candle for my favorite spider candle holder (which it appears, PartyLite no longer makes.) This candle has Madame Leota's incantation printed on it. For those of you who may not be as steeped in Disney tradition as we are in the cottage, Madame Leota is the talking head in the crystal ball in the seance room of the Haunted Mansion, just before the ballroom in the attraction. What you may not also realize, is that Madame Leota was modeled after a long-time Disney Imagineer, Leota Toombs Thomas. You can read a little more about her over at Magical School House, in a wonderful interview with her sister-in-law.

Making this candle was easier that I expected. In fact, this decorative candle tutorial from Heidi Swapp was incredibly easy to follow! I love the endless possibilities it offers! So first, here's the tutorial:


Secondly, here's the print for my candle. You can download my Madame Leota's Candle jpg for free if you'd like to use it. It's made for a 4.5" tall candle with a 9" diameter. This is what it looks like flat:


I could go a little crazy with this! So many great things could be done. I love the idea of three different sized candles, each with a hitchhiking ghost! I'll let you know if I try any more. And please let us know if you try this too! We'd love to see what you come up with. Remember to tag us on Instagram, or leave us a comment below. Until next time, may all your days be filled with fairy dust!


Tuesday, October 1, 2013

DIY Disney's Haunted Mansion Halloween Decor | Hitchhiking Ghost Windows

 When it comes to Halloween, I like the tamer side of things. I think that's why I gravitate to Disney's Haunted Mansion. It's spooky and fun without traveling into horror in any way. That's my idea of Halloween. And so we tend to be the Haunted Mansion house in our neighborhood, in that we play a CD of the area music, have a fog machine, carve our pumpkins to resemble the hitchhiking ghosts, and now, we will have the same hitchhikers in our windows!

I created these Haunted Mansion Hitchhiking Ghosts PNG files using photoshop. If you would like to purchase them for your own uses (scrapbooking or otherwise) you can find them in my Etsy shop. For this project, I simply imported the shapes to my Silhouette Studio software. I traced them using the trace tool and cut them out of adhesive vinyl. Remember when you are cutting out anything with words, think about reversing the image before you cut it. It depends on whether you want them to be legible to those in the house, or those on the street.


Once they are cut use the transfer paper to adhere them to the windows. I did not and wound up tearing off the middle hitchhiker's arm at the elbow. I just pieced it together again, but it was disconcerting! Now you're done! You have recreated the ghosts in the graveyard scene from the Haunted Mansion attraction! For a sharp silhouette, pull the blinds or the sheer curtains and turn on all the lights in the room so the light shines through, but the rest of the room is obscured from view. I can't wait to see how many trick-or-treaters (or their parents) recognize our grim grinning ghosts!

Until next time, may all your days be filled with fairy dust!