Showing posts with label environmentality. Show all posts

Saturday, August 27, 2016

Upcycled Disney T-shirt Trinket Bag

I have shared this tutorial on the blog before, but it is amazing to me how many of these little bags we use and how handy they are in my travel gear. So I hop you enjoy this rerun from March of 2014!

We are gearing up for another road trip, this time to Disney's Hilton Head Island Resort! In preparation for that, I am getting out all our road trip goodies. I realized that my previous case for all my electronics was woefully lacking in space for my new gadgetry. I needed something with a little more room that I could slip in my knitting basket or my purse without a lot of fuss. And I like having it all in one place, but not a tangled mess in my purse! As I was scavenging through my bin of t-shirts and clothing to recycle, I noticed a t-shirt that Little Chef was not too fond of because the printing on the front was uncomfortable. I didn't even put it in the rotation for Minnie. It was an 18-month Mickey T-shirt and perfectly suited for the job!

This was the easiest project I've done in some time. I simply cut the sleeves and bottom off the shirt, centering the Mickey image, and leaving the neck in tact as a ready-made casing for the drawstring. I used an overlock stitch and sewed up the three sides of the shirt. I then angled the corners in and cut them off, because I like a flat-bottomed bag. This is certainly a step you don't need to take, it just adds a nice touch. If it intimidates you, leave it out.

I then opened up a hole in the collar seam using my seam ripper, and slipped a ribbon through the casing the same way you would in a pair of pants. Because this is jersey, you really don't need to worry about the fabric unraveling, so I simply left the hole in the collar! I tied the two ends of the ribbon together with a knot, turned the bag right-side out and there you have it! Easy as can be!

Now I have a place for all my iPhone, Kindle and iPad cords, earbuds, etc., and they won't be a tangled mess when I want them! These would also be terrific bags for Tinkerbell Treasures, either to give filled with goodies or to give as a goody! And if you don't have an ample supply of 12-18M shirts in your cottage, the Goodwill is an excellent place to get exactly this sort of thing for a bargain price. In fact, I have found some wonderful park merchandise there that we wear in the parks! (No one has to know!) I do love a good bargain. Until next time, may all your days be filled with fairy dust!

Thursday, August 18, 2016

DIY Disney Road Trip Plastic Bag Dispenser

Disney Themed Plastic Bag Dispenser from Lysol Wipes Canister
This may be the first thing I ever pinned on Pinterest. I thought it was BRILLIANT! Seriously. We are always looking for a trash bag, a puke bag, a doggie pick-up-the-mess bag, a toss the diaper bag,  you name it. Traveling with the family can be messy! And now that I have an empty Lysol wipes can it's time to get to work!

If you have young ones in the house and are as Disney-crazed as we are, chances are you know all about the Handy Helpers. If not, let me fill you in. Disney Jr. made a genius decision when it started running The Mickey Mouse Clubhouse. Finally a way to connect a younger audience with the classic characters. It's fun, educational (as much as these things can be), and pleasant to listen to (unlike certain other Nick Jr. explorers). In the clubhouse, Mickey's Handy Helpers do everything from answering the door, to getting the mail, to finding Goofy's stinky shoes. A sort of butler system. So naturally, I thought of the Handy Helpers when I was creating this Road Trip Bag Dispenser.

To get the how to on rolling the bags to fit the canister, check out this tutorial from Tatertots and Jello. It's really easy. Don't worry if you have air bubbles as you roll the bags. It didn't have an adverse effect on ours in any way.

And of course I used my Silhouette SD to cut out the vinyl for the canister. I created a png of the hand from some clip art I found on line. And I used the font Minnie to create the lettering. Once I cut it out and removed the excess vinyl, I used the transfer tape to adhere it to the canister. Realizing this canister is going to be rolling around on the floor of our van for the rest of it's life, I decided to keep the transfer tape on it to help keep the vinyl on and legible! And that's all there is to it! Quick, easy and very handy.

Until next time, may all your days be filled with fairy dust!

Saturday, July 9, 2016

DIY Infinity Scarf from Upcycled Disney T-shirts Tutorial

I have to admit right up front, I'm not much of a scarf wearer outside of winter. They just seem in the way to me. But a scarf from jersey? That I can get into. And one that has more than one way to wear it? Even better. And one that showcases my old Disney Ts? Now we're talking! I'm even playing around with the idea of wearing this to the parks in the evening in October. It could happen!

This project was conceived mainly because I wanted to see the logos of the shirts I was using. Most tutorials I came across online were made with the bottom half of the T-shirt. That wasn't going to work for me. So I whipped up a practice scarf using some shirts destined for the rag bag and found that my idea worked! Here's the tutorial on how to make a Disney T-shirt Circle Scarf:


You will need:
  • 3 adult sized T-shirts (this would work with any T size 5 and up; the smaller they are, the more you need)
  • Good pair of scissors
  • coordinating thread
  • pins

Begin by turning your T-shirts inside out and measuring a 12" swath down the middle. Be sure any logos or designs you want to keep are inside that 12" area.


I then marked with white pencil (or a fabric marker on the white shirt) a line all the way down both sides. This is my stitch line. Once you have all your shirts marked, take them to the sewing machine and stitch down each line creating a tube. You don't have to be too precise with this; remember it's going to drape so no one has to know that your side seams are a little wavy.

Once all your shirts have been sewn up the sides, cut off the excess fabric on the sides leaving a 1/4" to 1/2" seam allowance.

I then cut off the collar of T-shirt and the bottom hem so that I had a nice tube. **I also took the tag off the Pirates shirt so I could reuse it on the outside, a little bit later.**


Begin sewing you first two shirts together. Turn one tube right side out and keep the other one inside out. Sandwich them together, right sides together. This is a good time to check that your logos are lined up the way you want them to be.

Pin the side seams together and pin the middle of each side together. Sew this seam using a 1/2" or 5/8" seam allowance. If the two pieces of fabric don't line up perfectly, you can stretch the fabric as you sew it so it lines up a bit better.


If you wish to insert the tag from the T-shirt so it shows on the outside, sandwich it into one of these seams, aligning all the raw edges. When you turn it right side out it should look something like this:


Continue sewing this way until you have sewn the last piece on. You should have one giant tube. 
To connect it, turn the scarf in on itself so that you can line up the last pice with the first piece just as you did all the others: right sides together, aligning the raw edges, and pin. When you sew this up, remember to leave about at 3" gap so you can turn the scarf right side out.

Once you have turned your scarf right side out, you can either sew the gap closed by hand (which looks best) or use the machine. I chose to use the machine. I invoke my grandmother once again: if you can't see it from the back of a running horse, it'll be just fine.

And that's it! I'd say this took me about 3 hours from start to finish on this project. Not bad for a rainy afternoon. If you want some tips on how to wear your circle scarf, check out this wonderful graphic. While this one isn't the sort you can wear as a dress, you could certainly work it in many of the other ways.


Enjoy experimenting with your circle scarf! And until next time, may all your days be filled with fairy dust!

Tuesday, July 5, 2016

DIY Disney Travel Game

When I saw this idea on Pinterest, I knew I wanted to recreate it using the Disney ephemera I had collected over the years. I tend to be a pack rat - every now and again, this winds up being a good thing. It's nice when that happens! If you are a pack rat too, then this project is free to create. I know I love a budget friendly DIY.
I had an old sturdy tube from some Silhouette stencil vinyl that was just right for this project, perfect for outlining the shapes of some old Disney stickers I had lying around. (I believe these are from the 90s - when I was still paper scrapbooking. Disney had a terrific scrapbooking store back then; I'm not sure if it's still around today.) If you don't have any stickers, they are very easily obtained from the Dollar Store, or a craft store. And they are usually fairly inexpensive, especially if you have a coupon.

The idea here is simple. I removed the outer edge of the sticker paper, leaving the actual stickers on the page. Then I used the "blanks" as a stencil to trace the shapes of the stickers onto the paper tube. I used a fat Sharpie to trace them and then a fine point Sharpie to label the shapes. (I have a bit of a pen addiction as well. I love my Sharpies!) Happy isn't quite able to read yet, and I wanted Poppins or Doc to be able to help him if I wasn't available.  So now there are several Disney shapes and characters to match to the shapes on the tube. I figure this could last him a good 20 minutes if he takes to it! Stickers are generally a favorite for him. For our family, the trick is finding new and different things to keep the little ones occupied on our drive. It's a LONG way to Orlando from our cottage in the midwest! I'll let you know if this works for us. And if you try it, let us know how it worked for you!

Until next time, may all your days be filled with fairy dust!

Tuesday, June 7, 2016

DIY Disney Map Coasters

 Perhaps you've seen this lovely tutorial on Pinterest. I've been eyeing it for a while and finally tackled it. I love the way these coasters turned out and the best part is they cost under $1.00 each to make! These would be a great gift to make for your fellow Disney geeks.

Of course, Jimminy Cricket would also be pleased that we are upcycling more of those park maps we all bring home as souvenirs.

I followed this tutorial with a few minor adjustments. I like to use Golden's Gel Medium instead of Mod Podge. It's more expensive, but I like the way it dries better. And I've been using it for years, so my comfort level is there. This also meant I had it on hand and didn't have the mod podge. One additional benefit to using the Gel Medium, it can handle hot liquids within a couple of days. No need to wait a month!

I applied one coat of Gel Medium to the top of the naked tile and adhered the cut out map piece to it. Try to smooth it out really well. The slick nature of the map makes it want to bubble up. You could use a credit card or bone folder - gently! - to get all the bubbles out. I let that dry. Then I came back and applied two more thin coats of Gel Medium, letting each tile dry thoroughly between coats. I made sure to brush the Gel all around the edges of the paper, making sure it was not going to peel up.

And instead of using rubber cement for adhering the felt, I used a spray adhesive. (If you are ever in doubt as to which glue to use, This To That is a fantastic resource!) I used an old box as my "spray zone" so as not to make my whole work space tacky. And that's it! My total cost for this project was $3.00 for the tile. Now THAT'S a bargain! If you try this project be sure to send us a photo; until next time, may all your days be filled with fairy dust!

Tuesday, May 31, 2016

DIY Disney Camera Buddy

DIY Winnie The Pooh Camera Buddy
I've been wanting to give this idea a try for a while now, but didn't want to screw up a $20 souvenir! So when I recently stumbled upon Tuesday Morning's clearance sale, I knew it was time to give this a try. Have you ever tried getting a little one to look at your camera? It can be pretty tricky. This camera buddy will turn your clunky black box into a soft fluffy Pooh Bear. A much nicer and interesting object to look at, don't you think?

I found this Winnie The Pooh plush for only $4; a steal if you ask me! And I used this very easy to follow tutorial on  making lens creatures. Seriously, it only took me an hour. And the tutorial only calls for scissors, pins, needle & thread, and enough elastic to wrap around your lens twice. THAT'S IT.

My seams were not so lovely, but since they are facing the lens, it doesn't really matter. I will say, I was surprised at how hesitant I was to cut into Pooh. I suppose Doc McStuffins has it's affect on a Mama.

Overall, I couldn't be happier with how this Camera Buddy turned out. I had no idea it would come together so quickly! I think this would be a fantastic gift for a new mom, a scrapbooker, or a Tinkerbell Treasure for your resident Disney photographer. It would also be a great way to upcylce those Disney souvenirs that get neglected. If you have a passing thought that this would be of interest to a fellow Disney mama, you absolutely should give it a try. Until next time, may all your days be filled with fairy dust!

Thursday, May 12, 2016

DIY Upcycled Disney T-shirt Pool Bag


I know I've mentioned this about a bazillion times, but I'll say it again, I hate those plastic-y graphics on T-shirts. Like, a lot. But sometimes you can't help but end up with one from a trip with friends. What to do? I say make a cute pool bag for your next trip! Doc needs a small bag (that's hard to miss!) to keep his sunscreen, hat, phone and arcade card in while he's at the pool. This would be perfect!

I saw this idea on Pinterest and immediately knew it was the project for this T-shirt. The shirt has sentimental value, but I can't bear to wear it. Perfect solution. I followed Jill's tutorial from One Good Thing. I particularly liked how she braided the handles of her bag. Great detail.

Modifications I made to her tutorial: I sewed two diagonal seams at the corner of the bag to give it the shape I was looking for; I also took a strip of fabric from the sleeve and sewed it over the braided seam. It just hid all my imperfect sewing! You can see a close up of it in the photo to the right.

All in all this was a terrifically easy project and certainly nap-time friendly! And for you budget conscious Disney travelers, this project is FREE if you already own the T-shirt. It doesn't get better than that! Until next time, may all your days be filled with fairy dust!

Thursday, April 21, 2016

DIY Disney Gift Bag from Upcycled Park Map

Every now and then you need emergency gift wrapping while in Disney: someone in the party reveals it's their birthday, you find the perfect just-because gift, or you remembered the gift and the occasion, but forgot to pack wrapping paper. Whatever the situation, I know I've had need before. Well, here is your solution.

Every park, every resort and many other places around Walt Disney World have free maps available. I always grab two or three when we enter a park because I know my family, and they have a tough time keeping track of theirs. This means I usually come back to the hotel with extras. Even if you don't, just stop by the check-in desk. They always have them. This map is your new gift bag - it just needs to be folded. You may need to stop at guest services and ask if they have a glue stick (or tape) and a ruler you can borrow - or scope out the gift shop. It's Disney. Someone is bound to help a guest in need.

I'll save you the double post and simply direct you over to How About Orange's awesome tutorial on how to make a gift bag from a newspaper. The steps are easy to follow. The only change you will want to make is in the folding dimensions. The Disney maps are a bit bigger than the rectangle she uses. Instead of the sides of the bag measuring 4 1/2", you will want to make them 6 5/8". Everything else is the same.

Viola! You have the perfect wrapping for the perfect Disney gift, and it was upcycled to boot. Wouldn't Jiminy Cricket be proud? Until next time, may all your days be filled with fairy dust.

Tuesday, April 19, 2016

DIY Disney Fused Plastic Rain Bucket Hat

As Earth Day approaches, I thought I would run one of my all-time favorite upcycled projects! Enjoy this oldie but goodie from last summer!

Are you looking for the perfect accessory for your Disney rain poncho? Well, look no further! You can upcycle some old shopping bags for this unique Disney look!

For this project I used 8 grey shopping bags for the lining, (available from Kohls, Lowes or Walmart in this area) and one large Disney shopping bag for the exposed side of this hat, as well as some white seam binding I had in my stash and purple thread for contrast! Which means that this Disney hat was completely free to make and helps the environment by not putting all that plastic in the landfill. Wouldn't Jiminy Cricket be so proud?

For all the details and instructions from fusing the plastic to creating the hat, I used this tutorial from Makezine. The only change I made was adding the seam binding to the two brim pieces before sewing them together. You could always just seam it the way the pattern suggests, without the seam binding. But I like the extra touch it gives this hat. So cute!

To fuse the plastic, I set my iron to somewhere between cotton and wool/silk, the highest and second highest settings on my iron. Fusing the plastic was the longest part of this project. It seemed to take forever! But setting the iron too hot was also a mistake; when it was set to the highest setting, the plastic shrank so quickly it pulled holes in the "fabric." Not so good for keeping the rain out!

To cut the pieces out, you can actually trace around them with ballpoint pen. That way you can see exactly what parts of the design will show. Just keep in mind that you will have a 1/4" seam around the pieces. And if you do try this at home, make sure the words will not be upside down when you sew the hat pieces together. You CAN pick the seam out of this plastic, but it is no picnic! My advice is to check everything twice before sewing!

I hope to see several of these hats the next time we are in the Disney parks! After all, what better place is there for a fabulous hat than Disney? Until next time, may all your days be filled with fairy dust!

Tuesday, April 5, 2016

Easy Upcycled DIY Disney Travel Game

When I saw this idea on Pinterest, I knew I wanted to recreate it using the Disney ephemera I had collected over the years. I tend to be a pack rat - every now and again, this winds up being a good thing. It's nice when that happens! If you are a pack rat too, then this project is free to create. I know I love a budget friendly DIY.
I had an old sturdy tube from some Silhouette stencil vinyl that was just right for this project, perfect for outlining the shapes of some old Disney stickers I had lying around. (I believe these are from the 90s - when I was still paper scrapbooking. Disney had a terrific scrapbooking store back then; I'm not sure if it's still around today.) If you don't have any stickers, they are very easily obtained from the Dollar Store, or a craft store. And they are usually fairly inexpensive, especially if you have a coupon.

The idea here is simple. I removed the outer edge of the sticker paper, leaving the actual stickers on the page. Then I used the "blanks" as a stencil to trace the shapes of the stickers onto the paper tube. I used a fat Sharpie to trace them and then a fine point Sharpie to label the shapes. (I have a bit of a pen addiction as well. I love my Sharpies!) Happy isn't quite able to read yet, and I wanted Poppins or Doc to be able to help him if I wasn't available.  So now there are several Disney shapes and characters to match to the shapes on the tube. I figure this could last him a good 20 minutes if he takes to it! Stickers are generally a favorite for him. For our family, the trick is finding new and different things to keep the little ones occupied on our drive. It's a LONG way to Orlando from our cottage in the midwest! I'll let you know if this works for us. And if you try it, let us know how it worked for you!

Until next time, may all your days be filled with fairy dust!

Saturday, September 12, 2015

DIY Disney T-shirt Quilt | Phase 5: Finishing

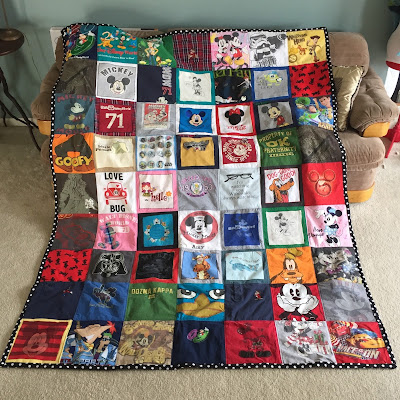
I am so excited to present my completed Disney T-Shirt Quilt! It was a long time in the making and a very big undertaking, but alas, I have persisted and completed this project!

I backed this with an old twin size duvet cover that the teenage had decided was too complicated to use. I also found this fun black and white polka dot fabric in my stash that was given to me a while back. I used it to make my own bias tape for binding.

So by the end of this project, the only cost that went into it was the bolt of iron-on Pelon I used to back the t-shirts. I'd say that's a bargain! Not only did it give new life to t-shirts we had outgrown, but also now is the coveted blanket for movie night!

I could not be happier with this quilt. It embodies all the qualities of love for a great DIY: reused items made into something useful and lovely. It is not going to win any awards for the construction, but it is definitely a family treasure, and that is better than any perfectly constructed quilt I could buy.

Until next time, may all your days be filled with fairy dust!

Wednesday, September 9, 2015

Disney DIY Envelopes from Calendar Pages

Like many Disney fans, I have Disney calendars in the cottage. I love watching the months change throughout the year. And then, just like that, the new year is upon us and I have an old calendar with pictures I love but have no idea what to do with.

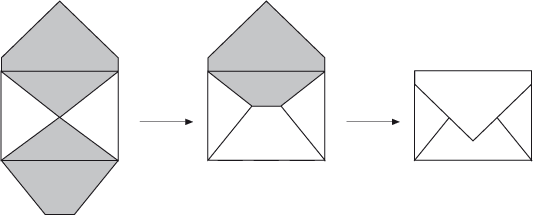
It occurred to me recently that these calendar pages would make great envelopes! They are fun, brightly colored and easy to make. All you need is a little glue or tape for the back flaps and you are all set! And being such an good environmentalist will certainly earn you your Environmentaility Badge from Jiminy Cricket!

These are easy to make, just follow these simple instructions for folding an envelope:


And you are all set! You can actually post these, or use them for teacher notes, hand delivered sentiments, enclosed in a gift, or for gift cards or certificates! They are a handy little way to put just a bit more Disney magic into the world.

Until next time, may all your days be filled with fairy dust!

Wednesday, September 2, 2015

DIY Disney T-shirt Quilt | Phase 4: Putting It All Together


So it feels like I started this project 100 years ago, collecting old t-shirts, ironing on stabilizer, cutting out squares of fabric.  It was taking so long I had resigned myself to never really having a quilt. And then, all of a sudden, I had all the squares I needed! Just like that. And in the course of one day (a very long, dedicated day) I had not only completed the top the quilt, but also completed the "sandwich" (the top, the batting and the backing,) and the quilting on top of it. It was an amazing day.

Quilting is a lot like painting a room. So much time is spent prepping the space that when the paint finally goes on the walls it feels incredibly satisfying. Same with sandwich day. It all starts coming together and you can see the real progress you've been making all along. Granted, painting a room usually only takes a day or two (not a year and a half!), but the principle's the same.

I began the assembly part of the quilt project by laying out all the squares on the floor to get an idea of the layout I preferred. I started with the squares I liked the most in the center of the quilt and went around them until I was finished, trying not to put two of the same color shirts right next to one another. I tried not to worry too much if three Mickey's were next to one another. That nonsense can drive me crazy! I made sure to take a photo incase my kids decided to mess with it. Of course they did! I was glad I had that photo!

After I was happy with the layout, I sewed the squares together in horizontal strips, noting each row as I went. This made sewing them all together easy. Once I had each horizontal row, I sewed them all together in order to create the completed top.

And here is just a sneak peek of the top before it was sandwiched and quilted together! Once I have the binding made and attached I will reveal the finished product. But this was a very productive and satisfying step toward a new family quilt!

Until next time, may all your days be filled with fairy dust!

Tuesday, June 2, 2015

DIY Disney Fused Plastic Rain Bucket Hat


Are you looking for the perfect accessory for your Disney rain poncho? Well, look no further! You can upcycle some old shopping bags for this unique Disney look!

For this project I used 8 grey shopping bags for the lining, (available from Kohls, Lowes or Walmart in this area) and one large Disney shopping bag for the exposed side of this hat, as well as some white seam binding I had in my stash and purple thread for contrast! Which means that this Disney hat was completely free to make and helps the environment by not putting all that plastic in the landfill. Wouldn't Jiminy Cricket be so proud?

For all the details and instructions from fusing the plastic to creating the hat, I used this tutorial from Makezine. The only change I made was adding the seam binding to the two brim pieces before sewing them together. You could always just seam it the way the pattern suggests, without the seam binding. But I like the extra touch it gives this hat. So cute!

To fuse the plastic, I set my iron to somewhere between cotton and wool/silk, the highest and second highest settings on my iron. Fusing the plastic was the longest part of this project. It seemed to take forever! But setting the iron too hot was also a mistake; when it was set to the highest setting, the plastic shrank so quickly it pulled holes in the "fabric." Not so good for keeping the rain out!

To cut the pieces out, you can actually trace around them with ballpoint pen. That way you can see exactly what parts of the design will show. Just keep in mind that you will have a 1/4" seam around the pieces. And if you do try this at home, make sure the words will not be upside down when you sew the hat pieces together. You CAN pick the seam out of this plastic, but it is no picnic! My advice is to check everything twice before sewing!

I hope to see several of these hats the next time we are in the Disney parks! After all, what better place is there for a fabulous hat than Disney? Until next time, may all your days be filled with fairy dust!

Thursday, January 22, 2015

DIY Upcycled Disney Resort Map Bucket

You know, I'm always surprised at how the easiest map projects become my favorites! This little bucket is no exception. And honestly, it was really easy to do! All you need is a paper cutter, a map and a tape runner.

I started with a bucket of Ghirardelli chocolates (minis) that we picked up at Downtown Disney this fall. They are not nut free, so I liked that Doc still have them as a treat, yet could keep them up on a high shelf away from Little Chef (and his nut allergy) in this handy bucket. Once the candy was gone I rescued the bucket from the recycle bin, not yet sure what I would do, but certain it would be useful in the future.

And yesterday, inspiration hit! I grabbed an Epcot map from my stash and cut it in two strips to cover the entire bucket. Future World for the front of the bucket and World Showcase for the back! I just used my tape runner (dry adhesive) to adhere the map to the plastic bucket and voila! I have the perfect little catch-all for my desk area! I am in constant need of another container for pens, colored pencils, googly eyes, colorful elastic, you name it! I love the way this looks. And wouldn't Jiminy Cricket be proud? We've upcycled this into something wonderful!

Until next time, dear readers, may all your days be filled with fairy dust!

Tuesday, October 7, 2014

DIY Disney Popcorn Bucket Makeover


We are savers; I admit it. I love all things Disney and I hate to toss even the smallest items. I'm always convinced I can find a way to use them all! And I love all the different designs that come on those souvenir popcorn buckets in the Disney Parks. And since we are constantly in need of snacks, we tend to collect a LOT of buckets.

So what do you do with all those popcorn buckets after all the popcorn has been eaten in the parks? Here's our list of top 10 ideas for reusing your bucket that would make Jiminy Cricket (and his environmentality campaign) proud:


  1. Disney Movie Night! Why not reuse those buckets for the same purpose they were intended for? Fill them with your favorite popcorn and pop in your favorite Disney movie and remember the magic!
  2. Bath Time! While we are at the parks we find these to be the best bath toy. Even at home we like to use them for washing the kids, and washing the dog. 
  3. Picnic Buckets: We like to fill each bucket with an individual picnic for the park or field trip days. With food allergies, it's better to be safe so we always pack our own food.
  4. Airplane Snack Buckets: I like to use all our leftover snack credits from the dining plan to fill up these buckets with Disney treats to have on the way home. There's nothing better than a little Disney magic to soften the blow of leaving The Happiest Place On Earth.
  5. Berry Picking Pails: We love to pick our own berries in the strawberry and raspberry fields all summer. These are the perfect size for small hands and clean up easily too.
  6. Sand Toys! We have been known to take these with us to Lake Michigan to build sandcastles and dig giant sand pits. The handles make it easy to tote water too! And when you are going back and forth it keeps your sunscreen separate from the other items in your beach bag. No spills!
  7. Backseat Trash Cans: Our road trips to Disney have been long and the car seems to get trashed in no time! One line of defense against this is making sure they have a place to put all their trash. These buckets can attach to the headrest in front and they hold a lot!
  8. Trick or Treat Bucket: Obviously the halloween themed buckets would be perfect for this!
  9. Play Kitchen Utensil Holder: With Little Chef in our cottage, we have a fairly extensive collection of things in the play kitchen. We use one of these popcorn buckets to corral all the utensils meant for the kids.
  10. Lego Bin: This bucket is the right size to carry a whole lego project and it's instructions for a road trip or even just a quick trip to Grandma's house.
There you have it! Ten ways to reuse those Disney popcorn buckets once you get home. Until next time, may all your days be filled with fairy dust!

Saturday, May 31, 2014

DIY Disney T-shirt Quilt | Phase 3: Using Smaller T-shirts

As I mentioned in my first post about this t-shirt quilt, I have t-shirts of varying sizes. Some are as small as 6 months onesies, others are 3T. I have some sentimental attachment to many of these and I wanted to include them in the quilt - a way of keeping them and making them useful again. But I was clearly not going to get an 11"x11" square out of them. So I decided to appliquƩ them onto larger squares.

This is the process I used:

As I was cutting the adult sized t-shirts, I laid them flat and cut through both the fronts and the backs of the shirts. This way, I had the printed square from the front, and a blank square from the back.

I then took the blank square, ironed on the fusible interfacing (Pellon) to stabilize it. (I did not use the Pellon on the smaller square as it felt it wasn't necessary.)

Then, I cut out the printed design from the child sized t-shirt using an 8"x8" square. Again, I made a pattern from scrapbooking paper to make it easy to cut.

Once the smaller square was cut, I centered it on the larger square and used Stitchery Witchery to bond the smaller one to the larger one. If you've never used Stitchery Witchery, it's very simple. It will bond two fabrics together by just ironing it on, the perfect thing to hold the small square on the larger one in order to appliquĆ© it.

After the smaller square was securely adhered to the larger one, I simply used the zigzag stitch on my machine, and stitched around all four sides of the small square. And since I had plenty of scrap material from the left-over t-shirt parts, I was able to test the zigzag settings to get them just the way I wanted them prior to sewing on the first square.

I almost have all my squares completed! The next installment should be the sewing of the quilt top! Until next time, may all your days be filled with fairy dust!

Thursday, May 29, 2014

DIY Disney T-shirt Quilt | Phase 2: Preparing the Shirt Squares

As my regular readers will know, I am currently working on a t-shirt quilt. This is my first attempt and I thought what better way to share it than while it's in progress?! Last time, we discussed the measurements and gathering up of t-shirts. This time, I wanted to show you how I prepared the t-shirts for the quilt.

If you've ever worked with jersey, you know it can be a little finicky in the machine. You can approach this in a couple of ways. For smaller projects, such as these adorable boxers from upcycled t-shirts, you can starch the heck out of the jersey and it sews up just fine. But for these larger squares of jersey, I wanted something more stable, especially since I want the measurements to stay fairly accurate. I happened to have some pellon fusible interfacing on hand, and used it (and another bolt I purchased from Amazon) to stabilize the t-shirt squares. If you've never used it, it's extremely easy.

To begin, I made a pattern from scrapbook paper of an 11" x 11" square. I placed it on top of the shirts (no pinning) and cut around it with my scissors. I cut out the back and the front at once so I would have the back squares for the smaller shirts, as I mentioned in my Phase 1 post. If you are a quilter and have a rotary cutter, this would be even faster. I don't have a mat for cutting on at the moment, so I just went old school with the scissors.

I also used that same pattern to cut out the interfacing. Once I had all my squares and all my interfacing cut out, I then ironed the interfacing to the t-shirt squares using the interactions included with the interfacing. I like to start in the middle and work out so there's less chance of puckering, stretching, or wrinkling. Jersey has a tendency to want to stretch as you iron it.

Once I have all 54 squares done it will be time to start sewing them together. Next time I'll walk you through using smaller t-shirts and how I made them fit the larger quilt blocks. Until next time, may all your days be filled with fairy dust!

Tuesday, May 27, 2014

DIY Disney T-shirt Quilt | Phase 1: Gathering Materials

It's official. I have begun work on my very first t-shirt quilt! This is something I have been wanting to do for a very long time. And what better way for us to do it than with our Disney shirts that we've been saving? In fact, I was amazed by how many shirts this quilt was going to need! I used several resources on-line to get started on this project, but finally settled on Totally Stitchin's tutorial. At least this gave me a good place to start with measurements.

I decided to make a twin size quilt. We generally use our quilts more as a throw while we are on the sofa watching movies, and less as a bed cover. To that end, I wanted this quilt to be easily accessible and not too big. I also realized that my t-shirts would not go nearly as far as I thought they would! Another good reason to stick with a twin-sized quilt. According to my measurements, I was going to need a LOT of shirts!

Since math is in no way my strong suit, I wanted my measurements to be even, meaning no half shirt squares to deal with for the quilt. For my twin, I decided to use 11" x 11" squares that would sew up to 10" x 10" squares. A twin quilt is 60" x 90". This way it was easy to see I would need 6 squares across and 9 down, for a whopping total of 54 shirts! This is actually more that I had on hand - shocking, by the way. So I gathered up the family and went to Goodwill. Did you know that the first Saturday of every month they have a 50% off the entire store sale? Neither did I, until we stumbled upon it. Great for the pocket book, not so great for the kiddos waiting for Mama to sort through all the shirts and then wait in line. Next time I will leave the kids with Mr. Photos From The Parks!

And to make things just a little more complicated, I realized that all my shirts were different sizes! So I needed to find a way to make them all work together in a way that would be pleasing to me. I didn't want to put something together only to think every time I got it out, "that looks so odd." Been there, done that! To address this problem I settled on appliquƩ. The baby and toddler sized shirts would need to be appliquƩd to larger squares that fit the pattern.

The solution was easy, since most of my adult-sized T-shirts didn't have printing on the backs. I would use the backs of those T-shirst for the 11"x11" base square, and appliquƩ onto them the baby size shirts. In theory, it totally works! I'll keep you posted on how well it goes in real time!

Now that I have all of my shirts gathered, my next step is to get them all cut and prepped! I'll keep you posted on this project - I'm super excited to get it done! Until next time, may all your days be filled with fairy dust!
Tuesday, April 22, 2014

Disney Park Map Project Round Up for Earth Day

Since it's Earth Day, I thought it would be nice to do a round up of all the Disney Park Map posts I've done in the last year or so. As we all know, Jimminy Cricket wants us all to be responsible with our resources and think about our environment! These projects are a fun Disney way to incorporate the three Rs into your Disney trips: reduce, reuse and recycle!

First up, make a Disney park map gift bag!

Or you could make some fun coasters from ceramic tiles and your Disney park maps.

You could use them as an insert for an insulated travel mug, so you always have a little Disney with you.

You could also insert a Disney park map into a three-ring binder for an instant Disney boost at work or at school!

You could decoupage an ornament for the holidays, or create this orb ornament.

You could decoupage a candle for your home (or a gift!) with Disney park maps too.

And finally, you could use your Disney park maps to make a block puzzle suitable for your coffee table or your next road trip box.

What ever you decide to do, we hope you remember to reduce, reuse and recycle those maps. Until next time, may all your days be filled with fairy dust!