Thursday, March 20, 2014

Upcycled Disney T-shirt Trinket Bag

We are gearing up for another road trip, this time to Disney's Hilton Head Island Resort! In preparation for that, I am getting out all our road trip goodies. I realized that my previous case for all my electronics was woefully lacking in space for my new gadgetry. I needed something with a little more room that I could slip in my knitting basket or my purse without a lot of fuss. And I like having it all in one place, but not a tangled mess in my purse! As I was scavenging through my bin of t-shirts and clothing to recycle, I noticed a t-shirt that Little Chef was not too fond of because the printing on the front was uncomfortable. I didn't even put it in the rotation for Minnie. It was an 18-month Mickey T-shirt and perfectly suited for the job!

This was the easiest project I've done in some time. I simply cut the sleeves and bottom off the shirt, centering the Mickey image, and leaving the neck in tact as a ready-made casing for the drawstring. I used an overlock stitch and sewed up the three sides of the shirt. I then angled the corners in and cut them off, because I like a flat-bottomed bag. This is certainly a step you don't need to take, it just adds a nice touch. If it intimidates you, leave it out.


I then opened up a hole in the collar seam using my seam ripper, and slipped a ribbon through the casing the same way you would in a pair of pants. Because this is jersey, you really don't need to worry about the fabric unraveling, so I simply left the hole in the collar! I tied the two ends of the ribbon together with a knot, turned the bag right-side out and there you have it! Easy as can be!


Now I have a place for all my iPhone, Kindle and iPad cords, earbuds, etc., and they won't be a tangled mess when I want them! These would also be terrific bags for Tinkerbell Treasures, either to give filled with goodies or to give as a goody! And if you don't have an ample supply of 12-18M shirts in your cottage, the Goodwill is an excellent place to get exactly this sort of thing for a bargain price. In fact, I have found some wonderful park merchandise there that we wear in the parks! (No one has to know!) I do love a good bargain. Until next time, may all your days be filled with fairy dust!

Tuesday, March 18, 2014

DIY Disney Trip Command Center

Spring Break planning is in full swing here in the cottage and it's hard for the littles to comprehend what is about to take place. I devised this command center as a sort of daily reminder and planning center for our upcoming trip to Disney's Hilton Head Island Resort. You can expect a trip report on this particular vacation, as we have never done it and I have found very little in the way of reviews on line.

I decided to use the very cute Disney countdown paper chain that I saw on CapturingMagic's Pinterest board. It was so easy to do using Lisa's tutorial for the Mickey ears loops. This was a great way to involve the littles. They may not know what to expect, but they know we are counting down to something!

I also put out these souvenir money jars for each of the kids. This was a great way to encourage good behavior. We awarded a dollar a day for good days for the littles and for no missing assignments for Doc. Watching their trip money grow was a great incentive for them. And what busy mom can't use a little extra help in encouraging kids to be good?

I also made my own subway art for the display area. I like thinking about all the possibilities of this trip: ice cream, campfires, lazy days, the beach, games. If you would like to download it, feel free. You can find my Disney's Hilton Head Island subway art right here. I would recommend printing it at around an 85-90% scale if you want it in an 8x10 frame.


Finally, I put our road trip basket (from our 2013 Wilderness Lodge trip!) on the table as a place to put all those little things that "would be great for the car" but have a way of disappearing before a trip. This way it's all centrally located and easy to pop in the van when we are ready to go!

If you have other command center ideas I'd love to hear about them. I like this so much I think I'll be doing another one for our Walt Disney World trip in October! Until next time, may all your days be filled with fairy dust!


Saturday, March 15, 2014

DIY Disney Popsicle Stick Magnet Puzzles


I first saw this idea on the Silhouette America Blog. It captured my attention as we are getting ready to road trip to Disney's Hilton Head Island Resort for spring break and I am always on the lookout for car-friendly activities. I especially like anything that will work on a magnet board (i.e. cookie sheet from the dollar store)! And this was easily converted. With two toddlers, keeping it fresh is the name of the game! Well, that and snacks. Lots and lots of snacks.

This is possibly one of the easiest crafts I've done. I first found pictures of Disney characters my kids are fond of by searching Google images. I then printed them out on regular copy paper. I even used one of my own pictures of Cinderella's Castle! The possibilities are endless here. You could use pictures of family members, the states you are traveling through, favorite rides at the parks, you name it! I think it's a fun and easy way to generate a little interest and excitement about the final destination while trapped in the car.

Once I had everything printed I used my tape runner to make the entire back of the picture sticky. I imagine you could use craft glue too, but I didn't want to deal with goop and bubbles. I then placed my popsicle sticks on the sticky paper and used an exacto knife to cut around them. It was just that simple! I'm not too worried about them getting torn up. I figure we can use them in the car, use them on the fridge in the villa, and then use them in the car again. If they last longer than that, bonus! If not, and the kids fall in love with them, I can always make more. After all, they were fast to assemble. I was able to whip up two of these in about 20 minutes. Simple and sweet!

May all your road trips be short, and until next time, may all your days be filled with fairy dust!

Thursday, March 13, 2014

DIY Disney St. Patrick's Day Beer Sampler Set : Peace, Love, Mickey & St. Patty's Day

Let there be no doubt that we are a beer drinking cottage! We love St. Patrick's Day for so many reasons, but certainly the opportunity to drink some beer from across the pond rates high on our list!

And to celebrate such an auspicious occasion, I bring you the Disney St. Patrick's Day Beer Sampler! What better way to introduce your family to the tastes of Ireland than with this fun sampler set? And yes, it's simple to make if you have the right tools!

You may remember the Snuggly Duckling Beer Sampler Set from last summer. I found these blank sets in the $1 spot at Target. It was part of their Father's Day/Summer promotions. If they have them again this summer I'll be sure to pick up some more! The paddle was $3 and each glass was $1. It's one of the best deals I've seen from them.

I used my Silhouette SD to cut out each shape from stencil vinyl. I used this shamrock, this peace sign, this heart, and I created my own Mickey shape using the circle tool. Remember, to draw a perfect circle, hold the shift key and drag. After that I simply adhered the stencils to the glass and used etching cream. I set the timer for 15 minutes for these. I really like the way these turned out. They are big enough to see.

If you are in the mood for a beer tasting, you might try these four Irish draughts: Murphy's, Harp, Smithwick's & of course Guinness. Until next time, may all your days be filled with fairy dust!

Tuesday, March 11, 2014

Sitting with Grandmother Willow: Danielle of DisneyLove417

Peter Pan Poster from DisneyLove417
As part of our on-going series, Sitting with Grandmother Willow, I am happy to introduce Danielle of DisneyLove417, an Etsy shop. This series of blog posts highlights artists and bloggers of all stripes with one thing in common: a passion for Disney! I hope you will enjoy getting to know Danielle as much as I have. A big thanks to her for taking the time to interview with us! And be sure to visit her shop for a great selection of Disney themed graphic art and phone accessories!


Disney by the numbers (with apologies to Harpers):

# of trips you have made: This is hard to say because I worked there from August 2009 till June 2013. I have visited the parks way more than the average person and loved every second of it.
Date of first trip: 1994
Date of next trip: May 2014 for Hollywood Studies 25th Anniversary
# of Resorts stayed in: I believe I have stayed in 10 different ones.
Usual # in your travel party: I would say 4 on the average day.
Pairs of mouse ears in your cottage: 7 beacuse you can never have too many mouse ears.

WDW or Disneyland (or other)? WDW .. I have never visited Disneyland :(
How do you usually travel to Disney? If on vacation a plane. But most of the time I just drive down the street in my car :)
Do you have any tips for trips? Yes lots. Feel free to contact me with any specific questions because there are just too many to name. I worked in guest relations at the parks so I know lots of fun facts.
Do you have a favorite place to eat while in Disney? Most recently I have been fascinated with Be Our Guest (like the rest of the world) You also can never leave without a Dole Whip
What is your absolute DON'T MISS attraction? Toy Story Mania
Stage shows, yes or no? Yes
Parades, yes or no? Yes .. I think some of them can use some updating but yes.
Best Fast Pass to get: Toy Story Mania for sure! Its the busiest ride at all 4 of the parks
Favorite park: Hollywood Studios. I have a special place in my heart for them considering I worked there for 4 years.
One piece of advice you'd give a novice about WDW/DL: Don't just show up and think you can figure out how to work the parks. Definitely do some research.
How do you create extra magic for your family? I know a lot of secrets about the parks so I will surprise them with things they didn't know about or show them great spots to watch fireworks or shows.
How can we connect with you?
www.etsy.com/shop/disneylove417
instagram.com/dswizzle417

Saturday, March 8, 2014

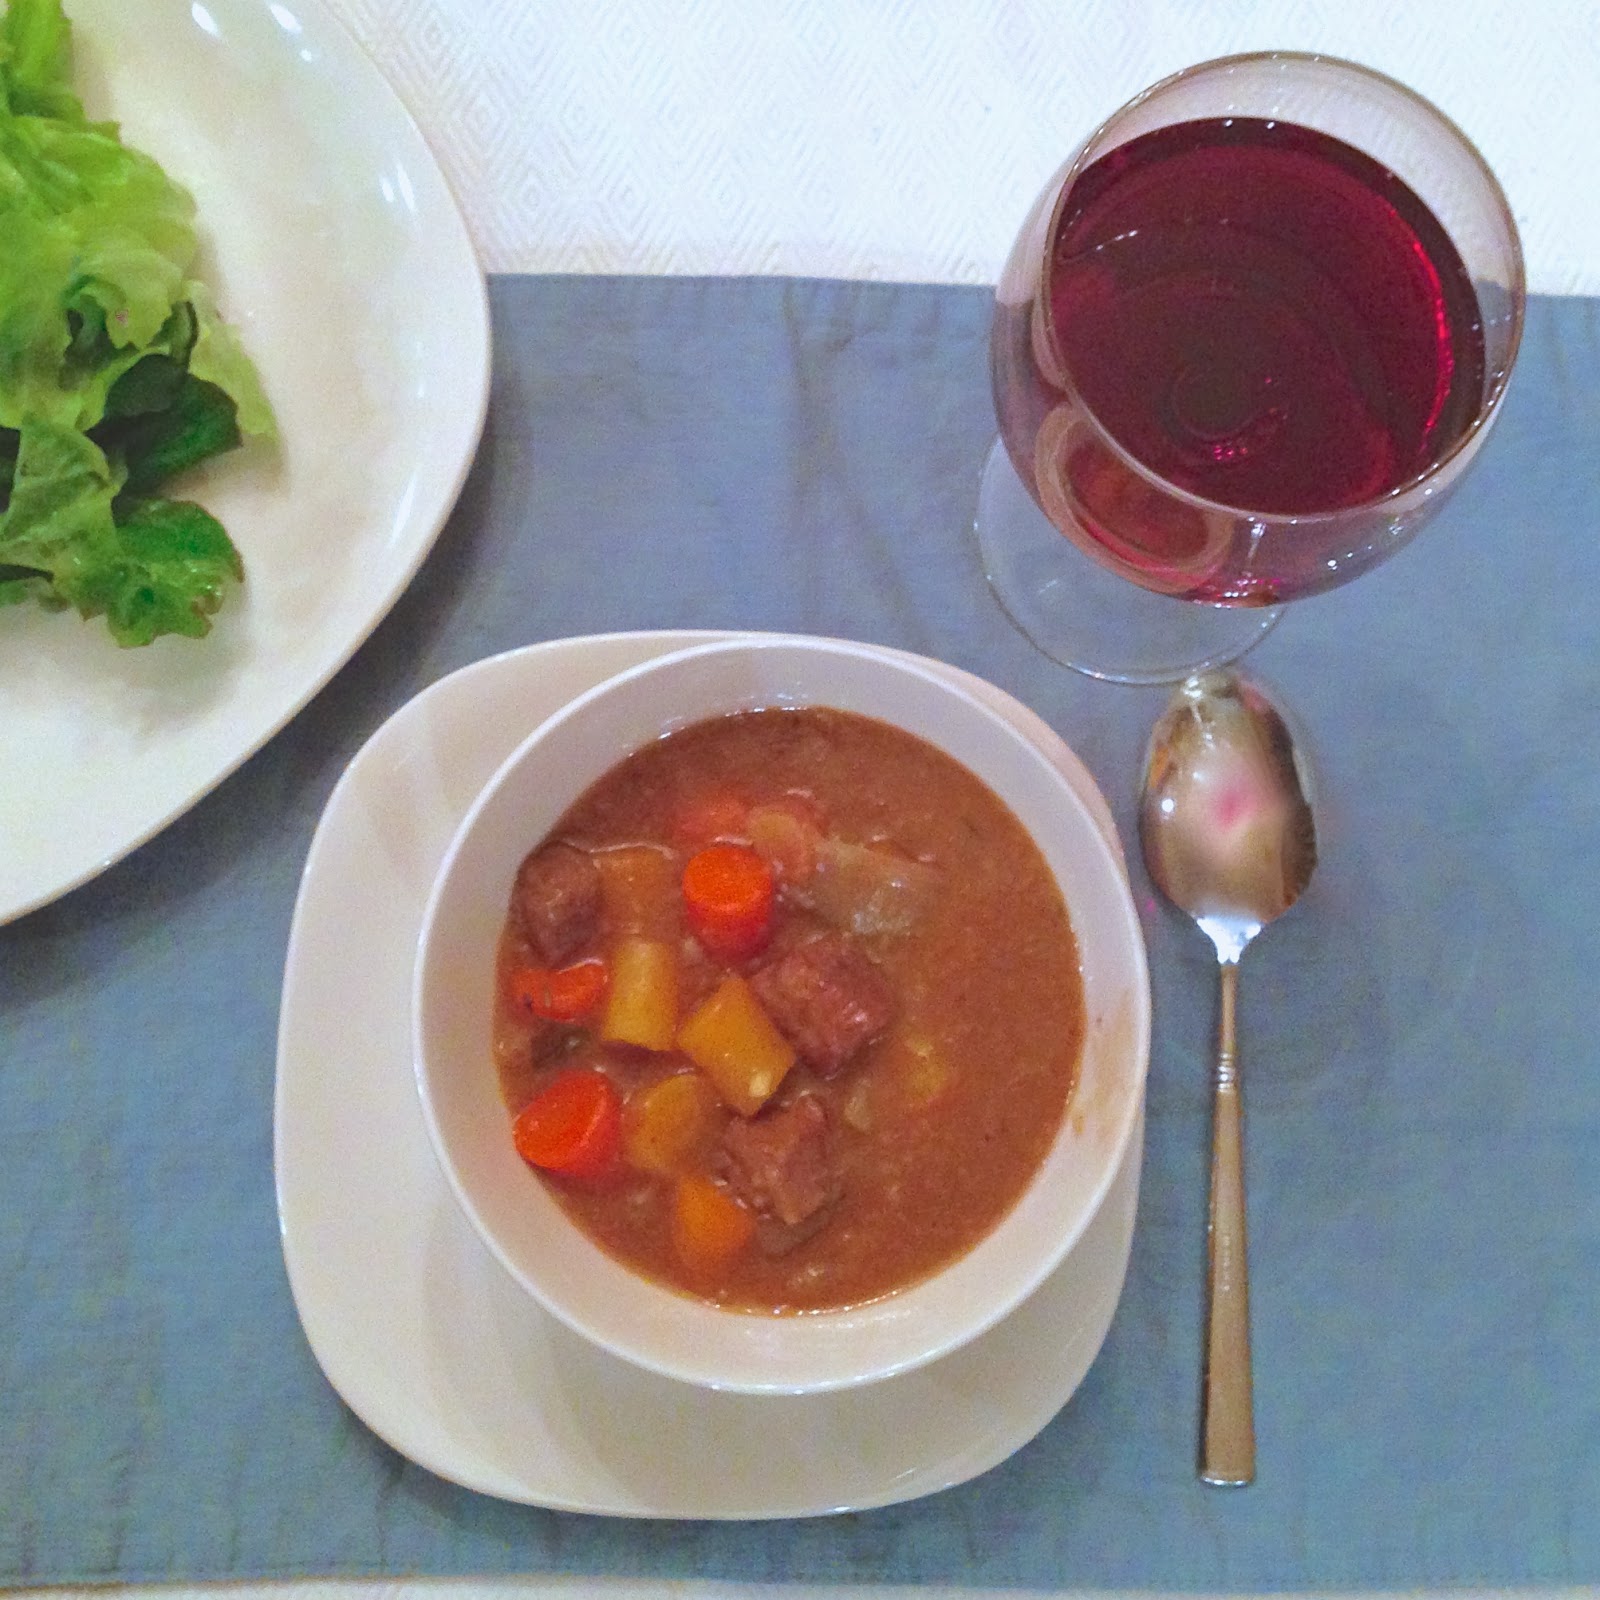
Celebrate St. Patrick's Day with Guinness Stew from Disney's Rose & Crown

It's time to start thinking about your St. Patrick's Day plans, and this Guinness Stew recipe from Disney's Rose & Crown is the perfect addition to a St. Patrick's Day menu. It was simple to make and LOVELY on the cold winter's night we enjoyed it. It's hardy and filling and just the thing for your Irish soul. (We may have added a little more Guinness than the recipe calls for - it didn't hurt a thing!)

We paired our stew with a Liberté Cabernet Sauvignon which was delicious! We can usually find that at our local Trader Joe's. It's one of our go to bottles. Of course, you certainly could serve it with Guinness! We rounded out the meal with a loaf of crusty rosemary bread and some in season greens.

I found this delightful recipe at The Disney Diner, where there is a HOST of other recipes as well. If you had it in Disney and you want to try it at home, chances are Lisa has the recipe. Lisa also has her own YouTube channel too, so if you are like me and need to see it happen, this is a great resource for all you're Disney recipe needs! Let us know if you have a favorite of hers. We'd be delighted to try it out! Until next time, may all your days be filled with fairy dust!

Thursday, March 6, 2014

DIY Disney's Crush the Turtle T-shirt

I think Crush is my favorite character in Finding Nemo (although I'm in love with Dory too). And I LOVE seeing Turtle Talk With Crush when we are in Epcot. I think I may even like it more than the kids! I'm always the first to suggest it. And when I saw this excellent turtle design in the Silhouette shop, I knew a t-shirt was in order!

I started with a 2T-3T shirt I happened to have on hand. We get a lot of hand-me-down clothes and I like to use them for these sorts of projects. It helps to make them feel new. It also makes this a very budget-friendly project. Since I had all the materials on hand already, making this was completely, 100% free to me!

I cut out this Turtle Tribal design from Silhouette stencil vinyl using my Silhouette Portrait machine. I sized the design to be about 6.5" wide and 3.875" high. This is an intricate design, so be very careful transferring it to the t-shirt. Make sure all those tiny dots are on there nice and tight! Once I had the design transferred, I painted the design with black fabric paint.

I then cut out the word "dude" using the Jungle Fever font. I had planned on putting it right below the turtle, but I'll let you in on a little secret: I smudged some paint on the shirt while I was rushing to finish it (haste makes waste!) - so I decided to cover it up with the "dude"! I'm really happy with the result. It's a little unexpected; kinda like Crush!

I was also toyed with the idea of writing "dude" or "squirt" on this one. I like the idea of both, so I'm thinking I might do another for Minnie to wear with "squirt" written on the back, the way you would see it on a jersey. We'll see what happens with that idea! Until next time, may all your days be filled with fairy dust!

Tuesday, March 4, 2014

Disney DIY Tangled Pacifier Clip


We use a lot of passies around the cottage. I know there are lots of opinions about them, but we are liberal in our usage and the two littles still need them for bed. While we were in Walt Disney World this fall we needed pacifier clips to wrangle them. Nothing like your kid losing his passie on the walkway in Disney, picking it back up and popping it in his mouth! Gack! I'm usually not too worried about that sort of thing, but in a place that gets as much foot traffic as Disney, and with a kid who seems to be allergic to everything, it's just not worth it!

As it's national crochet month, I thought I'd share this quick little crochet clip that worked very well on our trip and reminded me of Rapunzel's hair. It seemed the perfect accessory to our Minnie's Tangled outfit. Of course, there was a blueberry incident, so we didn't get a picture of the whole get up. Such is life with babies! But I assure you it was adorable, and if you have a small Disney fan toddling about your cottage, you just might want to create this sweet floral accessory too. If so, here is the pattern from A Bit Of Sunshine I followed to make this. I doubled the flower, but that is the only alteration I made.

This clip came together in well under an hour, which gave me time to create an additional flower which I attached to an alligator clip and used as an accessory for Minnie's sun hat! You could just as easily use a safety pin for that, but I wanted to try and use it as a hair clip later on - you know, when she has some hair to clip back! This is also a great way to use up those yarn scraps in your stash. I know I have a hard time pitching anything that might come in handy in the future. And if you have a button box with loads of random buttons, well all the better! These Tangled flowers are the perfect way to use and admire those odd ones.

Until next time, may all your days be filled with fairy dust!

Saturday, March 1, 2014

Crocheted DIY Disney Prince and Princess Crowns

Did you know that March is National Crochet Month? In honor of this, I thought I'd share this quick and easy crocheted crown pattern. It's the perfect accessory for your Disney Prince or Princess! I was able to whip this up in under an hour and it's another great project for using up your yarn stash.

I used this wonderful pattern from Corina at Stitch 11. There is no notation about gauge in the pattern itself, and I don't crochet enough to know if I'm usually a tight or loose crocheter. This pattern is perfect except for the fact that I had to remove 8 more stitches in the infant size to get it to fit Minnie's head. Little Chef is easily wearing the child size in this picture, but his head is large -- the same crown fits MY head as well!

Both of these little Disney kids love to dress up, and these crowns were so easy to make that I think I'll make more in several other colors to add to the dress up trunk. You never know when you might need just the right crown to complete your look! I hope you have fun making this adorable accessory for your little Disney fan. And until next time, may all your days be filled with fairy dust!